# I asked Manus to demo my CLI with asciinema
Source: https://www.pgschema.com/blog/demo-with-manus-and-asciinema
export const AsciinemaPlayer = ({recordingId, title = "Terminal Recording", height}) =>
;
## Background
When demonstrating CLI tools like pgschema, [asciinema](https://asciinema.org) is a good way
to record the demo. I started by creating the recording manually.
However, even though I had prepared and practiced, the manual recording still included typos and pauses.
Not a smooth experience.
Then it occurred to me that I could use AI to script the demo.
## Process
[Manus](https://manus.im) is a general AI agent. I have been using it for various research tasks. I watch it spin up browsers, click links, and extract information. Scripting a terminal demo is a natural extension of its capabilities.
### 1st Recording: Too fast
I started by giving Manus this instruction.
```text
Read https://www.pgschema.com/.
Use asciinema to record a cast to demonstrate. Dump, edit, plan, apply workflow
```
Since pgschema is new, I needed to explicitly provide the URL. On the other hand, I assumed asciinema is well-known and doesn't need further introduction.
It was doing the right thing, but too fast—the demo finished in the blink of an eye. Well, it's AI after all.
### 2nd Recording: Add delays
I then gently asked Manus to simulate human typing behavior:
```text
You are doing it too fast. Please simulate human typing behavior.
This way the cast is more realistic and people can follow along.
```
There were some problems along the way—for example, at one point it didn't generate the cast file as instructed at all.
After some additional tweaking, it was finally on track.
### 3rd Recording: Polish
There were still some rough edges.
In particular, the demo added a `CREATE TABLE` change, but to showcase
the declarative approach, it would be better to demonstrate an `ALTER TABLE` change—essentially comparing
two `CREATE TABLE` statements and generating the `ALTER TABLE` migration.
This is my prompt:
```text
This is too short, we still need to:
1. After dumping, show the initial schema
2. Show exactly what we change in the schema
3. Apply, then confirm with a small pause so it's visible to the viewer
4. Dump and show the schema after the change
Also, to show the declarative approach, we should add a column instead of
creating a table. Creating a table can't demonstrate the difference of the
declarative approach.
```
### Found a Bug
Now Manus generated a near-perfect demo with:
1. Clear workflow with all requested steps
2. Proper pauses
3. Color highlighting
4. Readable text
The imperfect part wasn't caused by Manus, but my pgschema.
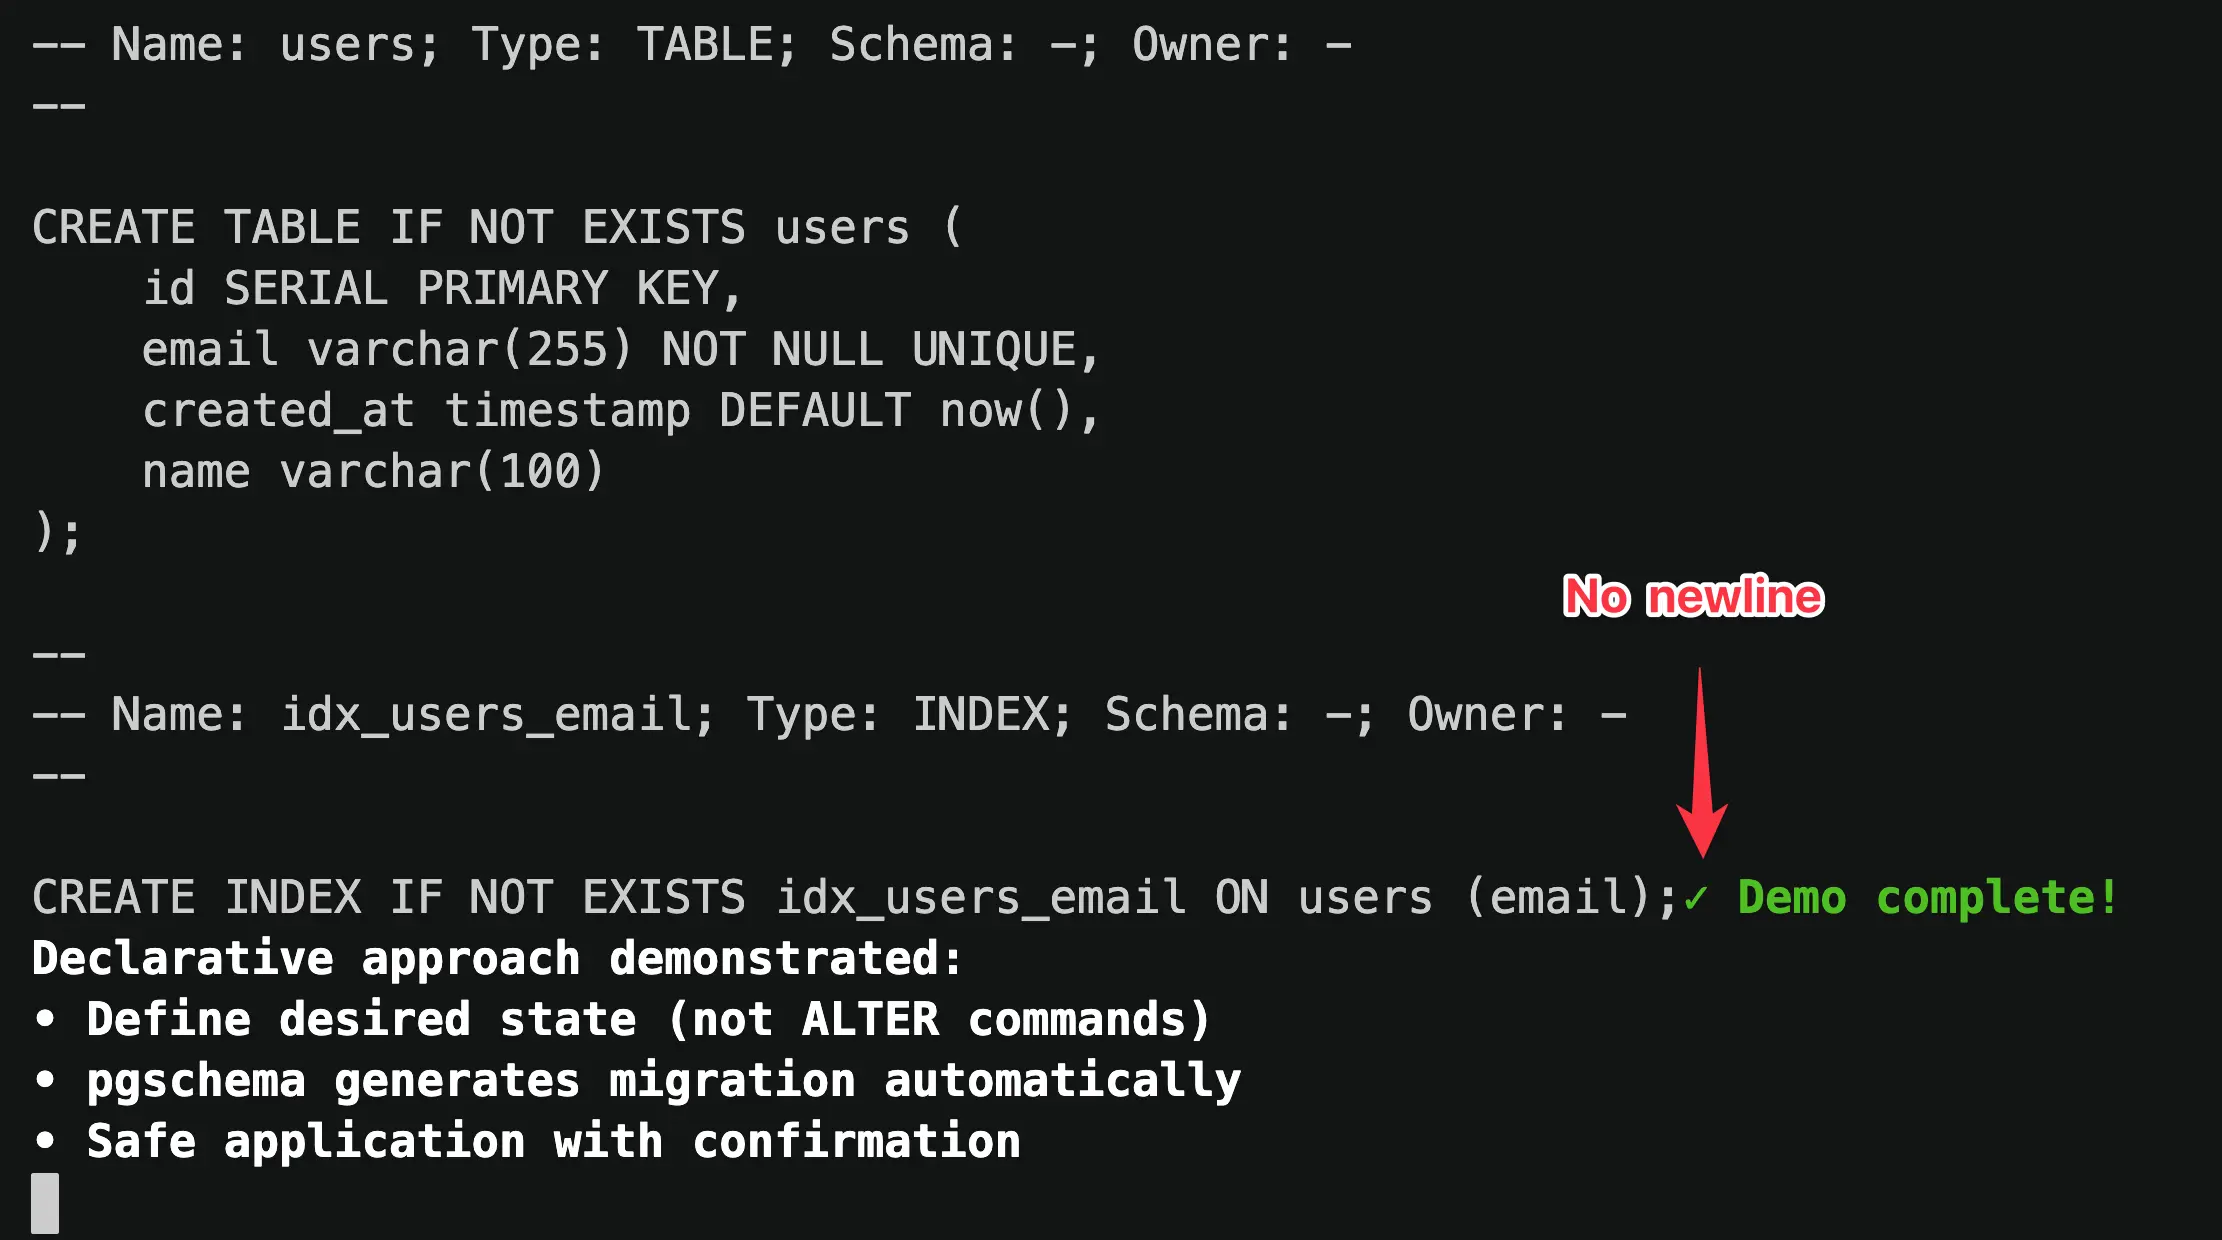
The generated dump didn't end with a newline. This was obvious from the playback.
### Final Recording
After I fixed the bug, I asked Manus to generate the final version.
```text
This pgschema version has a bug where the dump doesn't end with a newline.
I have fixed the issue. Please force pull the latest pgschema and rerun
the same script.
```
This time, Manus delivered a clean demo as shown below.
## Reflection
I have made the entire Manus session public and you can check it [here](https://manus.im/share/8fEln1OzxpnsRSU1PnHweG?replay=1).
Manus didn't just execute commands—it interpreted my intent, made mistakes, course-corrected, and even helped me discover a bug in my own software.
Fittingly, the first feature request for pgschema was to make it more AI coding friendly:

An AI-built codebase, demoed by an AI agent, for an audience that will likely include developers working alongside AI. Perhaps this is just a glimpse of how software development is evolving.
# pgschema: Postgres Declarative Schema Migration, like Terraform
Source: https://www.pgschema.com/blog/pgschema-postgres-declarative-schema-migration-like-terraform
export const AsciinemaPlayer = ({recordingId, title = "Terminal Recording", height}) =>
;
## Introduction
 While database migrations have traditionally been imperative (writing step-by-step migration scripts), declarative solutions are gaining traction.
`pgschema` differentiates itself from other declarative tools by:
* **Comprehensive Postgres Support**: Handles virtually all schema-level database objects - tables, indexes, views, functions, procedures, triggers, policies, types, and more. Thoroughly tested against Postgres versions 14 through 17.
* **Schema-Level Focus**: Designed for real-world Postgres usage patterns, from single-schema applications to multi-tenant architectures.
* **Terraform-Like Plan-Review-Apply Workflow**: Generate a detailed migration plan before execution, review changes in human-readable, SQL, or JSON formats, then apply with confidence. No surprises in production.
* **Concurrent Change Detection**: Built-in fingerprinting ensures the database hasn't changed between planning and execution.
* **Online DDL Support**: Automatically uses PostgreSQL's non-blocking strategies to minimize downtime during schema changes.
* **Adaptive Transaction**: Intelligently wraps migrations in transactions when possible, with automatic handling of operations like concurrent index creation that require special treatment.
* **Modular Schema Organization**: Supports multi-file schema definitions for better team collaboration and ownership.
* **Dependency Management**: Automatically resolves complex dependencies between database objects using topological sorting, ensuring operations execute in the correct order.
* **No Shadow Database Required**: Unlike other declarative tools, it works directly with your schema files and target database - no temporary databases, no extra infrastructure.
## Comprehensive Postgres Support
`pgschema` supports a wide range of [Postgres features](/syntax/create_table), including:
* Tables, columns, and constraints (primary keys, foreign keys, unique constraints, check constraints)
* Indexes (including partial, functional, and concurrent indexes)
* Views and materialized views
* Functions and stored procedures
* Custom types and domains
* Schemas and permissions
* Row-level security (RLS) policies
* Triggers and sequences
* Comments on database objects
The tool is thoroughly tested against [Postgres versions 14 through 17](https://github.com/pgschema/pgschema/blob/a41ffe8616f430ba36e6b39982c4455632a0dfa7/.github/workflows/release.yml#L44-L47)
with [extensive test suites](https://github.com/pgschema/pgschema/tree/main/testdata).
## Schema-Level Migration
Unlike many migration tools that operate at the database level, `pgschema` is designed to work at the **schema level**.
### Why Schema-Level?
**Single Schema Simplicity**: Most Postgres applications use only the default `public` schema. For these cases, schema-level operations eliminate unnecessary complexity while providing all the functionality needed for effective schema management.
**Multi-Tenant Architecture Support**: For applications using multiple schemas, the predominant pattern is **schema-per-tenant architecture** - where each customer or tenant gets their own schema within the same database. This schema-level approach enables [tenant schema reconciliation](/workflow/tenant-schema) - ensuring all tenant schemas stay in sync with the canonical schema definition.
### Schema-Agnostic Migrations
The tool intelligently handles schema qualifiers to create portable, schema-agnostic dumps and migrations:
```bash
# Dump from 'tenant_123' schema
pgschema dump \
--host localhost \
--user postgres \
--db myapp \
--schema tenant_123 \
> schema.sql
# Apply the same schema definition to 'tenant_456'
pgschema plan \
--host localhost \
--user postgres \
--db myapp \
--schema tenant_456 \
--file schema.sql
```
Here's what a schema-level dump looks like - notice how it creates **schema-agnostic SQL**:
```sql
--
-- pgschema database dump
--
--
-- Name: users; Type: TABLE; Schema: -; Owner: -
--
CREATE TABLE IF NOT EXISTS users (
id SERIAL PRIMARY KEY,
username varchar(100) NOT NULL,
email varchar(100) NOT NULL,
role public.user_role DEFAULT 'user',
status public.status DEFAULT 'active',
created_at timestamp DEFAULT now()
);
--
-- Name: posts; Type: TABLE; Schema: -; Owner: -
--
CREATE TABLE IF NOT EXISTS posts (
id SERIAL PRIMARY KEY,
user_id integer REFERENCES users(id),
title varchar(200) NOT NULL,
content text,
created_at timestamp DEFAULT now()
);
```
The tool automatically:
* **Strips schema qualifiers** from table and index names (notice `Schema: -` in comments)
* **Removes schema prefixes** from object references (`users` instead of `tenant_123.users`)
* **Preserves cross-schema type references** where needed (`public.user_role` for shared types)
* **Creates portable DDL** that can be applied to any target schema
## Declarative Workflow
This workflow mirrors Terraform's approach and fits [GitOps](/workflow/gitops) nicely:
### 1. Dump: Extract Current Schema
```bash
pgschema dump \
--host localhost \
--user postgres \
--db myapp \
> schema.sql
```
This extracts your current database schema into a clean, readable SQL file that represents your current state.
### 2. Edit: Define Desired State
Edit the dumped schema file to reflect your desired changes. Instead of writing `ALTER TABLE` statements, you write `CREATE TABLE` definitions to specify the desired end state.
### 3. Plan: Preview Changes
```bash
pgschema plan \
--host localhost \
--user postgres \
--db myapp \
--file schema.sql \
--output-human \
--output-json plan.json \
--output-sql plan.sql
```
This compares your desired schema (from the file) with the current database state and generates a migration plan. Here's where the tool differentiates from Terraform—the plan supports multiple output formats:
The human-readable format is perfect for reviewing changes during development
```
Plan: 1 to alter.
Summary by type:
tables: 1 to alter
Tables:
~ users
Transaction: true
DDL to be executed:
--------------------------------------------------
ALTER TABLE users ADD COLUMN name varchar(100);
```
The JSON format enables easy integration with CI/CD pipelines and approval workflows
```json
{
"version": "1.0.0",
"pgschema_version": "1.0.0",
"created_at": "2025-08-13T10:30:15+08:00",
"source_fingerprint": {
"hash": "7a8b9c1d2e3f4a5b6c7d8e9f0a1b2c3d4e5f6a7b8c9d0e1f2a3b4c5d6e7f8a9b"
},
"diffs": [
{
"sql": "ALTER TABLE users ADD COLUMN name varchar(100);",
"type": "table",
"operation": "alter",
"path": "public.users",
"source": {
"schema": "public",
"name": "users",
"type": "BASE_TABLE",
"columns": [
{
"name": "id",
"position": 1,
"data_type": "integer",
"is_nullable": false
},
{
"name": "email",
"position": 2,
"data_type": "character varying",
"character_maximum_length": 255,
"is_nullable": false
},
{
"name": "created_at",
"position": 3,
"data_type": "timestamp without time zone",
"is_nullable": true,
"column_default": "now()"
},
{
"name": "name",
"position": 4,
"data_type": "character varying",
"character_maximum_length": 100,
"is_nullable": true
}
],
"can_run_in_transaction": true
}
}
]
}
```
The SQL format shows the exact SQL to be executed, enabling custom tooling to inspect and analyze the changes
```sql
ALTER TABLE users ADD COLUMN name varchar(100);
```
### 4. Apply: Execute Changes
```bash
pgschema apply \
--plan plan.json \
--host localhost \
--user postgres \
--db myapp
```
This executes the planned changes safely, with built-in protections against concurrent schema modifications and proper transaction handling.
## Concurrent Change Detection
The separation between `plan` and `apply` phases creates a critical safety feature but also introduces a potential risk: **what if the database changes between planning and execution?** This time window could lead to applying outdated or conflicting migrations.
The tool solves this with **fingerprinting** - a cryptographic mechanism that ensures the exact database state you planned against is the same state you're applying changes to.
### How Fingerprinting Works
**During Plan Generation**: When you run `pgschema plan`, it calculates a cryptographic fingerprint of the current database schema state and embeds it in the plan file:
```json
{
"version": "1.0.0",
"pgschema_version": "1.0.0",
"created_at": "2025-08-12T17:44:43+08:00",
"source_fingerprint": {
"hash": "965b1131737c955e24c7f827c55bd78e4cb49a75adfd04229e0ba297376f5085"
},
"diffs": [...]
}
```
**During Apply Execution**: Before executing any changes, `pgschema apply` recalculates the current database fingerprint and compares it with the stored fingerprint from the plan.
### Safety in Action
This fingerprinting prevents dangerous scenarios:
```bash
# Team member A generates plan
pgschema plan \
--host prod.db.com \
--db myapp \
--user postgres \
--file schema.sql \
--output-json plan.json
# Time passes... Team member B makes emergency schema change
# Team member A tries to apply original plan
pgschema apply \
--host prod.db.com \
--db myapp \
--user postgres \
--plan plan.json
# ❌ Error: schema fingerprint mismatch detected - the database schema has changed since the plan was generated.
#
# schema fingerprint mismatch - expected: 965b1131737c955e, actual: abc123456789abcd
```
### Recover Fingerprint Mismatch
When a fingerprint mismatch occurs, the right approach is to reestablish the baseline with the current database state:
```bash
# 1. Get the latest schema from the current database
pgschema dump \
--host prod.db.com \
--db myapp \
--user postgres \
> current-schema.sql
# 2. Update your desired schema file with any new changes
# (merge your intended changes with the current state)
# 3. Plan the changes against the updated baseline
pgschema plan \
--host prod.db.com \
--db myapp \
--user postgres \
--file updated-schema.sql \
--output-json new-plan.json
# 4. Apply with the fresh plan
pgschema apply \
--host prod.db.com \
--db myapp \
--user postgres \
--plan new-plan.json
```
This fingerprinting mechanism maintains the integrity of the Plan-Review-Apply workflow, ensuring that concurrent modifications don't lead to unexpected or conflicting database changes.
## Online DDL Operations
The tool automatically uses PostgreSQL's non-blocking features to minimize downtime during schema changes, including concurrent index creation, NOT VALID constraint patterns, and safe NOT NULL additions.
**Example - Concurrent Index Creation**: Index operations automatically use `CREATE INDEX CONCURRENTLY` to avoid blocking table writes:
```sql
-- Generated migration for index addition
CREATE INDEX CONCURRENTLY IF NOT EXISTS idx_users_email_status ON users (email, status DESC);
-- pgschema:wait - Built-in progress monitoring
SELECT
COALESCE(i.indisvalid, false) as done,
CASE
WHEN p.blocks_total > 0 THEN p.blocks_done * 100 / p.blocks_total
ELSE 0
END as progress
FROM pg_class c
LEFT JOIN pg_index i ON c.oid = i.indexrelid
LEFT JOIN pg_stat_progress_create_index p ON c.oid = p.index_relid
WHERE c.relname = 'idx_users_email_status';
```
The `pgschema:wait` directive blocks migration execution, polls the database to monitor progress, and automatically continues when operations complete.
For comprehensive details, see the [Online DDL documentation](/workflow/online-ddl).
## Adaptive Transaction
The system automatically determines transaction boundaries based on the SQL operations in your migration plan. Each diff in the plan contains a `can_run_in_transaction` field that indicates whether that particular SQL can run inside a transaction.
```json plan.json snippet
"diffs": [
...
{
"sql": "ALTER TABLE department\nADD CONSTRAINT department_dept_name_key UNIQUE (dept_name);",
"type": "table.constraint",
"operation": "create",
"path": "public.department.department_dept_name_key",
"source": {
"schema": "public",
"table": "department",
"name": "department_dept_name_key",
"type": "UNIQUE",
"columns": [
{
"name": "dept_name",
"position": 1
}
]
},
"can_run_in_transaction": true <--------- transaction indication
},
...
]
```
### Smart Transaction Wrapping
* **If all diffs can run in a transaction**: The entire plan is wrapped in a single transaction for maximum atomicity
* **If any diff cannot run in a transaction**: Each diff runs in its own transaction to maintain isolation
Operating at the schema level, among all the DDL operations supported, only `CREATE INDEX CONCURRENTLY` cannot run inside a transaction.
## Modular Schema Organization
For large applications and teams, managing your database schema as a single monolithic file becomes unwieldy. The [modular](/workflow/modular-schema-files) approach transforms your schema into an organized structure that enables better collaboration, clearer ownership, and easier maintenance.
### Breaking Down the Monolith
Instead of a single large schema file, the tool can organize your database objects into logical, manageable files with the [`--multi-file`](/cli/dump#param-multi-file) option:
```bash
# Initialize modular structure from existing database
mkdir -p schema
pgschema dump \
--host localhost \
--db myapp \
--user postgres \
--multi-file \
--file schema/main.sql
# Examine the generated structure
tree schema/
```
This creates an organized drectory structure. The `main.sql` file serves as the entry point,
containing Postgres `\i` (include) directives that reference individual component files.
```
schema/
├── main.sql # Entry point with include directives
├── types/
│ ├── user_status.sql
│ ├── order_status.sql
│ └── address.sql
├── domains/
│ ├── email_address.sql
│ └── positive_integer.sql
├── sequences/
│ ├── global_id_seq.sql
│ └── order_number_seq.sql
├── tables/
│ ├── users.sql
│ └── orders.sql
├── functions/
│ ├── update_timestamp.sql
│ ├── get_user_count.sql
│ └── get_order_count.sql
├── procedures/
│ ├── cleanup_orders.sql
│ └── update_status.sql
└── views/
├── user_summary.sql
└── order_details.sql
```
```sql
-- Include custom types first (dependencies for tables)
\i types/user_status.sql
\i types/order_status.sql
\i types/address.sql
-- Include domain types (constrained base types)
\i domains/email_address.sql
\i domains/positive_integer.sql
-- Include sequences (may be used by tables)
\i sequences/global_id_seq.sql
\i sequences/order_number_seq.sql
-- Include core tables (with their constraints, indexes, and policies)
\i tables/users.sql
\i tables/orders.sql
-- Include functions and procedures
\i functions/update_timestamp.sql
\i functions/get_user_count.sql
\i procedures/cleanup_orders.sql
-- Include views (depend on tables and functions)
\i views/user_summary.sql
\i views/order_details.sql
```
```sql
--
-- Name: update_timestamp(); Type: FUNCTION; Schema: -; Owner: -
--
CREATE OR REPLACE FUNCTION update_timestamp()
RETURNS trigger
LANGUAGE plpgsql
SECURITY INVOKER
VOLATILE
AS $$
BEGIN
NEW.updated_at = CURRENT_TIMESTAMP;
RETURN NEW;
END;
$$;
```
### Team Collaboration Benefits
This modular approach enables powerful team collaboration patterns:
**Granular Ownership**: Use GitHub's CODEOWNERS to assign different teams to different parts of your schema:
```
# .github/CODEOWNERS
schema/tables/users* @user-team
schema/tables/orders* @orders-team
schema/tables/products* @inventory-team
schema/views/user_* @user-team
schema/views/order_* @orders-team
schema/functions/*inventory* @inventory-team
```
**Independent Development**: Teams can work on separate schema components without conflicts, test their changes in isolation, then combine for coordinated production deployments.
**Focused Code Reviews**: Instead of reviewing massive schema changes, reviewers can focus on specific files relevant to their domain expertise.
### Same Workflow, Better Organization
The declarative workflow remains identical - you're still defining desired state and letting the tool generate the migration plan:
```bash
# Teams edit their respective schema files to define desired state
# Example: Add new column to users table
vim schema/tables/users.sql
# Generate migration plan from modular schema
pgschema plan \
--host localhost \
--db myapp \
--user postgres \
--file schema/main.sql \
--output-human \
--output-json plan.json \
--output-sql plan.sql
# Apply the coordinated changes
pgschema apply \
--host localhost \
--db myapp \
--user postgres \
--plan plan.json
```
The multi-file approach scales from small teams working on focused components to large organizations managing complex schemas with hundreds of objects, while maintaining the same simple, declarative workflow.
## Dependency Management
As schemas grow in complexity, manually ordering DDL statements becomes increasingly error-prone. A single schema file with hundreds of objects becomes unmanageable—you're constantly scrolling and reordering statements to satisfy dependencies.
The modular schema approach introduces even greater challenges. With schema files spread across directories, tracking dependencies between objects becomes nearly impossible. A trigger in `triggers/audit.sql` might depend on a function in `functions/timestamps.sql`, which itself references types defined in `types/custom.sql`.
Database objects often depend on each other—triggers need functions, views reference tables, foreign keys require referenced tables to exist first. The tool automatically handles these dependencies using topological sorting to ensure operations execute in the correct order, regardless of how your schema files are organized.
### Automatic Dependency Resolution
Consider this modular schema example where you're adding a table with a trigger that depends on a function
```sql
-- tables/users.sql
CREATE TABLE public.users (
id serial PRIMARY KEY,
name text NOT NULL,
email text UNIQUE,
created_at timestamp DEFAULT CURRENT_TIMESTAMP,
updated_at timestamp DEFAULT CURRENT_TIMESTAMP
);
-- triggers/update_users_modified_time.sql
CREATE TRIGGER update_users_modified_time
BEFORE UPDATE ON public.users
FOR EACH ROW
EXECUTE FUNCTION public.update_modified_time();
-- functions/update_modified_time.sql
CREATE OR REPLACE FUNCTION public.update_modified_time()
RETURNS trigger AS $$
BEGIN
NEW.updated_at = CURRENT_TIMESTAMP;
RETURN NEW;
END;
$$ LANGUAGE plpgsql;
```
```sql
-- pgschema automatically orders operations correctly:
CREATE TABLE IF NOT EXISTS users (
id SERIAL PRIMARY KEY,
name text NOT NULL,
email text UNIQUE,
created_at timestamp DEFAULT CURRENT_TIMESTAMP,
updated_at timestamp DEFAULT CURRENT_TIMESTAMP
);
CREATE OR REPLACE FUNCTION update_modified_time()
RETURNS trigger
LANGUAGE plpgsql
SECURITY INVOKER
VOLATILE
AS $$
BEGIN
NEW.updated_at = CURRENT_TIMESTAMP;
RETURN NEW;
END;
$$;
CREATE OR REPLACE TRIGGER update_users_modified_time
BEFORE UPDATE ON users
FOR EACH ROW
EXECUTE FUNCTION update_modified_time();
```
The topological sort algorithm ensures that:
* Tables are created before their indexes, constraints, and triggers
* Functions are created before triggers that use them
* Referenced tables exist before foreign key constraints
* Views are created after all their dependent tables and functions
This automatic dependency management eliminates manual ordering errors and ensures migrations always execute successfully.
## No Shadow Database Required
Unlike many declarative schema migration tools, this approach doesn't require a separate "shadow" or "dev" database to compute schema differences. Other tools typically create a temporary database, apply your desired schema to it, then compare this shadow database with your target database to generate migrations.
This shadow database approach has several drawbacks:
* **Counterintuitive Configuration**: Most developers stumble on the additional shadow database flags and need to read documentation to understand what they're used for
* **Complex Setup**: Requires permissions for temporary database creation and cleanup of temporary databases
* **Additional Infrastructure**: Demands extra database resources, maintenance, and can cause inconsistencies with different Postgres versions or extensions
### IR Normalization
This tool eliminates these complexities by working directly with your schema files and target database through an **Intermediate Representation (IR)** system:
```plain
SQL Files Database System Catalogs
v v
(Desired) (Current)
| |
| Parse | Query
v v
IR
(Normalized)
|
v
Diff Engine
|
v
Migration Plan
```
**1. SQL Parsing**: Your desired state SQL files are parsed and converted into a normalized Intermediate Representation.
**2. Database Introspection**: The target database schema is introspected through Postgres system catalogs (`pg_class`, `pg_attribute`, `pg_constraint`, etc.) and converted into the same normalized IR format.
**3. Direct Comparison**: The diff engine compares these two normalized IR structures directly, identifying what changes are needed without requiring any temporary databases.
**4. Migration Generation**: The differences are converted into properly ordered DDL statements that transform the current state into the desired state.
The IR normalization ensures that regardless of whether schema information comes from SQL parsing or database introspection, it's represented consistently for accurate comparison - enabling precise migrations without the overhead and complexity of shadow databases.
## Acknowledgements
`pgschema` wouldn't exist without these amazing open source projects:
* [sqlc](https://github.com/sqlc-dev/sqlc) - For generating code to extract schema from target databases
* [pg\_query\_go](https://github.com/pganalyze/pg_query_go) - Go bindings for libpg\_query, enabling reliable Postgres SQL parsing. In fact, sqlc also uses pg\_query\_go under the hood! It's the secret weapon in the Postgres ecosystem that allows tools to build near-perfect Postgres compatibility.
* [testcontainers](https://github.com/testcontainers/) - Enabling comprehensive integration testing with real Postgres instances
**Design reference** came from:
* [Terraform](https://github.com/hashicorp/terraform) - For figuring out the right Plan-Review-Apply workflow that developers love
* [pg-schema-diff](https://github.com/stripe/pg-schema-diff) - Reading GitHub issues to understand use cases and studying the codebase. For example, I knew sqlc beforehand, but when I saw pg-schema-diff uses sqlc to fetch schema information, it immediately clicked.
And the real inspiration came from hundreds of customer conversations over 4+ years building [Bytebase](https://www.bytebase.com). Developers kept telling us: "Why can't database migrations be as simple as Terraform?" Well, now they can be.
Special thanks to Claude Code for sweating millions of tokens to make this project possible. Turns out AI is pretty good at writing database migration tools – who knew? 🤖
***
Ready to give it a try?
* [Installation](/installation)
* [Join Discord](https://discord.gg/pgschema) or open [GitHub Issues](https://github.com/pgschema/pgschema/issues)
# Apply
Source: https://www.pgschema.com/cli/apply
The `apply` command applies database schema changes to a target database schema. You can either provide a desired state file to generate and apply a plan, or execute a pre-generated plan file directly.
## Overview
The apply command supports two execution modes:
### File Mode (Generate and Apply)
1. Read the desired state from a SQL file (with include directive support)
2. Compare it with the current database state of the target schema
3. Generate a migration plan with proper dependency ordering
4. Display the plan for review
5. Apply the changes (with optional confirmation and safety checks)
### Plan Mode (Execute Pre-generated Plan)
1. Load a pre-generated plan from JSON file
2. Validate plan version compatibility and schema fingerprints
3. Display the plan for review
4. Apply the changes (with optional confirmation and safety checks)
## Basic Usage
```bash
# File mode: Generate and apply plan from desired state file
pgschema apply --host localhost --db myapp --user postgres --password mypassword --file schema.sql
# Plan mode: Execute pre-generated plan
pgschema apply --host localhost --db myapp --user postgres --password mypassword --plan plan.json
# Auto-approve mode for CI/CD (no confirmation prompt)
pgschema apply --host localhost --db myapp --user postgres --password mypassword --file schema.sql --auto-approve
```
## Connection Options
Database server host
Database server port
Database name
Database user name
Database password (can also use PGPASSWORD environment variable)
You can provide the password in two ways:
```bash Environment Variable (Recommended)
PGPASSWORD=mypassword pgschema apply \
--host localhost \
--db myapp \
--user postgres \
--file schema.sql
```
```bash Command Line Flag
pgschema apply \
--host localhost \
--db myapp \
--user postgres \
--password mypassword \
--file schema.sql
```
Schema name to apply changes to
## Apply Options
Path to desired state SQL schema file (mutually exclusive with --plan)
Used in File Mode to generate and apply a plan from the desired state.
Path to pre-generated plan JSON file (mutually exclusive with --file)
Used in Plan Mode to execute a plan that was previously generated with `pgschema plan --output-json`.
Apply changes without prompting for approval
Useful for automated deployments and CI/CD pipelines.
Disable colored output in the plan display
Useful for scripts, CI/CD environments, or terminals that don't support colors.
Maximum time to wait for database locks (e.g., '30s', '5m', '1h')
If not specified, uses PostgreSQL's default behavior (wait indefinitely).
See [PostgreSQL lock\_timeout documentation](https://www.postgresql.org/docs/current/runtime-config-client.html#GUC-LOCK-TIMEOUT).
Application name for database connection (visible in pg\_stat\_activity)
See [PostgreSQL application\_name documentation](https://www.postgresql.org/docs/current/libpq-connect.html#LIBPQ-CONNECT-APPLICATION-NAME).
## Examples
### File Mode (Generate and Apply)
```bash
# Interactive mode - shows plan and prompts for confirmation
pgschema apply --host localhost --db myapp --user postgres --file desired_schema.sql
```
This will:
1. Generate a migration plan by comparing the desired state with current database
2. Display the plan with colored output
3. Prompt: "Do you want to apply these changes? (yes/no):"
4. Wait for confirmation before proceeding
5. Apply changes using transactions where possible
Example output:
```
Plan: 2 to add, 1 to modify.
Summary by type:
tables: 1 to add, 1 to modify
indexes: 1 to add
Tables:
+ posts
~ users
+ email (column)
Indexes:
+ idx_users_email
Transaction: true
DDL to be executed:
--------------------------------------------------
CREATE TABLE IF NOT EXISTS posts (
id SERIAL PRIMARY KEY,
title TEXT NOT NULL,
user_id INTEGER REFERENCES users(id)
);
ALTER TABLE users ADD COLUMN email VARCHAR(255) UNIQUE;
CREATE INDEX idx_users_email ON users(email);
Do you want to apply these changes? (yes/no):
```
### Plan Mode (Execute Pre-generated Plan)
```bash
# First, generate a plan
pgschema plan --host localhost --db myapp --user postgres --file schema.sql --output-json plan.json
# Then apply the pre-generated plan
pgschema apply --host localhost --db myapp --user postgres --plan plan.json
```
Benefits of plan mode:
* **Separation of concerns**: Generate plans in one environment, apply in another
* **Review process**: Plans can be reviewed before deployment
* **Repeatability**: Same plan can be applied to multiple environments
* **Version control**: Plans can be stored and versioned
* **Rollback preparation**: Generate rollback plans before applying changes
### Auto-approve for CI/CD
```bash
pgschema apply \
--host prod-db \
--db myapp \
--user deployer \
--file schema.sql \
--auto-approve \
--no-color
```
### With Lock Timeout
```bash
# Prevent blocking on long-running locks
pgschema apply \
--host localhost \
--db myapp \
--user postgres \
--file schema.sql \
--lock-timeout "30s"
```
### Custom Application Name
```bash
pgschema apply \
--host localhost \
--db myapp \
--user postgres \
--file schema.sql \
--application-name "pgschema-deployment-v1.1.0"
```
```sql
-- Monitor active pgschema connections:
SELECT application_name, state, query_start, query
FROM pg_stat_activity
WHERE application_name LIKE 'pgschema%';
```
## Safety Features
### Schema Fingerprint Validation
When using plan mode, pgschema validates that the database schema hasn't changed since the plan was generated:
```bash
# Generate plan
pgschema plan --host localhost --db myapp --user postgres --file schema.sql --output-json plan.json
# Database schema changes here...
# Apply plan - will detect changes and fail
pgschema apply --host localhost --db myapp --user postgres --plan plan.json
```
If schema changes are detected:
```
Error: schema fingerprint mismatch detected - the database schema has changed since the plan was generated.
Expected fingerprint: abc123...
Current fingerprint: def456...
Difference: Table 'users' was modified
To resolve this issue:
1. Regenerate the plan with current database state: pgschema plan ...
2. Review the new plan to ensure it's still correct
3. Apply the new plan: pgschema apply ...
```
### Version Compatibility
Plans include version information to ensure compatibility:
* **pgschema version**: Must match the version used to generate the plan
* **Plan format version**: Must be supported by the current pgschema version
### Transaction Handling
pgschema automatically determines whether changes can run in a transaction:
* **Transactional mode** (default): All changes run in a single transaction with automatic rollback on failure
* **Non-transactional mode**: Some operations (like `CREATE INDEX CONCURRENTLY`) run outside transactions
```
Transaction: true # Changes will run in a transaction
Transaction: false # Some changes cannot run in a transaction
```
### No-op Detection
If no changes are needed, pgschema skips execution:
```
No changes to apply. Database schema is already up to date.
```
# Dump
Source: https://www.pgschema.com/cli/dump
The `dump` command extracts a PostgreSQL database schema for a specific schema and outputs it in a developer-friendly format. The dumped schema serves as a baseline that developers can modify and apply to target databases using the `plan` and `apply` commands.
## Overview
The dump command provides comprehensive schema extraction with:
1. Single schema targeting (defaults to 'public')
2. Dependency-aware object ordering
3. Cross-schema reference handling with smart qualification
4. Developer-friendly SQL output format
5. Single-file and multi-file organization options
## Basic Usage
```bash
# Dump default schema (public)
pgschema dump --host localhost --db myapp --user postgres --password mypassword
# Dump specific schema
pgschema dump --host localhost --db myapp --user postgres --password mypassword --schema myschema
# Save to file
pgschema dump --host localhost --db myapp --user postgres --password mypassword > schema.sql
# Multi-file organized output
pgschema dump --host localhost --db myapp --user postgres --password mypassword --multi-file --file schema.sql
```
## Integration with Plan/Apply
```bash
# 1. Dump current production schema
pgschema dump --host prod-host --db myapp --user postgres --schema public > current.sql
# 2. Make modifications to current.sql (now desired state)
# 3. Plan changes against staging
pgschema plan --host staging-host --db myapp --user postgres --file current.sql
# 4. Apply changes if plan looks good
pgschema apply --host staging-host --db myapp --user postgres --file current.sql
```
## Connection Options
Database server host
Database server port
Database name
Database user name
Database password (can also use PGPASSWORD environment variable)
You can provide the password in two ways:
```bash Environment Variable (Recommended)
PGPASSWORD=mypassword pgschema dump \
--host localhost \
--db myapp \
--user postgres
```
```bash Command Line Flag
pgschema dump \
--host localhost \
--db myapp \
--user postgres \
--password mypassword
```
Schema name to dump
## Output Options
Output schema to multiple files organized by object type. See [Multi-file Schema Management Workflow](/workflow/multi-file-schema).
When enabled, creates a structured directory with:
* Main file with header and include statements
* Separate directories for different object types (tables, views, functions, etc.)
* Each database object in its own file
Requires `--file` to specify the main output file path.
Output file path (required when --multi-file is used)
For single-file mode, this is optional (defaults to stdout).
For multi-file mode, this specifies the main file path.
## Examples
### Schema Dump
```bash
# Dump default schema (public)
pgschema dump --host localhost --db myapp --user postgres
# Dump specific schema
pgschema dump --host localhost --db myapp --user postgres --schema analytics
```
Example output:
```sql
--
-- pgschema database dump
--
-- Dumped from database version PostgreSQL 17.5
-- Dumped by pgschema version 1.0.0
--
-- Name: users; Type: TABLE; Schema: -; Owner: -
--
CREATE TABLE IF NOT EXISTS users (
id SERIAL PRIMARY KEY,
name VARCHAR(255) NOT NULL,
email VARCHAR(255) UNIQUE,
created_at TIMESTAMP DEFAULT CURRENT_TIMESTAMP
);
--
-- Name: idx_users_email; Type: INDEX; Schema: -; Owner: -
--
CREATE INDEX IF NOT EXISTS idx_users_email ON users(email);
```
### Multi-File Output
```bash
pgschema dump \
--host localhost \
--db myapp \
--user postgres \
--multi-file \
--file schema.sql
```
This creates a structured directory layout:
```
schema.sql # Main file with header and includes
├── tables/
│ ├── users.sql
│ ├── orders.sql
│ └── products.sql
├── views/
│ └── user_stats.sql
├── functions/
│ └── update_timestamp.sql
└── procedures/
└── cleanup_old_data.sql
```
The main `schema.sql` file contains:
```sql
--
-- pgschema database dump
--
-- Dumped from database version PostgreSQL 17.5
-- Dumped by pgschema version 1.0.0
\i tables/users.sql
\i tables/orders.sql
\i tables/products.sql
\i views/user_stats.sql
\i functions/update_timestamp.sql
\i procedures/cleanup_old_data.sql
```
Each individual file (e.g., `tables/users.sql`) contains the specific object definition:
```sql
--
-- Name: users; Type: TABLE; Schema: -; Owner: -
--
CREATE TABLE IF NOT EXISTS users (
id SERIAL PRIMARY KEY,
name VARCHAR(255) NOT NULL,
email VARCHAR(255) UNIQUE,
created_at TIMESTAMP DEFAULT CURRENT_TIMESTAMP
);
--
-- Name: idx_users_email; Type: INDEX; Schema: -; Owner: -
--
CREATE INDEX IF NOT EXISTS idx_users_email ON users(email);
--
-- Name: users; Type: RLS; Schema: -; Owner: -
--
ALTER TABLE users ENABLE ROW LEVEL SECURITY;
```
## Schema Qualification
`pgschema` uses smart schema qualification to make dumps portable:
* **Objects within the dumped schema**: No schema qualifier added
* **Objects from other schemas**: Fully qualified with schema name
This approach makes the dump suitable as a baseline that can be applied to different schemas, particularly useful for multi-tenant applications.
```bash
# Dump the 'public' schema
pgschema dump --host localhost --db myapp --user postgres --schema public
```
Output for objects within 'public' schema (no qualification):
```sql
-- Objects in the dumped schema have no qualifier
CREATE TABLE users (
id SERIAL PRIMARY KEY,
name VARCHAR(255) NOT NULL
);
CREATE TABLE orders (
id SERIAL PRIMARY KEY,
user_id INTEGER REFERENCES users(id), -- Same schema, no qualifier
product_id INTEGER REFERENCES catalog.products(id) -- Different schema, qualified
);
```
This qualification strategy enables using one schema as a template for multiple tenants:
```bash
# 1. Dump the template schema
pgschema dump --host localhost --db myapp --user postgres --schema template > template.sql
# 2. Apply to different tenant schemas
pgschema apply --host localhost --db myapp --user postgres --schema tenant1 --file template.sql
pgschema apply --host localhost --db myapp --user postgres --schema tenant2 --file template.sql
pgschema apply --host localhost --db myapp --user postgres --schema tenant3 --file template.sql
```
Because objects within the schema are not qualified, they will be created in whichever schema you specify during the apply command.
# Plan
Source: https://www.pgschema.com/cli/plan
The `plan` command generates a migration plan to apply a desired schema state to a target database schema. It compares the desired state (from a file) with the current state of a specific schema and shows what changes would be applied.
## Overview
The plan command follows infrastructure-as-code principles similar to Terraform:
1. Read the desired state from a SQL file (with include directive support)
2. Connect to the target database and analyze current state of the specified schema
3. Compare the two states
4. Generate a detailed migration plan with proper dependency ordering
5. Display the plan without making any changes
## Basic Usage
```bash
# Generate plan to apply schema.sql to the target database
pgschema plan --host localhost --db myapp --user postgres --password mypassword --file schema.sql
# Plan with specific schema
pgschema plan --host localhost --db myapp --user postgres --password mypassword --schema myschema --file schema.sql
# Generate JSON output for automation
pgschema plan --host localhost --db myapp --user postgres --password mypassword --file schema.sql --output-json stdout
# Generate SQL migration script
pgschema plan --host localhost --db myapp --user postgres --password mypassword --file schema.sql --output-sql stdout
# Save multiple output formats simultaneously
pgschema plan --host localhost --db myapp --user postgres --password mypassword --file schema.sql \
--output-human plan.txt --output-json plan.json --output-sql migration.sql
# Disable colored output (useful for scripts or CI/CD)
pgschema plan --host localhost --db myapp --user postgres --password mypassword --file schema.sql --no-color
```
## Connection Options
Database server host
Database server port
Database name
Database user name
Database password (can also use PGPASSWORD environment variable)
You can provide the password in two ways:
```bash Environment Variable (Recommended)
PGPASSWORD=mypassword pgschema plan \
--host localhost \
--db myapp \
--user postgres \
--file schema.sql
```
```bash Command Line Flag
pgschema plan \
--host localhost \
--db myapp \
--user postgres \
--password mypassword \
--file schema.sql
```
Schema name to target for comparison
## Plan Options
Path to desired state SQL schema file
Output human-readable format to stdout or file path
Examples:
* `--output-human stdout` - Display to terminal
* `--output-human plan.txt` - Save to file
Output JSON format to stdout or file path
This JSON format is the same format accepted by the [apply command](/cli/apply) for executing migration plans.
Examples:
* `--output-json stdout` - Display to terminal
* `--output-json plan.json` - Save to file
Output SQL format to stdout or file path
Examples:
* `--output-sql stdout` - Display to terminal
* `--output-sql migration.sql` - Save to file
Disable colored output for human format when writing to stdout
This is useful for:
* Scripts and automation that need to parse output
* CI/CD environments that don't support color codes
* Redirecting output to files where color codes are unwanted
Note: This flag only affects human format output to stdout. File output and JSON/SQL formats are never colored.
## Examples
### Default Human-Readable Output
```bash
pgschema plan --host localhost --db myapp --user postgres --file schema.sql
```
```
Plan: 2 to add, 1 to modify, 1 to drop.
Summary by type:
tables: 2 to add, 1 to modify, 1 to drop
indexes: 1 to add
functions: 1 to add
Tables:
+ users
+ posts
~ products
+ discount_rate (column)
- old_price (column)
- legacy_data
Indexes:
+ idx_users_email
Functions:
+ update_timestamp()
Transaction: true
DDL to be executed:
--------------------------------------------------
CREATE TABLE IF NOT EXISTS users (
id SERIAL PRIMARY KEY,
name VARCHAR(255) NOT NULL,
email VARCHAR(255) UNIQUE
);
CREATE TABLE IF NOT EXISTS posts (
id SERIAL PRIMARY KEY,
title TEXT NOT NULL,
user_id INTEGER REFERENCES users(id)
);
CREATE INDEX idx_users_email ON users(email);
CREATE FUNCTION update_timestamp() RETURNS TRIGGER AS $$
BEGIN
NEW.updated_at = NOW();
RETURN NEW;
END;
$$ LANGUAGE plpgsql;
ALTER TABLE products ADD COLUMN discount_rate numeric(5,2);
ALTER TABLE products DROP COLUMN old_price;
DROP TABLE legacy_data;
```
### JSON Output for Automation
```bash
pgschema plan \
--host localhost \
--db myapp \
--user postgres \
--file schema.sql \
--output-json stdout
```
```json
{
"version": "1.0.0",
"pgschema_version": "1.0.0",
"created_at": "2025-01-15T10:30:00Z",
"source_fingerprint": {
"hash": "abc123def456..."
},
"diffs": [
{
"sql": "CREATE TABLE IF NOT EXISTS users (\n id SERIAL PRIMARY KEY,\n name VARCHAR(255) NOT NULL,\n email VARCHAR(255) UNIQUE\n);",
"type": "table",
"operation": "create",
"path": "public.users",
"source": {
"schema": "public",
"name": "users",
"type": "BASE_TABLE",
"columns": [
{
"name": "id",
"position": 1,
"data_type": "integer",
"is_nullable": false,
"default_value": "nextval('users_id_seq'::regclass)"
},
{
"name": "name",
"position": 2,
"data_type": "character varying",
"is_nullable": false,
"character_maximum_length": 255
}
],
"constraints": {
"users_pkey": {
"schema": "public",
"table": "users",
"name": "users_pkey",
"type": "PRIMARY_KEY",
"columns": [
{
"name": "id",
"position": 1
}
]
}
}
},
"can_run_in_transaction": true
}
]
}
```
### SQL Migration Script
```bash
pgschema plan \
--host localhost \
--db myapp \
--user postgres \
--file schema.sql \
--output-sql stdout
```
```sql
CREATE TABLE IF NOT EXISTS users (
id SERIAL PRIMARY KEY,
name VARCHAR(255) NOT NULL,
email VARCHAR(255) UNIQUE
);
CREATE TABLE IF NOT EXISTS posts (
id SERIAL PRIMARY KEY,
title TEXT NOT NULL,
user_id INTEGER REFERENCES users(id)
);
CREATE INDEX idx_users_email ON users(email);
CREATE FUNCTION update_timestamp() RETURNS TRIGGER AS $$
BEGIN
NEW.updated_at = NOW();
RETURN NEW;
END;
$$ LANGUAGE plpgsql;
ALTER TABLE products ADD COLUMN discount_rate numeric(5,2);
ALTER TABLE products DROP COLUMN old_price;
DROP TABLE legacy_data;
```
### Plan for Specific Schema
```bash
pgschema plan \
--host localhost \
--db multi_tenant \
--user postgres \
--schema tenant1 \
--file tenant_schema.sql
```
## Use Cases
### Pre-deployment Validation
```bash
# Check what changes will be applied before deployment
pgschema plan \
--host prod-db \
--db myapp \
--user readonly \
--file new_schema.sql
# If plan looks good, proceed with apply
pgschema apply \
--host prod-db \
--db myapp \
--user deployer \
--file new_schema.sql
```
### CI/CD Integration
```yaml
# GitHub Actions example
- name: Validate Schema Changes
run: |
pgschema plan \
--host ${{ secrets.DB_HOST }} \
--db ${{ secrets.DB_NAME }} \
--user ${{ secrets.DB_USER }} \
--file schema/proposed.sql \
--output-json plan.json \
--no-color
# Check if there are destructive changes
if jq -e '.summary.to_destroy > 0' plan.json; then
echo "Warning: Destructive changes detected!"
exit 1
fi
```
### Change Tracking
```bash
# Generate plan and save for audit
DATE=$(date +%Y%m%d_%H%M%S)
pgschema plan \
--host localhost \
--db myapp \
--user postgres \
--file schema.sql \
--output-sql "migrations/plan_${DATE}.sql"
```
### Multiple Output Formats
You can generate multiple output formats simultaneously:
```bash
# Save all formats for comprehensive documentation
pgschema plan \
--host localhost \
--db myapp \
--user postgres \
--file schema.sql \
--output-human plan.txt \
--output-json plan.json \
--output-sql migration.sql
# Display human-readable format and save JSON for automation
pgschema plan \
--host localhost \
--db myapp \
--user postgres \
--file schema.sql \
--output-human stdout \
--output-json automation/plan.json \
--no-color
```
Note: Only one output format can use `stdout`. If no output flags are specified, the command defaults to human-readable output to stdout with colors enabled.
## Comparison Direction
The plan command is **unidirectional**: it always plans changes from the current state (database) to the desired state (file).
```
Current State (Database) → Desired State (File)
```
This ensures:
* Consistent infrastructure-as-code workflow
* Clear source of truth (the file)
* Predictable change direction
## Include Directive Support
The plan command supports include directives in schema files, allowing you to organize your schema across multiple files:
```sql
-- main.sql
\i tables/users.sql
\i tables/posts.sql
\i functions/triggers.sql
```
The include processor will resolve all includes relative to the directory containing the main schema file.
# For Coding Agent
Source: https://www.pgschema.com/coding-agent
This guide shows how to integrate pgschema with AI coding agents.
## llms.txt
pgschema provides official llms.txt files for AI agents that support [llms.txt](https://llmstxt.org/) context:
* **Concise version**: [pgschema.com/llms.txt](https://www.pgschema.com/llms.txt) - Essential commands and patterns
* **Full version**: [pgschema.com/llms-full.txt](https://www.pgschema.com/llms-full.txt) - Complete API reference and examples
AI agents can automatically fetch these context files to understand pgschema's core workflow: dump → edit → plan → apply.
## CLAUDE.md / AGENTS.md
For optimal code integration, add this configuration to your [CLAUDE.md](https://claude.md) or [AGENTS.md](https://agents.md/):
````markdown
## Project Overview
`pgschema` is a CLI tool that brings Terraform-style declarative schema migration workflow to PostgreSQL. It provides a dump/edit/plan/apply workflow for database schema changes:
- **Dump**: Extract current schema in a developer-friendly format
- **Edit**: Modify schema files to represent desired state
- **Plan**: Compare desired state with current database and generate migration plan
- **Apply**: Execute the migration with safety features like concurrent change detection
The tool supports PostgreSQL versions 14-17 and handles most common schema objects (tables, indexes, functions, views, constraints, etc.).
## Core Workflow
### 1. Dump Current Schema
Extract the current database schema in a clean, developer-friendly format:
```bash
# Basic dump
PGPASSWORD=password pgschema dump --host localhost --db myapp --user postgres > schema.sql
# Multi-file output for large schemas
pgschema dump --host localhost --db myapp --user postgres --multi-file --file schema.sql
# Specific schema (not public)
pgschema dump --host localhost --db myapp --user postgres --schema tenant1 > schema.sql
```
### 2. Edit Schema Files
Modify the dumped schema files to represent your desired state. pgschema compares the desired state (files) with current state (database) to generate migrations.
### 3. Generate Migration Plan
Preview what changes will be applied:
```bash
# Generate plan
PGPASSWORD=password pgschema plan --host localhost --db myapp --user postgres --file schema.sql
# Save plan in multiple formats
pgschema plan --host localhost --db myapp --user postgres --file schema.sql \
--output-human plan.txt --output-json plan.json --output-sql migration.sql
```
### 4. Apply Changes
Execute the migration:
```bash
# Apply from file (generate plan and apply)
PGPASSWORD=password pgschema apply --host localhost --db myapp --user postgres --file schema.sql
# Apply from pre-generated plan
pgschema apply --host localhost --db myapp --user postgres --plan plan.json
# Auto-approve for CI/CD
pgschema apply --host localhost --db myapp --user postgres --file schema.sql --auto-approve
```
## Key Features
### Connection Options
Use these connection parameters for all commands:
- `--host` - Database host (default: localhost)
- `--port` - Database port (default: 5432)
- `--db` - Database name (required)
- `--user` - Database user (required)
- `--password` - Database password (or use PGPASSWORD environment variable)
- `--schema` - Target schema (default: public)
### Multi-File Schema Management
For large schemas, use `--multi-file` to organize by object type:
```bash
pgschema dump --host localhost --db myapp --user postgres --multi-file --file schema/main.sql
```
Creates organized directory structure:
```
schema/
├── main.sql # Contains \i include directives
├── tables/
├── views/
├── functions/
└── indexes/
```
### Online DDL Support
pgschema automatically uses safe patterns for production:
- `CREATE INDEX CONCURRENTLY` for new indexes
- `NOT VALID` + `VALIDATE CONSTRAINT` for constraints
- Progress monitoring for long-running operations
### Safety Features
- **Schema fingerprinting**: Detects concurrent schema changes
- **Transaction handling**: Automatic rollback on failure
- **Dependency ordering**: Objects created/dropped in correct order
- **Lock timeout control**: `--lock-timeout` for production safety
## Common Use Cases
### Development Workflow
```bash
# 1. Dump production schema
pgschema dump --host prod --db myapp --user postgres > baseline.sql
# 2. Make changes to baseline.sql (desired state)
# 3. Test against staging
pgschema plan --host staging --db myapp --user postgres --file baseline.sql
# 4. Apply to staging
pgschema apply --host staging --db myapp --user postgres --file baseline.sql
```
### Multi-Tenant Schema Management
```bash
# Dump template schema
pgschema dump --host localhost --db myapp --user postgres --schema template > template.sql
# Apply to multiple tenants
pgschema apply --host localhost --db myapp --user postgres --schema tenant1 --file template.sql
pgschema apply --host localhost --db myapp --user postgres --schema tenant2 --file template.sql
```
### CI/CD Integration
```bash
# Generate and save plan for review
pgschema plan --host prod --db myapp --user postgres --file schema.sql \
--output-json plan.json --no-color
# Apply in deployment
pgschema apply --host prod --db myapp --user postgres --plan plan.json --auto-approve
```
## Supported Schema Objects
pgschema handles most common PostgreSQL schema objects:
- **Tables**: Full DDL including columns, constraints, defaults
- **Indexes**: Regular and partial indexes with concurrent creation
- **Views**: Regular and materialized views
- **Functions**: PL/pgSQL and SQL functions with all options
- **Procedures**: Stored procedures
- **Triggers**: Table triggers with dependency handling
- **Types**: Custom types (enum, composite, domain)
- **Constraints**: Primary keys, foreign keys, unique, check constraints
- **Sequences**: Auto-generated and custom sequences
- **Policies**: Row-level security policies
- **Comments**: Comments on all supported objects
For unsupported objects, see the documentation.
## Additional Resources
- **Concise reference**: [pgschema.com/llms.txt](https://www.pgschema.com/llms.txt) - Essential commands and patterns
- **Complete reference**: [pgschema.com/llms-full.txt](https://www.pgschema.com/llms-full.txt) - Full API reference and examples
- **Documentation**: [pgschema.com](https://www.pgschema.com) - Complete documentation
````
# FAQ
Source: https://www.pgschema.com/faq
## Getting Help
* Report bugs or request features? 👉 [GitHub Issues](https://github.com/pgschema/pgschema/issues)
* Community for pgschema users? 👉 Join [Discord](https://discord.gg/rvgZCYuJG4)
* Need commercial support? 👉 [Contact us](mailto:support@bytebase.com)
## Compatibility
### Which PostgreSQL versions are supported?
pgschema is tested with PostgreSQL versions 14, 15, 16, and 17. While it may work with older versions, we recommend using one of these tested versions for the best experience.
### Can I use pgschema with cloud PostgreSQL services?
Yes, pgschema works with any PostgreSQL-compatible database that you can connect to, including:
* Amazon RDS for PostgreSQL
* Google Cloud SQL for PostgreSQL
* Azure Database for PostgreSQL
* Supabase
* Neon
* And other PostgreSQL-compatible services
### How do I handle database-specific settings?
pgschema focuses on schema structure (tables, indexes, functions, etc.) and doesn't manage:
* Database-level settings
* User/role management
* Tablespace configuration
* Extensions
These should be managed separately through your infrastructure tooling. See [unsupported syntax](/syntax/unsupported).
### What happens if a migration fails?
1. For most changes, pgschema executes them in a transaction and will roll back on failure
2. For changes containing non-transactional statements (like `CREATE INDEX CONCURRENTLY`), each statement runs in its own transaction
3. Your database will remain in its previous state for transactional changes. When migrations include non-transactional DDL statements, partial application may occur if a later statement fails
4. You'll see a clear error message indicating what went wrong
5. Fix the issue in your schema file and try again
## Troubleshooting
### Why does pgschema show no changes when I expect some?
Common causes:
* The changes are in objects pgschema doesn't track yet
* The database already matches your desired state
* You're comparing against the wrong schema (check [`--schema`](/cli/plan#param-schema) flag)
Run with `--debug` flag for more detailed output.
### How do I debug connection issues?
For connection problems:
1. Verify PostgreSQL is running: `pg_isready -h host -p port`
2. Check your credentials and permissions
3. Ensure the database exists
4. Check network/firewall settings
5. Try connecting with `psql` using the same parameters
### What permissions does pgschema need?
pgschema needs:
* `CONNECT` privilege on the database
* `USAGE` privilege on the target schema
* `CREATE` privilege on the schema (for new objects)
* Appropriate privileges for all object types you're managing
For read-only operations (dump, plan), only `SELECT` privileges are needed.
## Advanced Topics
### How does pgschema handle dependencies?
pgschema automatically:
* Detects dependencies between database objects
* Orders DDL statements to respect dependencies
* Creates objects in the correct order
* Drops objects in reverse dependency order
### How does pgschema detect concurrent schema changes?
pgschema uses fingerprinting to detect if the database schema has changed since the migration plan was created:
* A fingerprint (hash) of the current schema is calculated during planning
* Before applying changes, pgschema verifies the fingerprint still matches
* If the schema has changed (concurrent modifications), the apply operation will fail safely
* This prevents conflicts and ensures migrations are applied to the expected schema state
### Can I use pgschema for database comparisons?
Yes! You can compare schemas across databases:
```bash
# Dump both schemas
pgschema dump --host db1 --db myapp > schema1.sql
pgschema dump --host db2 --db myapp > schema2.sql
# Compare with diff
diff schema1.sql schema2.sql
```
## License
See [pgschema Community License](https://github.com/pgschema/pgschema/blob/main/LICENSE).
**Q: Can I use pgschema for my startup?**\
Yes, if your company’s annual gross revenue is ≤ US \$10M and you are not competing with pgschema.
**Q: I’m a large company using pgschema internally. Do I need a license?**\
Yes, if your company’s total global annual gross revenue is > US \$10M.
**Q: What counts as “competing with pgschema”?**\
Offering software or services that are managing, transforming, or validating PostgreSQL schema for others.
**Q: How is the \$10M threshold calculated?**
* Total annual gross revenue before deductions
* Includes all affiliates, parents, and subsidiaries
* Based on the prior fiscal year
**Q: What if I want to remove these restrictions?**\
[Contact us](mailto:support@bytebase.com) for a commercial license.
# Introduction
Source: https://www.pgschema.com/index
Declarative schema migration for Postgres
export const AsciinemaPlayer = ({recordingId, title = "Terminal Recording", height}) =>
While database migrations have traditionally been imperative (writing step-by-step migration scripts), declarative solutions are gaining traction.
`pgschema` differentiates itself from other declarative tools by:
* **Comprehensive Postgres Support**: Handles virtually all schema-level database objects - tables, indexes, views, functions, procedures, triggers, policies, types, and more. Thoroughly tested against Postgres versions 14 through 17.
* **Schema-Level Focus**: Designed for real-world Postgres usage patterns, from single-schema applications to multi-tenant architectures.
* **Terraform-Like Plan-Review-Apply Workflow**: Generate a detailed migration plan before execution, review changes in human-readable, SQL, or JSON formats, then apply with confidence. No surprises in production.
* **Concurrent Change Detection**: Built-in fingerprinting ensures the database hasn't changed between planning and execution.
* **Online DDL Support**: Automatically uses PostgreSQL's non-blocking strategies to minimize downtime during schema changes.
* **Adaptive Transaction**: Intelligently wraps migrations in transactions when possible, with automatic handling of operations like concurrent index creation that require special treatment.
* **Modular Schema Organization**: Supports multi-file schema definitions for better team collaboration and ownership.
* **Dependency Management**: Automatically resolves complex dependencies between database objects using topological sorting, ensuring operations execute in the correct order.
* **No Shadow Database Required**: Unlike other declarative tools, it works directly with your schema files and target database - no temporary databases, no extra infrastructure.
## Comprehensive Postgres Support
`pgschema` supports a wide range of [Postgres features](/syntax/create_table), including:
* Tables, columns, and constraints (primary keys, foreign keys, unique constraints, check constraints)
* Indexes (including partial, functional, and concurrent indexes)
* Views and materialized views
* Functions and stored procedures
* Custom types and domains
* Schemas and permissions
* Row-level security (RLS) policies
* Triggers and sequences
* Comments on database objects
The tool is thoroughly tested against [Postgres versions 14 through 17](https://github.com/pgschema/pgschema/blob/a41ffe8616f430ba36e6b39982c4455632a0dfa7/.github/workflows/release.yml#L44-L47)
with [extensive test suites](https://github.com/pgschema/pgschema/tree/main/testdata).
## Schema-Level Migration
Unlike many migration tools that operate at the database level, `pgschema` is designed to work at the **schema level**.
### Why Schema-Level?
**Single Schema Simplicity**: Most Postgres applications use only the default `public` schema. For these cases, schema-level operations eliminate unnecessary complexity while providing all the functionality needed for effective schema management.
**Multi-Tenant Architecture Support**: For applications using multiple schemas, the predominant pattern is **schema-per-tenant architecture** - where each customer or tenant gets their own schema within the same database. This schema-level approach enables [tenant schema reconciliation](/workflow/tenant-schema) - ensuring all tenant schemas stay in sync with the canonical schema definition.
### Schema-Agnostic Migrations
The tool intelligently handles schema qualifiers to create portable, schema-agnostic dumps and migrations:
```bash
# Dump from 'tenant_123' schema
pgschema dump \
--host localhost \
--user postgres \
--db myapp \
--schema tenant_123 \
> schema.sql
# Apply the same schema definition to 'tenant_456'
pgschema plan \
--host localhost \
--user postgres \
--db myapp \
--schema tenant_456 \
--file schema.sql
```
Here's what a schema-level dump looks like - notice how it creates **schema-agnostic SQL**:
```sql
--
-- pgschema database dump
--
--
-- Name: users; Type: TABLE; Schema: -; Owner: -
--
CREATE TABLE IF NOT EXISTS users (
id SERIAL PRIMARY KEY,
username varchar(100) NOT NULL,
email varchar(100) NOT NULL,
role public.user_role DEFAULT 'user',
status public.status DEFAULT 'active',
created_at timestamp DEFAULT now()
);
--
-- Name: posts; Type: TABLE; Schema: -; Owner: -
--
CREATE TABLE IF NOT EXISTS posts (
id SERIAL PRIMARY KEY,
user_id integer REFERENCES users(id),
title varchar(200) NOT NULL,
content text,
created_at timestamp DEFAULT now()
);
```
The tool automatically:
* **Strips schema qualifiers** from table and index names (notice `Schema: -` in comments)
* **Removes schema prefixes** from object references (`users` instead of `tenant_123.users`)
* **Preserves cross-schema type references** where needed (`public.user_role` for shared types)
* **Creates portable DDL** that can be applied to any target schema
## Declarative Workflow
This workflow mirrors Terraform's approach and fits [GitOps](/workflow/gitops) nicely:
### 1. Dump: Extract Current Schema
```bash
pgschema dump \
--host localhost \
--user postgres \
--db myapp \
> schema.sql
```
This extracts your current database schema into a clean, readable SQL file that represents your current state.
### 2. Edit: Define Desired State
Edit the dumped schema file to reflect your desired changes. Instead of writing `ALTER TABLE` statements, you write `CREATE TABLE` definitions to specify the desired end state.
### 3. Plan: Preview Changes
```bash
pgschema plan \
--host localhost \
--user postgres \
--db myapp \
--file schema.sql \
--output-human \
--output-json plan.json \
--output-sql plan.sql
```
This compares your desired schema (from the file) with the current database state and generates a migration plan. Here's where the tool differentiates from Terraform—the plan supports multiple output formats:
The human-readable format is perfect for reviewing changes during development
```
Plan: 1 to alter.
Summary by type:
tables: 1 to alter
Tables:
~ users
Transaction: true
DDL to be executed:
--------------------------------------------------
ALTER TABLE users ADD COLUMN name varchar(100);
```
The JSON format enables easy integration with CI/CD pipelines and approval workflows
```json
{
"version": "1.0.0",
"pgschema_version": "1.0.0",
"created_at": "2025-08-13T10:30:15+08:00",
"source_fingerprint": {
"hash": "7a8b9c1d2e3f4a5b6c7d8e9f0a1b2c3d4e5f6a7b8c9d0e1f2a3b4c5d6e7f8a9b"
},
"diffs": [
{
"sql": "ALTER TABLE users ADD COLUMN name varchar(100);",
"type": "table",
"operation": "alter",
"path": "public.users",
"source": {
"schema": "public",
"name": "users",
"type": "BASE_TABLE",
"columns": [
{
"name": "id",
"position": 1,
"data_type": "integer",
"is_nullable": false
},
{
"name": "email",
"position": 2,
"data_type": "character varying",
"character_maximum_length": 255,
"is_nullable": false
},
{
"name": "created_at",
"position": 3,
"data_type": "timestamp without time zone",
"is_nullable": true,
"column_default": "now()"
},
{
"name": "name",
"position": 4,
"data_type": "character varying",
"character_maximum_length": 100,
"is_nullable": true
}
],
"can_run_in_transaction": true
}
}
]
}
```
The SQL format shows the exact SQL to be executed, enabling custom tooling to inspect and analyze the changes
```sql
ALTER TABLE users ADD COLUMN name varchar(100);
```
### 4. Apply: Execute Changes
```bash
pgschema apply \
--plan plan.json \
--host localhost \
--user postgres \
--db myapp
```
This executes the planned changes safely, with built-in protections against concurrent schema modifications and proper transaction handling.
## Concurrent Change Detection
The separation between `plan` and `apply` phases creates a critical safety feature but also introduces a potential risk: **what if the database changes between planning and execution?** This time window could lead to applying outdated or conflicting migrations.
The tool solves this with **fingerprinting** - a cryptographic mechanism that ensures the exact database state you planned against is the same state you're applying changes to.
### How Fingerprinting Works
**During Plan Generation**: When you run `pgschema plan`, it calculates a cryptographic fingerprint of the current database schema state and embeds it in the plan file:
```json
{
"version": "1.0.0",
"pgschema_version": "1.0.0",
"created_at": "2025-08-12T17:44:43+08:00",
"source_fingerprint": {
"hash": "965b1131737c955e24c7f827c55bd78e4cb49a75adfd04229e0ba297376f5085"
},
"diffs": [...]
}
```
**During Apply Execution**: Before executing any changes, `pgschema apply` recalculates the current database fingerprint and compares it with the stored fingerprint from the plan.
### Safety in Action
This fingerprinting prevents dangerous scenarios:
```bash
# Team member A generates plan
pgschema plan \
--host prod.db.com \
--db myapp \
--user postgres \
--file schema.sql \
--output-json plan.json
# Time passes... Team member B makes emergency schema change
# Team member A tries to apply original plan
pgschema apply \
--host prod.db.com \
--db myapp \
--user postgres \
--plan plan.json
# ❌ Error: schema fingerprint mismatch detected - the database schema has changed since the plan was generated.
#
# schema fingerprint mismatch - expected: 965b1131737c955e, actual: abc123456789abcd
```
### Recover Fingerprint Mismatch
When a fingerprint mismatch occurs, the right approach is to reestablish the baseline with the current database state:
```bash
# 1. Get the latest schema from the current database
pgschema dump \
--host prod.db.com \
--db myapp \
--user postgres \
> current-schema.sql
# 2. Update your desired schema file with any new changes
# (merge your intended changes with the current state)
# 3. Plan the changes against the updated baseline
pgschema plan \
--host prod.db.com \
--db myapp \
--user postgres \
--file updated-schema.sql \
--output-json new-plan.json
# 4. Apply with the fresh plan
pgschema apply \
--host prod.db.com \
--db myapp \
--user postgres \
--plan new-plan.json
```
This fingerprinting mechanism maintains the integrity of the Plan-Review-Apply workflow, ensuring that concurrent modifications don't lead to unexpected or conflicting database changes.
## Online DDL Operations
The tool automatically uses PostgreSQL's non-blocking features to minimize downtime during schema changes, including concurrent index creation, NOT VALID constraint patterns, and safe NOT NULL additions.
**Example - Concurrent Index Creation**: Index operations automatically use `CREATE INDEX CONCURRENTLY` to avoid blocking table writes:
```sql
-- Generated migration for index addition
CREATE INDEX CONCURRENTLY IF NOT EXISTS idx_users_email_status ON users (email, status DESC);
-- pgschema:wait - Built-in progress monitoring
SELECT
COALESCE(i.indisvalid, false) as done,
CASE
WHEN p.blocks_total > 0 THEN p.blocks_done * 100 / p.blocks_total
ELSE 0
END as progress
FROM pg_class c
LEFT JOIN pg_index i ON c.oid = i.indexrelid
LEFT JOIN pg_stat_progress_create_index p ON c.oid = p.index_relid
WHERE c.relname = 'idx_users_email_status';
```
The `pgschema:wait` directive blocks migration execution, polls the database to monitor progress, and automatically continues when operations complete.
For comprehensive details, see the [Online DDL documentation](/workflow/online-ddl).
## Adaptive Transaction
The system automatically determines transaction boundaries based on the SQL operations in your migration plan. Each diff in the plan contains a `can_run_in_transaction` field that indicates whether that particular SQL can run inside a transaction.
```json plan.json snippet
"diffs": [
...
{
"sql": "ALTER TABLE department\nADD CONSTRAINT department_dept_name_key UNIQUE (dept_name);",
"type": "table.constraint",
"operation": "create",
"path": "public.department.department_dept_name_key",
"source": {
"schema": "public",
"table": "department",
"name": "department_dept_name_key",
"type": "UNIQUE",
"columns": [
{
"name": "dept_name",
"position": 1
}
]
},
"can_run_in_transaction": true <--------- transaction indication
},
...
]
```
### Smart Transaction Wrapping
* **If all diffs can run in a transaction**: The entire plan is wrapped in a single transaction for maximum atomicity
* **If any diff cannot run in a transaction**: Each diff runs in its own transaction to maintain isolation
Operating at the schema level, among all the DDL operations supported, only `CREATE INDEX CONCURRENTLY` cannot run inside a transaction.
## Modular Schema Organization
For large applications and teams, managing your database schema as a single monolithic file becomes unwieldy. The [modular](/workflow/modular-schema-files) approach transforms your schema into an organized structure that enables better collaboration, clearer ownership, and easier maintenance.
### Breaking Down the Monolith
Instead of a single large schema file, the tool can organize your database objects into logical, manageable files with the [`--multi-file`](/cli/dump#param-multi-file) option:
```bash
# Initialize modular structure from existing database
mkdir -p schema
pgschema dump \
--host localhost \
--db myapp \
--user postgres \
--multi-file \
--file schema/main.sql
# Examine the generated structure
tree schema/
```
This creates an organized drectory structure. The `main.sql` file serves as the entry point,
containing Postgres `\i` (include) directives that reference individual component files.
```
schema/
├── main.sql # Entry point with include directives
├── types/
│ ├── user_status.sql
│ ├── order_status.sql
│ └── address.sql
├── domains/
│ ├── email_address.sql
│ └── positive_integer.sql
├── sequences/
│ ├── global_id_seq.sql
│ └── order_number_seq.sql
├── tables/
│ ├── users.sql
│ └── orders.sql
├── functions/
│ ├── update_timestamp.sql
│ ├── get_user_count.sql
│ └── get_order_count.sql
├── procedures/
│ ├── cleanup_orders.sql
│ └── update_status.sql
└── views/
├── user_summary.sql
└── order_details.sql
```
```sql
-- Include custom types first (dependencies for tables)
\i types/user_status.sql
\i types/order_status.sql
\i types/address.sql
-- Include domain types (constrained base types)
\i domains/email_address.sql
\i domains/positive_integer.sql
-- Include sequences (may be used by tables)
\i sequences/global_id_seq.sql
\i sequences/order_number_seq.sql
-- Include core tables (with their constraints, indexes, and policies)
\i tables/users.sql
\i tables/orders.sql
-- Include functions and procedures
\i functions/update_timestamp.sql
\i functions/get_user_count.sql
\i procedures/cleanup_orders.sql
-- Include views (depend on tables and functions)
\i views/user_summary.sql
\i views/order_details.sql
```
```sql
--
-- Name: update_timestamp(); Type: FUNCTION; Schema: -; Owner: -
--
CREATE OR REPLACE FUNCTION update_timestamp()
RETURNS trigger
LANGUAGE plpgsql
SECURITY INVOKER
VOLATILE
AS $$
BEGIN
NEW.updated_at = CURRENT_TIMESTAMP;
RETURN NEW;
END;
$$;
```
### Team Collaboration Benefits
This modular approach enables powerful team collaboration patterns:
**Granular Ownership**: Use GitHub's CODEOWNERS to assign different teams to different parts of your schema:
```
# .github/CODEOWNERS
schema/tables/users* @user-team
schema/tables/orders* @orders-team
schema/tables/products* @inventory-team
schema/views/user_* @user-team
schema/views/order_* @orders-team
schema/functions/*inventory* @inventory-team
```
**Independent Development**: Teams can work on separate schema components without conflicts, test their changes in isolation, then combine for coordinated production deployments.
**Focused Code Reviews**: Instead of reviewing massive schema changes, reviewers can focus on specific files relevant to their domain expertise.
### Same Workflow, Better Organization
The declarative workflow remains identical - you're still defining desired state and letting the tool generate the migration plan:
```bash
# Teams edit their respective schema files to define desired state
# Example: Add new column to users table
vim schema/tables/users.sql
# Generate migration plan from modular schema
pgschema plan \
--host localhost \
--db myapp \
--user postgres \
--file schema/main.sql \
--output-human \
--output-json plan.json \
--output-sql plan.sql
# Apply the coordinated changes
pgschema apply \
--host localhost \
--db myapp \
--user postgres \
--plan plan.json
```
The multi-file approach scales from small teams working on focused components to large organizations managing complex schemas with hundreds of objects, while maintaining the same simple, declarative workflow.
## Dependency Management
As schemas grow in complexity, manually ordering DDL statements becomes increasingly error-prone. A single schema file with hundreds of objects becomes unmanageable—you're constantly scrolling and reordering statements to satisfy dependencies.
The modular schema approach introduces even greater challenges. With schema files spread across directories, tracking dependencies between objects becomes nearly impossible. A trigger in `triggers/audit.sql` might depend on a function in `functions/timestamps.sql`, which itself references types defined in `types/custom.sql`.
Database objects often depend on each other—triggers need functions, views reference tables, foreign keys require referenced tables to exist first. The tool automatically handles these dependencies using topological sorting to ensure operations execute in the correct order, regardless of how your schema files are organized.
### Automatic Dependency Resolution
Consider this modular schema example where you're adding a table with a trigger that depends on a function
```sql
-- tables/users.sql
CREATE TABLE public.users (
id serial PRIMARY KEY,
name text NOT NULL,
email text UNIQUE,
created_at timestamp DEFAULT CURRENT_TIMESTAMP,
updated_at timestamp DEFAULT CURRENT_TIMESTAMP
);
-- triggers/update_users_modified_time.sql
CREATE TRIGGER update_users_modified_time
BEFORE UPDATE ON public.users
FOR EACH ROW
EXECUTE FUNCTION public.update_modified_time();
-- functions/update_modified_time.sql
CREATE OR REPLACE FUNCTION public.update_modified_time()
RETURNS trigger AS $$
BEGIN
NEW.updated_at = CURRENT_TIMESTAMP;
RETURN NEW;
END;
$$ LANGUAGE plpgsql;
```
```sql
-- pgschema automatically orders operations correctly:
CREATE TABLE IF NOT EXISTS users (
id SERIAL PRIMARY KEY,
name text NOT NULL,
email text UNIQUE,
created_at timestamp DEFAULT CURRENT_TIMESTAMP,
updated_at timestamp DEFAULT CURRENT_TIMESTAMP
);
CREATE OR REPLACE FUNCTION update_modified_time()
RETURNS trigger
LANGUAGE plpgsql
SECURITY INVOKER
VOLATILE
AS $$
BEGIN
NEW.updated_at = CURRENT_TIMESTAMP;
RETURN NEW;
END;
$$;
CREATE OR REPLACE TRIGGER update_users_modified_time
BEFORE UPDATE ON users
FOR EACH ROW
EXECUTE FUNCTION update_modified_time();
```
The topological sort algorithm ensures that:
* Tables are created before their indexes, constraints, and triggers
* Functions are created before triggers that use them
* Referenced tables exist before foreign key constraints
* Views are created after all their dependent tables and functions
This automatic dependency management eliminates manual ordering errors and ensures migrations always execute successfully.
## No Shadow Database Required
Unlike many declarative schema migration tools, this approach doesn't require a separate "shadow" or "dev" database to compute schema differences. Other tools typically create a temporary database, apply your desired schema to it, then compare this shadow database with your target database to generate migrations.
This shadow database approach has several drawbacks:
* **Counterintuitive Configuration**: Most developers stumble on the additional shadow database flags and need to read documentation to understand what they're used for
* **Complex Setup**: Requires permissions for temporary database creation and cleanup of temporary databases
* **Additional Infrastructure**: Demands extra database resources, maintenance, and can cause inconsistencies with different Postgres versions or extensions
### IR Normalization
This tool eliminates these complexities by working directly with your schema files and target database through an **Intermediate Representation (IR)** system:
```plain
SQL Files Database System Catalogs
v v
(Desired) (Current)
| |
| Parse | Query
v v
IR
(Normalized)
|
v
Diff Engine
|
v
Migration Plan
```
**1. SQL Parsing**: Your desired state SQL files are parsed and converted into a normalized Intermediate Representation.
**2. Database Introspection**: The target database schema is introspected through Postgres system catalogs (`pg_class`, `pg_attribute`, `pg_constraint`, etc.) and converted into the same normalized IR format.
**3. Direct Comparison**: The diff engine compares these two normalized IR structures directly, identifying what changes are needed without requiring any temporary databases.
**4. Migration Generation**: The differences are converted into properly ordered DDL statements that transform the current state into the desired state.
The IR normalization ensures that regardless of whether schema information comes from SQL parsing or database introspection, it's represented consistently for accurate comparison - enabling precise migrations without the overhead and complexity of shadow databases.
## Acknowledgements
`pgschema` wouldn't exist without these amazing open source projects:
* [sqlc](https://github.com/sqlc-dev/sqlc) - For generating code to extract schema from target databases
* [pg\_query\_go](https://github.com/pganalyze/pg_query_go) - Go bindings for libpg\_query, enabling reliable Postgres SQL parsing. In fact, sqlc also uses pg\_query\_go under the hood! It's the secret weapon in the Postgres ecosystem that allows tools to build near-perfect Postgres compatibility.
* [testcontainers](https://github.com/testcontainers/) - Enabling comprehensive integration testing with real Postgres instances
**Design reference** came from:
* [Terraform](https://github.com/hashicorp/terraform) - For figuring out the right Plan-Review-Apply workflow that developers love
* [pg-schema-diff](https://github.com/stripe/pg-schema-diff) - Reading GitHub issues to understand use cases and studying the codebase. For example, I knew sqlc beforehand, but when I saw pg-schema-diff uses sqlc to fetch schema information, it immediately clicked.
And the real inspiration came from hundreds of customer conversations over 4+ years building [Bytebase](https://www.bytebase.com). Developers kept telling us: "Why can't database migrations be as simple as Terraform?" Well, now they can be.
Special thanks to Claude Code for sweating millions of tokens to make this project possible. Turns out AI is pretty good at writing database migration tools – who knew? 🤖
***
Ready to give it a try?
* [Installation](/installation)
* [Join Discord](https://discord.gg/pgschema) or open [GitHub Issues](https://github.com/pgschema/pgschema/issues)
# Apply
Source: https://www.pgschema.com/cli/apply
The `apply` command applies database schema changes to a target database schema. You can either provide a desired state file to generate and apply a plan, or execute a pre-generated plan file directly.
## Overview
The apply command supports two execution modes:
### File Mode (Generate and Apply)
1. Read the desired state from a SQL file (with include directive support)
2. Compare it with the current database state of the target schema
3. Generate a migration plan with proper dependency ordering
4. Display the plan for review
5. Apply the changes (with optional confirmation and safety checks)
### Plan Mode (Execute Pre-generated Plan)
1. Load a pre-generated plan from JSON file
2. Validate plan version compatibility and schema fingerprints
3. Display the plan for review
4. Apply the changes (with optional confirmation and safety checks)
## Basic Usage
```bash
# File mode: Generate and apply plan from desired state file
pgschema apply --host localhost --db myapp --user postgres --password mypassword --file schema.sql
# Plan mode: Execute pre-generated plan
pgschema apply --host localhost --db myapp --user postgres --password mypassword --plan plan.json
# Auto-approve mode for CI/CD (no confirmation prompt)
pgschema apply --host localhost --db myapp --user postgres --password mypassword --file schema.sql --auto-approve
```
## Connection Options
Database server host
Database server port
Database name
Database user name
Database password (can also use PGPASSWORD environment variable)
You can provide the password in two ways:
```bash Environment Variable (Recommended)
PGPASSWORD=mypassword pgschema apply \
--host localhost \
--db myapp \
--user postgres \
--file schema.sql
```
```bash Command Line Flag
pgschema apply \
--host localhost \
--db myapp \
--user postgres \
--password mypassword \
--file schema.sql
```
Schema name to apply changes to
## Apply Options
Path to desired state SQL schema file (mutually exclusive with --plan)
Used in File Mode to generate and apply a plan from the desired state.
Path to pre-generated plan JSON file (mutually exclusive with --file)
Used in Plan Mode to execute a plan that was previously generated with `pgschema plan --output-json`.
Apply changes without prompting for approval
Useful for automated deployments and CI/CD pipelines.
Disable colored output in the plan display
Useful for scripts, CI/CD environments, or terminals that don't support colors.
Maximum time to wait for database locks (e.g., '30s', '5m', '1h')
If not specified, uses PostgreSQL's default behavior (wait indefinitely).
See [PostgreSQL lock\_timeout documentation](https://www.postgresql.org/docs/current/runtime-config-client.html#GUC-LOCK-TIMEOUT).
Application name for database connection (visible in pg\_stat\_activity)
See [PostgreSQL application\_name documentation](https://www.postgresql.org/docs/current/libpq-connect.html#LIBPQ-CONNECT-APPLICATION-NAME).
## Examples
### File Mode (Generate and Apply)
```bash
# Interactive mode - shows plan and prompts for confirmation
pgschema apply --host localhost --db myapp --user postgres --file desired_schema.sql
```
This will:
1. Generate a migration plan by comparing the desired state with current database
2. Display the plan with colored output
3. Prompt: "Do you want to apply these changes? (yes/no):"
4. Wait for confirmation before proceeding
5. Apply changes using transactions where possible
Example output:
```
Plan: 2 to add, 1 to modify.
Summary by type:
tables: 1 to add, 1 to modify
indexes: 1 to add
Tables:
+ posts
~ users
+ email (column)
Indexes:
+ idx_users_email
Transaction: true
DDL to be executed:
--------------------------------------------------
CREATE TABLE IF NOT EXISTS posts (
id SERIAL PRIMARY KEY,
title TEXT NOT NULL,
user_id INTEGER REFERENCES users(id)
);
ALTER TABLE users ADD COLUMN email VARCHAR(255) UNIQUE;
CREATE INDEX idx_users_email ON users(email);
Do you want to apply these changes? (yes/no):
```
### Plan Mode (Execute Pre-generated Plan)
```bash
# First, generate a plan
pgschema plan --host localhost --db myapp --user postgres --file schema.sql --output-json plan.json
# Then apply the pre-generated plan
pgschema apply --host localhost --db myapp --user postgres --plan plan.json
```
Benefits of plan mode:
* **Separation of concerns**: Generate plans in one environment, apply in another
* **Review process**: Plans can be reviewed before deployment
* **Repeatability**: Same plan can be applied to multiple environments
* **Version control**: Plans can be stored and versioned
* **Rollback preparation**: Generate rollback plans before applying changes
### Auto-approve for CI/CD
```bash
pgschema apply \
--host prod-db \
--db myapp \
--user deployer \
--file schema.sql \
--auto-approve \
--no-color
```
### With Lock Timeout
```bash
# Prevent blocking on long-running locks
pgschema apply \
--host localhost \
--db myapp \
--user postgres \
--file schema.sql \
--lock-timeout "30s"
```
### Custom Application Name
```bash
pgschema apply \
--host localhost \
--db myapp \
--user postgres \
--file schema.sql \
--application-name "pgschema-deployment-v1.1.0"
```
```sql
-- Monitor active pgschema connections:
SELECT application_name, state, query_start, query
FROM pg_stat_activity
WHERE application_name LIKE 'pgschema%';
```
## Safety Features
### Schema Fingerprint Validation
When using plan mode, pgschema validates that the database schema hasn't changed since the plan was generated:
```bash
# Generate plan
pgschema plan --host localhost --db myapp --user postgres --file schema.sql --output-json plan.json
# Database schema changes here...
# Apply plan - will detect changes and fail
pgschema apply --host localhost --db myapp --user postgres --plan plan.json
```
If schema changes are detected:
```
Error: schema fingerprint mismatch detected - the database schema has changed since the plan was generated.
Expected fingerprint: abc123...
Current fingerprint: def456...
Difference: Table 'users' was modified
To resolve this issue:
1. Regenerate the plan with current database state: pgschema plan ...
2. Review the new plan to ensure it's still correct
3. Apply the new plan: pgschema apply ...
```
### Version Compatibility
Plans include version information to ensure compatibility:
* **pgschema version**: Must match the version used to generate the plan
* **Plan format version**: Must be supported by the current pgschema version
### Transaction Handling
pgschema automatically determines whether changes can run in a transaction:
* **Transactional mode** (default): All changes run in a single transaction with automatic rollback on failure
* **Non-transactional mode**: Some operations (like `CREATE INDEX CONCURRENTLY`) run outside transactions
```
Transaction: true # Changes will run in a transaction
Transaction: false # Some changes cannot run in a transaction
```
### No-op Detection
If no changes are needed, pgschema skips execution:
```
No changes to apply. Database schema is already up to date.
```
# Dump
Source: https://www.pgschema.com/cli/dump
The `dump` command extracts a PostgreSQL database schema for a specific schema and outputs it in a developer-friendly format. The dumped schema serves as a baseline that developers can modify and apply to target databases using the `plan` and `apply` commands.
## Overview
The dump command provides comprehensive schema extraction with:
1. Single schema targeting (defaults to 'public')
2. Dependency-aware object ordering
3. Cross-schema reference handling with smart qualification
4. Developer-friendly SQL output format
5. Single-file and multi-file organization options
## Basic Usage
```bash
# Dump default schema (public)
pgschema dump --host localhost --db myapp --user postgres --password mypassword
# Dump specific schema
pgschema dump --host localhost --db myapp --user postgres --password mypassword --schema myschema
# Save to file
pgschema dump --host localhost --db myapp --user postgres --password mypassword > schema.sql
# Multi-file organized output
pgschema dump --host localhost --db myapp --user postgres --password mypassword --multi-file --file schema.sql
```
## Integration with Plan/Apply
```bash
# 1. Dump current production schema
pgschema dump --host prod-host --db myapp --user postgres --schema public > current.sql
# 2. Make modifications to current.sql (now desired state)
# 3. Plan changes against staging
pgschema plan --host staging-host --db myapp --user postgres --file current.sql
# 4. Apply changes if plan looks good
pgschema apply --host staging-host --db myapp --user postgres --file current.sql
```
## Connection Options
Database server host
Database server port
Database name
Database user name
Database password (can also use PGPASSWORD environment variable)
You can provide the password in two ways:
```bash Environment Variable (Recommended)
PGPASSWORD=mypassword pgschema dump \
--host localhost \
--db myapp \
--user postgres
```
```bash Command Line Flag
pgschema dump \
--host localhost \
--db myapp \
--user postgres \
--password mypassword
```
Schema name to dump
## Output Options
Output schema to multiple files organized by object type. See [Multi-file Schema Management Workflow](/workflow/multi-file-schema).
When enabled, creates a structured directory with:
* Main file with header and include statements
* Separate directories for different object types (tables, views, functions, etc.)
* Each database object in its own file
Requires `--file` to specify the main output file path.
Output file path (required when --multi-file is used)
For single-file mode, this is optional (defaults to stdout).
For multi-file mode, this specifies the main file path.
## Examples
### Schema Dump
```bash
# Dump default schema (public)
pgschema dump --host localhost --db myapp --user postgres
# Dump specific schema
pgschema dump --host localhost --db myapp --user postgres --schema analytics
```
Example output:
```sql
--
-- pgschema database dump
--
-- Dumped from database version PostgreSQL 17.5
-- Dumped by pgschema version 1.0.0
--
-- Name: users; Type: TABLE; Schema: -; Owner: -
--
CREATE TABLE IF NOT EXISTS users (
id SERIAL PRIMARY KEY,
name VARCHAR(255) NOT NULL,
email VARCHAR(255) UNIQUE,
created_at TIMESTAMP DEFAULT CURRENT_TIMESTAMP
);
--
-- Name: idx_users_email; Type: INDEX; Schema: -; Owner: -
--
CREATE INDEX IF NOT EXISTS idx_users_email ON users(email);
```
### Multi-File Output
```bash
pgschema dump \
--host localhost \
--db myapp \
--user postgres \
--multi-file \
--file schema.sql
```
This creates a structured directory layout:
```
schema.sql # Main file with header and includes
├── tables/
│ ├── users.sql
│ ├── orders.sql
│ └── products.sql
├── views/
│ └── user_stats.sql
├── functions/
│ └── update_timestamp.sql
└── procedures/
└── cleanup_old_data.sql
```
The main `schema.sql` file contains:
```sql
--
-- pgschema database dump
--
-- Dumped from database version PostgreSQL 17.5
-- Dumped by pgschema version 1.0.0
\i tables/users.sql
\i tables/orders.sql
\i tables/products.sql
\i views/user_stats.sql
\i functions/update_timestamp.sql
\i procedures/cleanup_old_data.sql
```
Each individual file (e.g., `tables/users.sql`) contains the specific object definition:
```sql
--
-- Name: users; Type: TABLE; Schema: -; Owner: -
--
CREATE TABLE IF NOT EXISTS users (
id SERIAL PRIMARY KEY,
name VARCHAR(255) NOT NULL,
email VARCHAR(255) UNIQUE,
created_at TIMESTAMP DEFAULT CURRENT_TIMESTAMP
);
--
-- Name: idx_users_email; Type: INDEX; Schema: -; Owner: -
--
CREATE INDEX IF NOT EXISTS idx_users_email ON users(email);
--
-- Name: users; Type: RLS; Schema: -; Owner: -
--
ALTER TABLE users ENABLE ROW LEVEL SECURITY;
```
## Schema Qualification
`pgschema` uses smart schema qualification to make dumps portable:
* **Objects within the dumped schema**: No schema qualifier added
* **Objects from other schemas**: Fully qualified with schema name
This approach makes the dump suitable as a baseline that can be applied to different schemas, particularly useful for multi-tenant applications.
```bash
# Dump the 'public' schema
pgschema dump --host localhost --db myapp --user postgres --schema public
```
Output for objects within 'public' schema (no qualification):
```sql
-- Objects in the dumped schema have no qualifier
CREATE TABLE users (
id SERIAL PRIMARY KEY,
name VARCHAR(255) NOT NULL
);
CREATE TABLE orders (
id SERIAL PRIMARY KEY,
user_id INTEGER REFERENCES users(id), -- Same schema, no qualifier
product_id INTEGER REFERENCES catalog.products(id) -- Different schema, qualified
);
```
This qualification strategy enables using one schema as a template for multiple tenants:
```bash
# 1. Dump the template schema
pgschema dump --host localhost --db myapp --user postgres --schema template > template.sql
# 2. Apply to different tenant schemas
pgschema apply --host localhost --db myapp --user postgres --schema tenant1 --file template.sql
pgschema apply --host localhost --db myapp --user postgres --schema tenant2 --file template.sql
pgschema apply --host localhost --db myapp --user postgres --schema tenant3 --file template.sql
```
Because objects within the schema are not qualified, they will be created in whichever schema you specify during the apply command.
# Plan
Source: https://www.pgschema.com/cli/plan
The `plan` command generates a migration plan to apply a desired schema state to a target database schema. It compares the desired state (from a file) with the current state of a specific schema and shows what changes would be applied.
## Overview
The plan command follows infrastructure-as-code principles similar to Terraform:
1. Read the desired state from a SQL file (with include directive support)
2. Connect to the target database and analyze current state of the specified schema
3. Compare the two states
4. Generate a detailed migration plan with proper dependency ordering
5. Display the plan without making any changes
## Basic Usage
```bash
# Generate plan to apply schema.sql to the target database
pgschema plan --host localhost --db myapp --user postgres --password mypassword --file schema.sql
# Plan with specific schema
pgschema plan --host localhost --db myapp --user postgres --password mypassword --schema myschema --file schema.sql
# Generate JSON output for automation
pgschema plan --host localhost --db myapp --user postgres --password mypassword --file schema.sql --output-json stdout
# Generate SQL migration script
pgschema plan --host localhost --db myapp --user postgres --password mypassword --file schema.sql --output-sql stdout
# Save multiple output formats simultaneously
pgschema plan --host localhost --db myapp --user postgres --password mypassword --file schema.sql \
--output-human plan.txt --output-json plan.json --output-sql migration.sql
# Disable colored output (useful for scripts or CI/CD)
pgschema plan --host localhost --db myapp --user postgres --password mypassword --file schema.sql --no-color
```
## Connection Options
Database server host
Database server port
Database name
Database user name
Database password (can also use PGPASSWORD environment variable)
You can provide the password in two ways:
```bash Environment Variable (Recommended)
PGPASSWORD=mypassword pgschema plan \
--host localhost \
--db myapp \
--user postgres \
--file schema.sql
```
```bash Command Line Flag
pgschema plan \
--host localhost \
--db myapp \
--user postgres \
--password mypassword \
--file schema.sql
```
Schema name to target for comparison
## Plan Options
Path to desired state SQL schema file
Output human-readable format to stdout or file path
Examples:
* `--output-human stdout` - Display to terminal
* `--output-human plan.txt` - Save to file
Output JSON format to stdout or file path
This JSON format is the same format accepted by the [apply command](/cli/apply) for executing migration plans.
Examples:
* `--output-json stdout` - Display to terminal
* `--output-json plan.json` - Save to file
Output SQL format to stdout or file path
Examples:
* `--output-sql stdout` - Display to terminal
* `--output-sql migration.sql` - Save to file
Disable colored output for human format when writing to stdout
This is useful for:
* Scripts and automation that need to parse output
* CI/CD environments that don't support color codes
* Redirecting output to files where color codes are unwanted
Note: This flag only affects human format output to stdout. File output and JSON/SQL formats are never colored.
## Examples
### Default Human-Readable Output
```bash
pgschema plan --host localhost --db myapp --user postgres --file schema.sql
```
```
Plan: 2 to add, 1 to modify, 1 to drop.
Summary by type:
tables: 2 to add, 1 to modify, 1 to drop
indexes: 1 to add
functions: 1 to add
Tables:
+ users
+ posts
~ products
+ discount_rate (column)
- old_price (column)
- legacy_data
Indexes:
+ idx_users_email
Functions:
+ update_timestamp()
Transaction: true
DDL to be executed:
--------------------------------------------------
CREATE TABLE IF NOT EXISTS users (
id SERIAL PRIMARY KEY,
name VARCHAR(255) NOT NULL,
email VARCHAR(255) UNIQUE
);
CREATE TABLE IF NOT EXISTS posts (
id SERIAL PRIMARY KEY,
title TEXT NOT NULL,
user_id INTEGER REFERENCES users(id)
);
CREATE INDEX idx_users_email ON users(email);
CREATE FUNCTION update_timestamp() RETURNS TRIGGER AS $$
BEGIN
NEW.updated_at = NOW();
RETURN NEW;
END;
$$ LANGUAGE plpgsql;
ALTER TABLE products ADD COLUMN discount_rate numeric(5,2);
ALTER TABLE products DROP COLUMN old_price;
DROP TABLE legacy_data;
```
### JSON Output for Automation
```bash
pgschema plan \
--host localhost \
--db myapp \
--user postgres \
--file schema.sql \
--output-json stdout
```
```json
{
"version": "1.0.0",
"pgschema_version": "1.0.0",
"created_at": "2025-01-15T10:30:00Z",
"source_fingerprint": {
"hash": "abc123def456..."
},
"diffs": [
{
"sql": "CREATE TABLE IF NOT EXISTS users (\n id SERIAL PRIMARY KEY,\n name VARCHAR(255) NOT NULL,\n email VARCHAR(255) UNIQUE\n);",
"type": "table",
"operation": "create",
"path": "public.users",
"source": {
"schema": "public",
"name": "users",
"type": "BASE_TABLE",
"columns": [
{
"name": "id",
"position": 1,
"data_type": "integer",
"is_nullable": false,
"default_value": "nextval('users_id_seq'::regclass)"
},
{
"name": "name",
"position": 2,
"data_type": "character varying",
"is_nullable": false,
"character_maximum_length": 255
}
],
"constraints": {
"users_pkey": {
"schema": "public",
"table": "users",
"name": "users_pkey",
"type": "PRIMARY_KEY",
"columns": [
{
"name": "id",
"position": 1
}
]
}
}
},
"can_run_in_transaction": true
}
]
}
```
### SQL Migration Script
```bash
pgschema plan \
--host localhost \
--db myapp \
--user postgres \
--file schema.sql \
--output-sql stdout
```
```sql
CREATE TABLE IF NOT EXISTS users (
id SERIAL PRIMARY KEY,
name VARCHAR(255) NOT NULL,
email VARCHAR(255) UNIQUE
);
CREATE TABLE IF NOT EXISTS posts (
id SERIAL PRIMARY KEY,
title TEXT NOT NULL,
user_id INTEGER REFERENCES users(id)
);
CREATE INDEX idx_users_email ON users(email);
CREATE FUNCTION update_timestamp() RETURNS TRIGGER AS $$
BEGIN
NEW.updated_at = NOW();
RETURN NEW;
END;
$$ LANGUAGE plpgsql;
ALTER TABLE products ADD COLUMN discount_rate numeric(5,2);
ALTER TABLE products DROP COLUMN old_price;
DROP TABLE legacy_data;
```
### Plan for Specific Schema
```bash
pgschema plan \
--host localhost \
--db multi_tenant \
--user postgres \
--schema tenant1 \
--file tenant_schema.sql
```
## Use Cases
### Pre-deployment Validation
```bash
# Check what changes will be applied before deployment
pgschema plan \
--host prod-db \
--db myapp \
--user readonly \
--file new_schema.sql
# If plan looks good, proceed with apply
pgschema apply \
--host prod-db \
--db myapp \
--user deployer \
--file new_schema.sql
```
### CI/CD Integration
```yaml
# GitHub Actions example
- name: Validate Schema Changes
run: |
pgschema plan \
--host ${{ secrets.DB_HOST }} \
--db ${{ secrets.DB_NAME }} \
--user ${{ secrets.DB_USER }} \
--file schema/proposed.sql \
--output-json plan.json \
--no-color
# Check if there are destructive changes
if jq -e '.summary.to_destroy > 0' plan.json; then
echo "Warning: Destructive changes detected!"
exit 1
fi
```
### Change Tracking
```bash
# Generate plan and save for audit
DATE=$(date +%Y%m%d_%H%M%S)
pgschema plan \
--host localhost \
--db myapp \
--user postgres \
--file schema.sql \
--output-sql "migrations/plan_${DATE}.sql"
```
### Multiple Output Formats
You can generate multiple output formats simultaneously:
```bash
# Save all formats for comprehensive documentation
pgschema plan \
--host localhost \
--db myapp \
--user postgres \
--file schema.sql \
--output-human plan.txt \
--output-json plan.json \
--output-sql migration.sql
# Display human-readable format and save JSON for automation
pgschema plan \
--host localhost \
--db myapp \
--user postgres \
--file schema.sql \
--output-human stdout \
--output-json automation/plan.json \
--no-color
```
Note: Only one output format can use `stdout`. If no output flags are specified, the command defaults to human-readable output to stdout with colors enabled.
## Comparison Direction
The plan command is **unidirectional**: it always plans changes from the current state (database) to the desired state (file).
```
Current State (Database) → Desired State (File)
```
This ensures:
* Consistent infrastructure-as-code workflow
* Clear source of truth (the file)
* Predictable change direction
## Include Directive Support
The plan command supports include directives in schema files, allowing you to organize your schema across multiple files:
```sql
-- main.sql
\i tables/users.sql
\i tables/posts.sql
\i functions/triggers.sql
```
The include processor will resolve all includes relative to the directory containing the main schema file.
# For Coding Agent
Source: https://www.pgschema.com/coding-agent
This guide shows how to integrate pgschema with AI coding agents.
## llms.txt
pgschema provides official llms.txt files for AI agents that support [llms.txt](https://llmstxt.org/) context:
* **Concise version**: [pgschema.com/llms.txt](https://www.pgschema.com/llms.txt) - Essential commands and patterns
* **Full version**: [pgschema.com/llms-full.txt](https://www.pgschema.com/llms-full.txt) - Complete API reference and examples
AI agents can automatically fetch these context files to understand pgschema's core workflow: dump → edit → plan → apply.
## CLAUDE.md / AGENTS.md
For optimal code integration, add this configuration to your [CLAUDE.md](https://claude.md) or [AGENTS.md](https://agents.md/):
````markdown
## Project Overview
`pgschema` is a CLI tool that brings Terraform-style declarative schema migration workflow to PostgreSQL. It provides a dump/edit/plan/apply workflow for database schema changes:
- **Dump**: Extract current schema in a developer-friendly format
- **Edit**: Modify schema files to represent desired state
- **Plan**: Compare desired state with current database and generate migration plan
- **Apply**: Execute the migration with safety features like concurrent change detection
The tool supports PostgreSQL versions 14-17 and handles most common schema objects (tables, indexes, functions, views, constraints, etc.).
## Core Workflow
### 1. Dump Current Schema
Extract the current database schema in a clean, developer-friendly format:
```bash
# Basic dump
PGPASSWORD=password pgschema dump --host localhost --db myapp --user postgres > schema.sql
# Multi-file output for large schemas
pgschema dump --host localhost --db myapp --user postgres --multi-file --file schema.sql
# Specific schema (not public)
pgschema dump --host localhost --db myapp --user postgres --schema tenant1 > schema.sql
```
### 2. Edit Schema Files
Modify the dumped schema files to represent your desired state. pgschema compares the desired state (files) with current state (database) to generate migrations.
### 3. Generate Migration Plan
Preview what changes will be applied:
```bash
# Generate plan
PGPASSWORD=password pgschema plan --host localhost --db myapp --user postgres --file schema.sql
# Save plan in multiple formats
pgschema plan --host localhost --db myapp --user postgres --file schema.sql \
--output-human plan.txt --output-json plan.json --output-sql migration.sql
```
### 4. Apply Changes
Execute the migration:
```bash
# Apply from file (generate plan and apply)
PGPASSWORD=password pgschema apply --host localhost --db myapp --user postgres --file schema.sql
# Apply from pre-generated plan
pgschema apply --host localhost --db myapp --user postgres --plan plan.json
# Auto-approve for CI/CD
pgschema apply --host localhost --db myapp --user postgres --file schema.sql --auto-approve
```
## Key Features
### Connection Options
Use these connection parameters for all commands:
- `--host` - Database host (default: localhost)
- `--port` - Database port (default: 5432)
- `--db` - Database name (required)
- `--user` - Database user (required)
- `--password` - Database password (or use PGPASSWORD environment variable)
- `--schema` - Target schema (default: public)
### Multi-File Schema Management
For large schemas, use `--multi-file` to organize by object type:
```bash
pgschema dump --host localhost --db myapp --user postgres --multi-file --file schema/main.sql
```
Creates organized directory structure:
```
schema/
├── main.sql # Contains \i include directives
├── tables/
├── views/
├── functions/
└── indexes/
```
### Online DDL Support
pgschema automatically uses safe patterns for production:
- `CREATE INDEX CONCURRENTLY` for new indexes
- `NOT VALID` + `VALIDATE CONSTRAINT` for constraints
- Progress monitoring for long-running operations
### Safety Features
- **Schema fingerprinting**: Detects concurrent schema changes
- **Transaction handling**: Automatic rollback on failure
- **Dependency ordering**: Objects created/dropped in correct order
- **Lock timeout control**: `--lock-timeout` for production safety
## Common Use Cases
### Development Workflow
```bash
# 1. Dump production schema
pgschema dump --host prod --db myapp --user postgres > baseline.sql
# 2. Make changes to baseline.sql (desired state)
# 3. Test against staging
pgschema plan --host staging --db myapp --user postgres --file baseline.sql
# 4. Apply to staging
pgschema apply --host staging --db myapp --user postgres --file baseline.sql
```
### Multi-Tenant Schema Management
```bash
# Dump template schema
pgschema dump --host localhost --db myapp --user postgres --schema template > template.sql
# Apply to multiple tenants
pgschema apply --host localhost --db myapp --user postgres --schema tenant1 --file template.sql
pgschema apply --host localhost --db myapp --user postgres --schema tenant2 --file template.sql
```
### CI/CD Integration
```bash
# Generate and save plan for review
pgschema plan --host prod --db myapp --user postgres --file schema.sql \
--output-json plan.json --no-color
# Apply in deployment
pgschema apply --host prod --db myapp --user postgres --plan plan.json --auto-approve
```
## Supported Schema Objects
pgschema handles most common PostgreSQL schema objects:
- **Tables**: Full DDL including columns, constraints, defaults
- **Indexes**: Regular and partial indexes with concurrent creation
- **Views**: Regular and materialized views
- **Functions**: PL/pgSQL and SQL functions with all options
- **Procedures**: Stored procedures
- **Triggers**: Table triggers with dependency handling
- **Types**: Custom types (enum, composite, domain)
- **Constraints**: Primary keys, foreign keys, unique, check constraints
- **Sequences**: Auto-generated and custom sequences
- **Policies**: Row-level security policies
- **Comments**: Comments on all supported objects
For unsupported objects, see the documentation.
## Additional Resources
- **Concise reference**: [pgschema.com/llms.txt](https://www.pgschema.com/llms.txt) - Essential commands and patterns
- **Complete reference**: [pgschema.com/llms-full.txt](https://www.pgschema.com/llms-full.txt) - Full API reference and examples
- **Documentation**: [pgschema.com](https://www.pgschema.com) - Complete documentation
````
# FAQ
Source: https://www.pgschema.com/faq
## Getting Help
* Report bugs or request features? 👉 [GitHub Issues](https://github.com/pgschema/pgschema/issues)
* Community for pgschema users? 👉 Join [Discord](https://discord.gg/rvgZCYuJG4)
* Need commercial support? 👉 [Contact us](mailto:support@bytebase.com)
## Compatibility
### Which PostgreSQL versions are supported?
pgschema is tested with PostgreSQL versions 14, 15, 16, and 17. While it may work with older versions, we recommend using one of these tested versions for the best experience.
### Can I use pgschema with cloud PostgreSQL services?
Yes, pgschema works with any PostgreSQL-compatible database that you can connect to, including:
* Amazon RDS for PostgreSQL
* Google Cloud SQL for PostgreSQL
* Azure Database for PostgreSQL
* Supabase
* Neon
* And other PostgreSQL-compatible services
### How do I handle database-specific settings?
pgschema focuses on schema structure (tables, indexes, functions, etc.) and doesn't manage:
* Database-level settings
* User/role management
* Tablespace configuration
* Extensions
These should be managed separately through your infrastructure tooling. See [unsupported syntax](/syntax/unsupported).
### What happens if a migration fails?
1. For most changes, pgschema executes them in a transaction and will roll back on failure
2. For changes containing non-transactional statements (like `CREATE INDEX CONCURRENTLY`), each statement runs in its own transaction
3. Your database will remain in its previous state for transactional changes. When migrations include non-transactional DDL statements, partial application may occur if a later statement fails
4. You'll see a clear error message indicating what went wrong
5. Fix the issue in your schema file and try again
## Troubleshooting
### Why does pgschema show no changes when I expect some?
Common causes:
* The changes are in objects pgschema doesn't track yet
* The database already matches your desired state
* You're comparing against the wrong schema (check [`--schema`](/cli/plan#param-schema) flag)
Run with `--debug` flag for more detailed output.
### How do I debug connection issues?
For connection problems:
1. Verify PostgreSQL is running: `pg_isready -h host -p port`
2. Check your credentials and permissions
3. Ensure the database exists
4. Check network/firewall settings
5. Try connecting with `psql` using the same parameters
### What permissions does pgschema need?
pgschema needs:
* `CONNECT` privilege on the database
* `USAGE` privilege on the target schema
* `CREATE` privilege on the schema (for new objects)
* Appropriate privileges for all object types you're managing
For read-only operations (dump, plan), only `SELECT` privileges are needed.
## Advanced Topics
### How does pgschema handle dependencies?
pgschema automatically:
* Detects dependencies between database objects
* Orders DDL statements to respect dependencies
* Creates objects in the correct order
* Drops objects in reverse dependency order
### How does pgschema detect concurrent schema changes?
pgschema uses fingerprinting to detect if the database schema has changed since the migration plan was created:
* A fingerprint (hash) of the current schema is calculated during planning
* Before applying changes, pgschema verifies the fingerprint still matches
* If the schema has changed (concurrent modifications), the apply operation will fail safely
* This prevents conflicts and ensures migrations are applied to the expected schema state
### Can I use pgschema for database comparisons?
Yes! You can compare schemas across databases:
```bash
# Dump both schemas
pgschema dump --host db1 --db myapp > schema1.sql
pgschema dump --host db2 --db myapp > schema2.sql
# Compare with diff
diff schema1.sql schema2.sql
```
## License
See [pgschema Community License](https://github.com/pgschema/pgschema/blob/main/LICENSE).
**Q: Can I use pgschema for my startup?**\
Yes, if your company’s annual gross revenue is ≤ US \$10M and you are not competing with pgschema.
**Q: I’m a large company using pgschema internally. Do I need a license?**\
Yes, if your company’s total global annual gross revenue is > US \$10M.
**Q: What counts as “competing with pgschema”?**\
Offering software or services that are managing, transforming, or validating PostgreSQL schema for others.
**Q: How is the \$10M threshold calculated?**
* Total annual gross revenue before deductions
* Includes all affiliates, parents, and subsidiaries
* Based on the prior fiscal year
**Q: What if I want to remove these restrictions?**\
[Contact us](mailto:support@bytebase.com) for a commercial license.
# Introduction
Source: https://www.pgschema.com/index
Declarative schema migration for Postgres
export const AsciinemaPlayer = ({recordingId, title = "Terminal Recording", height}) =>
;
 ## What is pgschema?
`pgschema` is a CLI tool that brings terraform-style declarative schema migration workflow to Postgres:
* **Dump** a Postgres schema in a developer-friendly format with support for all common objects
* **Edit** a schema to the desired state
* **Plan** a schema migration by comparing desired state with current database state
* **Apply** a schema migration with concurrent change detection, transaction-adaptive execution, and lock timeout control
Think of it as Terraform for your Postgres schemas - declare your desired state, generate plan, preview changes, and apply them with confidence.
Watch in action:
## Why pgschema?
Traditional database migration tools often require you to write migrations manually or rely on ORMs that may not support all Postgres features. pgschema takes a different approach:
* **Declarative**: Define your desired schema state in SQL files
* **Schema-based**: Compare at the schema level instead of the database level to reconcile schemas across different tenants
* **Comprehensive**: Support most common Postgres objects under a schema
* **Transparent**: Show exactly what SQL will be executed before applying changes
## Getting Started
Install pgschema using Go or download pre-built binaries
Learn the basics with a hands-on tutorial
# Installation
Source: https://www.pgschema.com/installation
If you have Go 1.23.0 or later installed, you can install pgschema directly:
```bash
go install github.com/pgschema/pgschema@latest
```
This will install the latest version of pgschema to your `$GOPATH/bin` directory.
After installation, verify that pgschema is working correctly:
```bash
# View help and check version
pgschema --help
```
Run pgschema using Docker without installing it locally:
```bash
# Pull the latest image
docker pull pgschema/pgschema:latest
# Run pgschema commands
docker run --rm pgschema/pgschema:latest --help
```
```bash
# Dump a localhost database (requires --network host)
docker run --rm --network host \
-e PGPASSWORD=mypassword \
pgschema/pgschema:latest dump \
--host localhost \
--port 5432 \
--db mydb \
--schema public \
--user myuser > schema.sql
```
```bash
# Plan migration and save to plan.json on host
docker run --rm --network host \
-v "$(pwd):/workspace" \
-e PGPASSWORD=mypassword \
pgschema/pgschema:latest plan \
--host localhost \
--port 5432 \
--db mydb \
--schema public \
--user myuser \
--file /workspace/schema.sql \
--output-json /workspace/plan.json
```
```bash
# Apply changes using the saved plan.json
docker run --rm --network host \
-v "$(pwd):/workspace" \
-e PGPASSWORD=mypassword \
pgschema/pgschema:latest apply \
--host localhost \
--port 5432 \
--db mydb \
--schema public \
--user myuser \
--plan /workspace/plan.json
```
**Important Docker Usage Notes:**
* Use `--network host` when connecting to databases on localhost/127.0.0.1
* Mount volumes with `-v "$(pwd):/workspace"` to access local schema files
* Files inside the container should be referenced with `/workspace/` prefix
Download pre-built binaries from the [GitHub releases page](https://github.com/pgschema/pgschema/releases).
**MacOS (Apple Silicon):**
```bash
curl -L https://github.com/pgschema/pgschema/releases/download/v1.0.0/pgschema-darwin-arm64 -o pgschema
chmod +x pgschema
sudo mv pgschema /usr/local/bin/
```
**Linux**
```bash
curl -L https://github.com/pgschema/pgschema/releases/download/v1.0.0/pgschema-linux-amd64 -o pgschema
chmod +x pgschema
sudo mv pgschema /usr/local/bin/
```
Clone the repository and build from source:
```bash
# Clone the repository
git clone https://github.com/pgschema/pgschema.git
cd pgschema
# Build the binary
go build -v -o pgschema .
# Optional: Install to system
sudo mv pgschema /usr/local/bin/
```
Building from source requires Go 1.23.0 or later.
# Quickstart
Source: https://www.pgschema.com/quickstart
This guide will walk you through the core pgschema workflow: dumping a schema, making edits, planning changes, and applying migrations. By the end, you'll understand how to manage Postgres schemas declaratively.
## Prerequisites
Before starting, ensure you have:
* pgschema installed ([see installation guide](/installation))
* Access to a PostgreSQL database (14+)
* Database credentials with appropriate permissions
## Step 1: Dump Your Current Schema
First, let's capture the current state of your database schema:
```bash
$ PGPASSWORD=testpwd1 pgschema dump \
--host localhost \
--db testdb \
--user postgres \
--schema public > schema.sql
```
This creates a `schema.sql` file containing your complete schema definition. Let's look at what it contains:
```sql schema.sql
-- Example output
CREATE TABLE users (
id SERIAL PRIMARY KEY,
email VARCHAR(255) UNIQUE NOT NULL,
created_at TIMESTAMP DEFAULT NOW()
);
CREATE INDEX idx_users_email ON users(email);
```
The output is clean and developer-friendly, unlike the verbose output from `pg_dump`.
## Step 2: Make Schema Changes
Now, let's modify the `schema.sql` file to add new features. Edit the file to include:
```sql schema.sql (modified)
CREATE TABLE users (
id SERIAL PRIMARY KEY,
email VARCHAR(255) UNIQUE NOT NULL,
name VARCHAR(100), -- New column
created_at TIMESTAMP DEFAULT NOW(),
updated_at TIMESTAMP DEFAULT NOW() -- New column
);
-- New index
CREATE INDEX idx_users_name ON users(name);
CREATE INDEX idx_users_email ON users(email);
-- New table
CREATE TABLE posts (
id SERIAL PRIMARY KEY,
user_id INTEGER REFERENCES users(id),
title VARCHAR(200) NOT NULL,
content TEXT,
created_at TIMESTAMP DEFAULT NOW()
);
```
## Step 3: Generate Plan
```bash
$ PGPASSWORD=testpwd1 pgschema plan \
--host localhost \
--db testdb \
--user postgres \
--schema public \
--file schema.sql \
--output-json plan.json \
--output-human stdout
```
This will save the migration plan to `plan.json` and print the human-readable version to `stdout`:
```sql plan.txt
Plan: 2 to add, 1 to modify.
Summary by type:
tables: 1 to add, 1 to modify
indexes: 1 to add
Tables:
+ public.posts
~ public.users
+ column name
+ column updated_at
Indexes:
+ public.idx_users_name
Transaction: true
DDL to be executed:
--------------------------------------------------
ALTER TABLE users
ADD COLUMN name VARCHAR(100);
ALTER TABLE users
ADD COLUMN updated_at TIMESTAMP DEFAULT NOW();
CREATE INDEX idx_users_name ON users (name);
CREATE TABLE posts (
id SERIAL NOT NULL,
user_id integer,
title VARCHAR(200) NOT NULL,
content text,
created_at timestamp DEFAULT NOW(),
PRIMARY KEY (id),
FOREIGN KEY (user_id) REFERENCES users (id)
);
```
## Step 4: Apply Changes
When you're ready to apply the changes:
```bash
# Apply using the plan file from Step 3
$ PGPASSWORD=testpwd1 pgschema apply \
--host localhost \
--db testdb \
--user postgres \
--schema public \
--plan plan.json
```
### Alternative: Direct Apply
You can also skip the separate planning step and apply changes directly from the schema file:
```bash
# Apply directly from schema file (combines plan + apply)
$ PGPASSWORD=testpwd1 pgschema apply \
--host localhost \
--db testdb \
--user postgres \
--schema public \
--file schema.sql
```
This approach automatically generates the plan internally and applies the changes in one command.
The two-phase workflow (plan then apply) is recommended for production environments where you want to review and save the plan before execution. Direct apply is convenient for development environments.
pgschema will:
1. Show you the migration plan
2. Ask for confirmation (unless using [`--auto-approve`](/cli/apply#param-auto-approve))
3. Apply the changes
4. Report success or any errors
# COMMENT ON
Source: https://www.pgschema.com/syntax/comment_on
## Syntax
```sql
comment_on ::= COMMENT ON object_type object_name IS 'comment_text'
| COMMENT ON object_type object_name IS NULL
object_type ::= COLUMN | INDEX | TABLE | VIEW
object_name ::= [schema.]name
| [schema.]table_name.column_name -- for columns
```
`COMMENT ON` is supported for the following objects:
* Column
* Index
* Table
* View
# CREATE DOMAIN
Source: https://www.pgschema.com/syntax/create_domain
## Syntax
```sql
create_domain ::= CREATE DOMAIN domain_name AS data_type
[ DEFAULT expression ]
[ NOT NULL ]
[ constraint_definition [, ...] ]
domain_name ::= [schema.]name
constraint_definition ::= CHECK ( expression )
| CONSTRAINT constraint_name CHECK ( expression )
```
pgschema understands the following `CREATE DOMAIN` features:
* **Schema-qualified names**: Domains can be defined in specific schemas
* **Base types**: Any valid PostgreSQL data type as the underlying type
* **Default values**: Default expressions for the domain
* **NOT NULL constraints**: Enforce non-null values
* **CHECK constraints**:
* Anonymous CHECK constraints
* Named constraints with CONSTRAINT clause
* Multiple constraints per domain
* Expressions using VALUE keyword to reference the domain value
## Canonical Format
When generating migration SQL, pgschema produces domains in the following canonical format:
```sql
-- Simple domain without constraints
CREATE DOMAIN [schema.]domain_name AS data_type;
-- Domain with constraints (multi-line format)
CREATE DOMAIN [schema.]domain_name AS data_type
[ DEFAULT expression ]
[ NOT NULL ]
[ CONSTRAINT constraint_name CHECK ( expression ) ]
[ CHECK ( expression ) ];
```
**Key characteristics of the canonical format:**
* Uses single-line format for simple domains without constraints
* Uses multi-line format with indentation when domain has constraints, defaults, or NOT NULL
* DEFAULT clause appears before NOT NULL when both are present
* Named constraints use `CONSTRAINT constraint_name` prefix
* Anonymous constraints are listed without the CONSTRAINT keyword
* Each constraint is on its own indented line for readability
* For DROP operations: `DROP DOMAIN IF EXISTS domain_name RESTRICT;`
**Note**: Domain modifications in pgschema currently require dropping and recreating the domain, as PostgreSQL has limited ALTER DOMAIN support and complex dependencies make in-place modifications challenging.
# CREATE FUNCTION
Source: https://www.pgschema.com/syntax/create_function
## Syntax
```sql
create_function ::= CREATE [ OR REPLACE ] FUNCTION function_name
( [ parameter_list ] )
RETURNS return_type
LANGUAGE language_name
[ SECURITY { DEFINER | INVOKER } ]
[ volatility ]
[ STRICT ]
AS function_body
function_name ::= [schema.]name
parameter_list ::= parameter [, ...]
parameter ::= [ parameter_mode ] [ parameter_name ] parameter_type [ DEFAULT default_value ]
parameter_mode ::= IN | OUT | INOUT
argument_list ::= data_type [, ...]
return_type ::= data_type
| SETOF data_type
| TABLE ( column_name data_type [, ...] )
| trigger
language_name ::= plpgsql | sql | c | internal
volatility ::= IMMUTABLE | STABLE | VOLATILE
function_body ::= 'definition'
| $$definition$$
| $tag$definition$tag$
```
pgschema understands the following `CREATE FUNCTION` features:
* **Schema-qualified names**: Functions can be defined in specific schemas
* **Parameters**:
* IN, OUT, INOUT parameter modes
* Default parameter values
* Named parameters with data types
* **Return types**:
* Scalar data types
* SETOF for set-returning functions
* TABLE for table-returning functions
* trigger for trigger functions
* **Languages**: Any PostgreSQL procedural language (plpgsql, sql, c, internal, etc.)
* **Security**: DEFINER or INVOKER
* **Volatility**: IMMUTABLE, STABLE, or VOLATILE
* **STRICT**: Returns NULL automatically if any argument is NULL
* **Function body**: Any valid function definition with proper dollar-quoting
## Canonical Format
When generating migration SQL, pgschema produces functions in the following canonical format:
```sql
CREATE OR REPLACE FUNCTION [schema.]function_name(
parameter_name parameter_type[ DEFAULT default_value][,
...]
)
RETURNS return_type
LANGUAGE language_name
SECURITY { DEFINER | INVOKER }
[ IMMUTABLE | STABLE | VOLATILE ]
[ STRICT ]
AS $tag$function_body$tag$;
```
**Key characteristics of the canonical format:**
* Always uses `CREATE OR REPLACE FUNCTION` for modifications
* Parameters are formatted with line breaks for readability
* Explicitly specifies SECURITY mode (`INVOKER` is default if not specified)
* Includes volatility when specified
* Includes STRICT when the function should return NULL on NULL input
* Uses intelligent dollar-quoting with automatic tag generation to avoid conflicts with function body content
* For DROP operations: `DROP FUNCTION IF EXISTS function_name(argument_types);`
# CREATE INDEX
Source: https://www.pgschema.com/syntax/create_index
## Syntax
```sql
create_index ::= CREATE [ UNIQUE ] INDEX [ CONCURRENTLY ] [ IF NOT EXISTS ] index_name
ON table_name [ USING method ]
( index_element [, ...] )
[ WHERE condition ]
index_name ::= name
table_name ::= [schema.]name
method ::= btree | hash | gist | spgist | gin | brin
index_element ::= column_name [ direction ] [ operator_class ]
| ( expression ) [ direction ] [ operator_class ]
direction ::= ASC | DESC
operator_class ::= name
```
pgschema understands the following `CREATE INDEX` features:
* **Index types**:
* Regular indexes
* UNIQUE indexes for enforcing uniqueness
* Primary key indexes (handled with constraints)
* **Index methods**: btree (default), hash, gist, spgist, gin, brin
* **Concurrent creation**: CONCURRENTLY option for creating indexes without blocking writes
* **Columns and expressions**:
* Simple column indexes
* Multi-column indexes
* Expression/functional indexes (e.g., LOWER(column), JSON operators)
* **Sort direction**: ASC (default) or DESC for each column
* **Operator classes**: Custom operator classes for specialized indexing
* **Partial indexes**: WHERE clause for indexing subset of rows
* **Schema qualification**: Indexes can be created in specific schemas
## Canonical Format
When generating migration SQL, pgschema produces indexes in the following canonical format:
```sql
CREATE [UNIQUE] INDEX [CONCURRENTLY] IF NOT EXISTS index_name
ON [schema.]table_name [USING method] (
column_or_expression[ direction][,
...]
)[ WHERE condition];
```
**Key characteristics of the canonical format:**
* Always includes `IF NOT EXISTS` to prevent errors on re-running
* Includes `UNIQUE` when the index enforces uniqueness
* Includes `CONCURRENTLY` when specified (cannot run in a transaction)
* Only includes `USING method` when not btree (the default)
* Only includes direction when not ASC (the default)
* JSON expressions are wrapped in double parentheses: `((data->>'key'))`
* Partial index WHERE clause is included when present
* For DROP operations: `DROP INDEX IF EXISTS [schema.]index_name;`
**Note on transactions:**
* Regular index creation can run in a transaction
* `CREATE INDEX CONCURRENTLY` cannot run in a transaction and will be executed separately
# CREATE MATERIALIZED VIEW
Source: https://www.pgschema.com/syntax/create_materialized_view
## Syntax
```sql
create_materialized_view ::= CREATE MATERIALIZED VIEW [ IF NOT EXISTS ] view_name
AS select_statement
[ WITH [ NO ] DATA ]
view_name ::= [schema.]name
select_statement ::= SELECT ...
```
pgschema understands the following `CREATE MATERIALIZED VIEW` features:
* **Schema-qualified names**: Materialized views can be defined in specific schemas
* **IF NOT EXISTS**: Optional clause to avoid errors if the view already exists
* **AS clause**: Any valid SELECT statement that defines the view's contents
* **WITH \[NO] DATA**: Whether to populate the view immediately (WITH DATA) or defer population (WITH NO DATA)
## Canonical Format
When generating migration SQL, pgschema produces materialized views in the following canonical format:
```sql
CREATE MATERIALIZED VIEW IF NOT EXISTS [schema.]view_name AS
select_statement;
```
**Key characteristics of the canonical format:**
* Always uses `CREATE MATERIALIZED VIEW IF NOT EXISTS` for creation
* Schema qualification included when necessary
* Preserves the original SELECT statement formatting
* For modifications: Materialized views cannot use `CREATE OR REPLACE`, so changes require a drop/create cycle
* For DROP operations: `DROP MATERIALIZED VIEW IF EXISTS view_name;`
**Note on modifications:** Unlike regular views which support `CREATE OR REPLACE`, materialized views must be dropped and recreated when their definition changes. pgschema handles this automatically during migration planning.
# CREATE POLICY
Source: https://www.pgschema.com/syntax/create_policy
## Syntax
```sql
create_policy ::= CREATE POLICY policy_name ON table_name
[ AS { PERMISSIVE | RESTRICTIVE } ]
[ FOR command ]
[ TO { role_name | PUBLIC | CURRENT_USER | SESSION_USER } [, ...] ]
[ USING ( using_expression ) ]
[ WITH CHECK ( check_expression ) ]
policy_name ::= identifier
table_name ::= [schema.]table
command ::= ALL | SELECT | INSERT | UPDATE | DELETE
using_expression ::= sql_expression
check_expression ::= sql_expression
```
pgschema understands the following `CREATE POLICY` features:
* **Policy names**: Unique identifiers for Row Level Security policies
* **Table references**: Schema-qualified table names where policies apply
* **Policy type**:
* PERMISSIVE (default) - allows access when policy evaluates to true
* RESTRICTIVE - denies access unless policy evaluates to true
* **Commands**:
* ALL - applies to all commands
* SELECT - applies to SELECT queries
* INSERT - applies to INSERT commands
* UPDATE - applies to UPDATE commands
* DELETE - applies to DELETE commands
* **Roles**: Specific roles, PUBLIC, CURRENT\_USER, or SESSION\_USER that the policy applies to
* **USING clause**: Boolean expression checked for existing rows (SELECT, UPDATE, DELETE)
* **WITH CHECK clause**: Boolean expression checked for new rows (INSERT, UPDATE)
## Canonical Format
When generating migration SQL, pgschema produces policies in the following canonical format:
```sql
CREATE POLICY policy_name ON [schema.]table_name
[ FOR command ]
[ TO role_name[, ...] ]
[ USING expression ]
[ WITH CHECK expression ];
```
**Key characteristics of the canonical format:**
* Schema qualification is omitted for tables in the target schema
* The AS PERMISSIVE/RESTRICTIVE clause is omitted when PERMISSIVE (the default)
* FOR ALL is omitted as it's the default command
* Roles are listed in a consistent order
* USING and WITH CHECK expressions are preserved exactly as defined
* For ALTER operations that only change roles, USING, or WITH CHECK:
```sql
ALTER POLICY policy_name ON [schema.]table_name
[ TO role_name[, ...] ]
[ USING expression ]
[ WITH CHECK expression ];
```
* For changes requiring recreation (command or permissive/restrictive changes):
```sql
DROP POLICY IF EXISTS policy_name ON [schema.]table_name;
CREATE POLICY policy_name ON [schema.]table_name ...;
```
## Row Level Security
Policies require Row Level Security to be enabled on the table:
```sql
ALTER TABLE table_name ENABLE ROW LEVEL SECURITY;
```
pgschema automatically handles RLS enablement when policies are present and generates the appropriate `ALTER TABLE ... ENABLE/DISABLE ROW LEVEL SECURITY` statements in the migration plan.
# CREATE PROCEDURE
Source: https://www.pgschema.com/syntax/create_procedure
## Syntax
```sql
create_procedure ::= CREATE [ OR REPLACE ] PROCEDURE procedure_name
( [ parameter_list ] )
LANGUAGE language_name
AS procedure_body
procedure_name ::= [schema.]name
parameter_list ::= parameter [, ...]
parameter ::= [ parameter_mode ] [ parameter_name ] parameter_type [ DEFAULT default_value ]
parameter_mode ::= IN | OUT | INOUT
language_name ::= plpgsql | sql | c | internal
procedure_body ::= 'definition'
| $$definition$$
| $tag$definition$tag$
```
pgschema understands the following `CREATE PROCEDURE` features:
* **Schema-qualified names**: Procedures can be defined in specific schemas
* **Parameters**:
* IN, OUT, INOUT parameter modes
* Default parameter values
* Named parameters with data types
* **Languages**: Any PostgreSQL procedural language (plpgsql, sql, c, internal, etc.)
* **Procedure body**: Any valid procedure definition with proper dollar-quoting
## Canonical Format
When generating migration SQL, pgschema produces procedures in the following canonical format:
```sql
CREATE OR REPLACE PROCEDURE [schema.]procedure_name(
parameter_name parameter_type[ DEFAULT default_value][,
...]
)
LANGUAGE language_name
AS $tag$procedure_body$tag$;
```
**Key characteristics of the canonical format:**
* Always uses `CREATE OR REPLACE PROCEDURE` for modifications
* Parameters are formatted with line breaks for readability when multiple parameters exist
* Uses intelligent dollar-quoting with automatic tag generation to avoid conflicts with procedure body content
* For DROP operations: `DROP PROCEDURE IF EXISTS procedure_name(parameter_types);`
* The parameter\_types in DROP statements contain only the data types, not parameter names
# CREATE SEQUENCE
Source: https://www.pgschema.com/syntax/create_sequence
## Syntax
```sql
create_sequence ::= CREATE SEQUENCE [ IF NOT EXISTS ] sequence_name
[ AS data_type ]
[ INCREMENT [ BY ] increment ]
[ MINVALUE minvalue | NO MINVALUE ]
[ MAXVALUE maxvalue | NO MAXVALUE ]
[ START [ WITH ] start ]
[ CACHE cache ]
[ [ NO ] CYCLE ]
[ OWNED BY { table_name.column_name | NONE } ]
sequence_name ::= [schema.]name
data_type ::= smallint | integer | bigint
increment ::= integer
minvalue ::= integer
maxvalue ::= integer
start ::= integer
cache ::= integer
```
pgschema understands the following `CREATE SEQUENCE` features:
* **Schema-qualified names**: Sequences can be defined in specific schemas
* **Data types**: bigint (default), integer, smallint
* **START WITH**: Initial value of the sequence (default: 1)
* **INCREMENT BY**: Step value for sequence increments (default: 1)
* **MINVALUE/NO MINVALUE**: Minimum value for the sequence (default: 1 for ascending sequences)
* **MAXVALUE/NO MAXVALUE**: Maximum value for the sequence (default: 2^63-1 for bigint)
* **CYCLE/NO CYCLE**: Whether the sequence should wrap around when reaching min/max values
* **OWNED BY**: Associates the sequence with a table column for automatic cleanup
## Canonical Format
When generating migration SQL, pgschema produces sequences in the following canonical format:
```sql
CREATE SEQUENCE IF NOT EXISTS [schema.]sequence_name
[ START WITH start_value ]
[ INCREMENT BY increment_value ]
[ MINVALUE min_value ]
[ MAXVALUE max_value ]
[ CYCLE ];
```
**Key characteristics of the canonical format:**
* Always uses `IF NOT EXISTS` for CREATE operations
* Only includes parameters that differ from PostgreSQL defaults:
* START WITH is included if not 1
* INCREMENT BY is included if not 1
* MINVALUE is included if not 1
* MAXVALUE is included if not the data type maximum (9223372036854775807 for bigint)
* CYCLE is only included if enabled (default is NO CYCLE)
* For ALTER operations: `ALTER SEQUENCE sequence_name parameter_changes;`
* For DROP operations: `DROP SEQUENCE IF EXISTS sequence_name CASCADE;`
* CACHE specifications are included when they differ from the default (1)
* Data type specifications (AS bigint/integer/smallint) are included when explicitly specified
* OWNED BY relationships are tracked but managed separately through column dependencies
# CREATE TABLE
Source: https://www.pgschema.com/syntax/create_table
## Syntax
```sql
create_table ::= CREATE TABLE [ IF NOT EXISTS ] table_name
( [ column_definition [, ...] ] [ table_constraint [, ...] ] )
[ PARTITION BY { RANGE | LIST | HASH } ( { column_name | ( expression ) } ) ]
table_name ::= [schema.]name
column_definition ::= column_name data_type
[ NOT NULL | NULL ]
[ DEFAULT default_value ]
[ GENERATED { ALWAYS | BY DEFAULT } AS IDENTITY [ ( identity_option [, ...] ) ] ]
[ column_constraint [, ...] ]
column_constraint ::= [ CONSTRAINT constraint_name ]
{ PRIMARY KEY | UNIQUE | CHECK ( expression ) |
REFERENCES referenced_table [ ( referenced_column ) ]
[ ON DELETE { CASCADE | RESTRICT | SET NULL | SET DEFAULT } ]
[ ON UPDATE { CASCADE | RESTRICT | SET NULL | SET DEFAULT } ]
[ DEFERRABLE [ INITIALLY DEFERRED ] ] }
table_constraint ::= [ CONSTRAINT constraint_name ]
{ PRIMARY KEY ( column_name [, ...] ) |
UNIQUE ( column_name [, ...] ) |
CHECK ( expression ) |
FOREIGN KEY ( column_name [, ...] )
REFERENCES referenced_table [ ( referenced_column [, ...] ) ]
[ ON DELETE { CASCADE | RESTRICT | SET NULL | SET DEFAULT } ]
[ ON UPDATE { CASCADE | RESTRICT | SET NULL | SET DEFAULT } ]
[ DEFERRABLE [ INITIALLY DEFERRED ] ] }
data_type ::= { SMALLINT | INTEGER | BIGINT | DECIMAL | NUMERIC | REAL | DOUBLE PRECISION |
SMALLSERIAL | SERIAL | BIGSERIAL |
VARCHAR [ ( length ) ] | CHAR [ ( length ) ] | CHARACTER [ ( length ) ] |
CHARACTER VARYING [ ( length ) ] | TEXT |
DATE | TIME | TIMESTAMP | TIMESTAMPTZ | TIMETZ |
BOOLEAN | UUID | JSONB | JSON |
user_defined_type | ARRAY }
identity_option ::= { START WITH start_value | INCREMENT BY increment_value |
MAXVALUE max_value | NO MAXVALUE |
MINVALUE min_value | NO MINVALUE |
CYCLE | NO CYCLE }
default_value ::= literal | expression | function_call
```
pgschema understands the following `CREATE TABLE` features:
* **Schema-qualified names**: Tables can be created in specific schemas
* **Columns**:
* All PostgreSQL data types including user-defined types
* NULL/NOT NULL constraints
* DEFAULT values with expressions and function calls
* IDENTITY columns with GENERATED ALWAYS or BY DEFAULT
* Serial types (SMALLSERIAL, SERIAL, BIGSERIAL)
* **Constraints**:
* PRIMARY KEY (single or composite)
* UNIQUE constraints (single or composite)
* FOREIGN KEY references with referential actions (CASCADE, RESTRICT, SET NULL, SET DEFAULT)
* CHECK constraints with arbitrary expressions
* DEFERRABLE constraints with INITIALLY DEFERRED option
* **Partitioning**: PARTITION BY RANGE, LIST, or HASH
* **Row-level security**: RLS policies (handled separately)
* **Indexes**: Created via separate CREATE INDEX statements
* **Triggers**: Created via separate CREATE TRIGGER statements
## Canonical Format
When generating migration SQL, pgschema produces tables in the following canonical format. pgschema intelligently decides when to inline constraints with column definitions versus defining them as separate table constraints.
### Simple Table with Inline Constraints
```sql
CREATE TABLE IF NOT EXISTS users (
id SERIAL PRIMARY KEY,
email VARCHAR(255) NOT NULL UNIQUE,
age INTEGER CHECK (age >= 0),
created_at TIMESTAMP DEFAULT now()
);
```
### Complex Table with Mixed Inline and Separate Constraints
```sql
CREATE TABLE IF NOT EXISTS order_items (
order_id INTEGER NOT NULL REFERENCES orders(id) ON DELETE CASCADE,
item_id INTEGER NOT NULL REFERENCES items(id),
quantity INTEGER DEFAULT 1 CHECK (quantity > 0),
unit_price DECIMAL(10,2) NOT NULL,
discount_percent DECIMAL(5,2) DEFAULT 0.00 CHECK (discount_percent >= 0 AND discount_percent <= 100),
created_at TIMESTAMP NOT NULL DEFAULT now(),
updated_at TIMESTAMP,
CONSTRAINT pk_order_item PRIMARY KEY (order_id, item_id),
CONSTRAINT uk_order_item_position UNIQUE (order_id, position),
CONSTRAINT fk_order_item_supplier FOREIGN KEY (supplier_id, region)
REFERENCES suppliers(id, region) ON DELETE SET NULL ON UPDATE CASCADE,
CONSTRAINT chk_valid_dates CHECK (created_at <= updated_at),
CONSTRAINT chk_pricing CHECK (unit_price >= 0 AND (unit_price * quantity * (1 - discount_percent/100)) >= 0)
) PARTITION BY HASH (order_id);
```
### Identity and Serial Columns
```sql
CREATE TABLE IF NOT EXISTS products (
id BIGSERIAL PRIMARY KEY,
uuid UUID DEFAULT gen_random_uuid(),
version INTEGER GENERATED ALWAYS AS IDENTITY,
name VARCHAR(255) NOT NULL,
sku VARCHAR(50) UNIQUE,
price DECIMAL(10,2) DEFAULT 0.00
);
```
**Note on SERIAL types**: pgschema automatically detects and normalizes SERIAL columns (integer types with `nextval()` defaults) to their canonical SERIAL forms (SMALLSERIAL, SERIAL, BIGSERIAL) in CREATE TABLE statements.
### Constraint Handling Rules
**Inline Constraints (Column-Level)** - Added directly to the column definition:
* **PRIMARY KEY**: Single-column primary keys only (`id INTEGER PRIMARY KEY`)
* **UNIQUE**: Single-column unique constraints only (`email VARCHAR(255) UNIQUE`)
* **FOREIGN KEY**: Single-column foreign key references only (`user_id INTEGER REFERENCES users(id)`)
* **CHECK**: Single-column check constraints only (`age INTEGER CHECK (age >= 0)`)
**Separate Table Constraints** - Defined after all columns:
* **PRIMARY KEY**: Multi-column (composite) primary keys (`CONSTRAINT pk_name PRIMARY KEY (col1, col2)`)
* **UNIQUE**: Multi-column unique constraints (`CONSTRAINT uk_name UNIQUE (col1, col2)`)
* **FOREIGN KEY**: Multi-column foreign key references (`CONSTRAINT fk_name FOREIGN KEY (col1, col2) REFERENCES...`)
* **CHECK**: Table-level check constraints involving multiple columns or complex logic (`CONSTRAINT chk_name CHECK (col1 <= col2)`)
**Column Element Order** - When multiple elements are present in a column definition:
1. Column name and data type
2. NOT NULL (omitted if PRIMARY KEY, IDENTITY, or SERIAL)
3. DEFAULT value (omitted for SERIAL/IDENTITY columns)
4. GENERATED...AS IDENTITY
5. PRIMARY KEY (single-column only)
6. UNIQUE (single-column only, omitted if PRIMARY KEY present)
7. REFERENCES (single-column foreign key)
8. CHECK (single-column check constraints)
**Key characteristics of the canonical format:**
* Always uses `CREATE TABLE IF NOT EXISTS` for safety and idempotency
* Columns with inline constraints: single-column PRIMARY KEY, UNIQUE, REFERENCES, and CHECK
* Table-level constraints: multi-column PRIMARY KEY, UNIQUE, FOREIGN KEY, and complex CHECK constraints
* Constraints are ordered: PRIMARY KEY, UNIQUE, FOREIGN KEY, CHECK (both inline and separate)
* Column elements appear in order: data\_type, PRIMARY KEY, IDENTITY, DEFAULT, NOT NULL, UNIQUE, REFERENCES, CHECK
* SERIAL types are normalized to uppercase canonical forms (SMALLSERIAL, SERIAL, BIGSERIAL)
* Data types include appropriate precision/scale modifiers (e.g., VARCHAR(255), NUMERIC(10,2))
* Schema prefixes are stripped from user-defined types when they match the target schema
* Foreign key constraints include full referential action specifications when present
* IDENTITY columns preserve their generation mode and options
* NOT NULL is omitted for PRIMARY KEY, IDENTITY, and SERIAL columns (implicit)
* DEFAULT is omitted for SERIAL and IDENTITY columns
* CHECK constraints are simplified to developer-friendly format (e.g., `IN('val1', 'val2')` instead of `= ANY (ARRAY[...])`)
* Partitioned tables include the PARTITION BY clause
* Proper indentation with 4 spaces for readability
* All table creation operations can run within transactions
* For DROP operations: `DROP TABLE IF EXISTS table_name CASCADE;`
# CREATE TRIGGER
Source: https://www.pgschema.com/syntax/create_trigger
## Syntax
```sql
create_trigger ::= CREATE [ OR REPLACE ] TRIGGER trigger_name
{ BEFORE | AFTER | INSTEAD OF } trigger_event [ OR ... ]
ON table_name
[ FOR [ EACH ] { ROW | STATEMENT } ]
[ WHEN ( condition ) ]
EXECUTE FUNCTION function_name ( )
trigger_name ::= name
trigger_event ::= INSERT | UPDATE | DELETE | TRUNCATE
table_name ::= [schema.]name
condition ::= expression
function_name ::= [schema.]name
```
pgschema understands the following `CREATE TRIGGER` features:
* **Trigger timing**:
* BEFORE - executes before the triggering event
* AFTER - executes after the triggering event
* INSTEAD OF - replaces the triggering event (views only)
* **Trigger events**:
* INSERT, UPDATE, DELETE, TRUNCATE
* Multiple events can be combined with OR
* **Trigger level**:
* FOR EACH ROW - fires once for each affected row (default)
* FOR EACH STATEMENT - fires once for the entire SQL statement
* **WHEN condition**: Optional condition that must be true for trigger to fire
* **Schema-qualified names**: Tables and functions can be in specific schemas
* **Function execution**: Triggers execute functions that return TRIGGER type
## Canonical Format
When generating migration SQL, pgschema produces triggers in the following canonical format:
```sql
CREATE OR REPLACE TRIGGER trigger_name
{ BEFORE | AFTER | INSTEAD OF } { INSERT | UPDATE | DELETE | TRUNCATE } [ OR ... ] ON [schema.]table_name
FOR EACH { ROW | STATEMENT }
[ WHEN (condition) ]
EXECUTE FUNCTION function_name();
```
**Key characteristics of the canonical format:**
* Always uses `CREATE OR REPLACE TRIGGER` for modifications
* Events are ordered consistently: INSERT, UPDATE, DELETE, TRUNCATE
* Multi-line formatting with proper indentation for readability
* Explicit FOR EACH clause (ROW is default if not specified)
* WHEN conditions are properly parenthesized
* Function names include parentheses even when no arguments
* Schema qualifiers only included when table is in different schema than target
* For DROP operations: `DROP TRIGGER IF EXISTS trigger_name ON table_name;`
# CREATE TYPE
Source: https://www.pgschema.com/syntax/create_type
## Syntax
```sql
create_type ::= CREATE TYPE type_name AS enum_type
| CREATE TYPE type_name AS composite_type
enum_type ::= ENUM ( [ enum_value [, ...] ] )
composite_type ::= ( attribute_definition [, ...] )
type_name ::= [schema.]name
enum_value ::= 'value'
attribute_definition ::= attribute_name data_type
```
pgschema understands the following `CREATE TYPE` features:
* **Schema-qualified names**: Types can be defined in specific schemas
* **ENUM types**: User-defined enumeration types
* Empty enums (no values)
* Single-quoted string values
* Multiple values separated by commas
* **Composite types**: Row types with named attributes
* Multiple attributes with their data types
* Any valid PostgreSQL data type for attributes
* Named attributes for structured data
## Canonical Format
When generating migration SQL, pgschema produces types in the following canonical format:
```sql
-- ENUM type with no values
CREATE TYPE [schema.]type_name AS ENUM ();
-- ENUM type with values (multi-line format)
CREATE TYPE [schema.]type_name AS ENUM (
'value1',
'value2',
'value3'
);
-- Composite type (single line)
CREATE TYPE [schema.]type_name AS (attribute1 data_type, attribute2 data_type);
```
**Key characteristics of the canonical format:**
* Uses single-line format for empty enums
* Uses multi-line format with indentation for enums with values
* Each enum value is on its own indented line for readability
* No comma after the last enum value
* Composite types use single-line format with attributes separated by commas
* For DROP operations: `DROP TYPE IF EXISTS type_name RESTRICT;`
* ENUM types can be modified by adding values with `ALTER TYPE type_name ADD VALUE 'new_value' AFTER 'existing_value';`
**Note**: Composite type modifications in pgschema currently require dropping and recreating the type, as PostgreSQL has limited ALTER TYPE support for composite types and complex dependencies make in-place modifications challenging.
# CREATE VIEW
Source: https://www.pgschema.com/syntax/create_view
## Syntax
```sql
create_view ::= CREATE [ OR REPLACE ] VIEW [ IF NOT EXISTS ] view_name
AS select_statement
view_name ::= [schema.]name
select_statement ::= SELECT ...
```
pgschema understands the following `CREATE VIEW` features:
* **Schema-qualified names**: Views can be defined in specific schemas
* **OR REPLACE**: Optional clause to replace an existing view definition
* **AS clause**: Any valid SELECT statement that defines the view's contents
* **View dependencies**: Proper handling of view-to-view dependencies
## Canonical Format
When generating migration SQL, pgschema produces views in the following canonical format:
```sql
CREATE OR REPLACE VIEW [schema.]view_name AS
select_statement;
```
**Key characteristics of the canonical format:**
* Always uses `CREATE OR REPLACE VIEW` for creation and modifications
* Schema qualification included when necessary
* Preserves the original SELECT statement formatting
* For DROP operations: `DROP VIEW IF EXISTS view_name CASCADE;`
**Note on modifications:** Regular views support `CREATE OR REPLACE`, allowing seamless updates to view definitions without dropping dependent objects. pgschema leverages this feature for efficient view migrations.
# Unsupported
Source: https://www.pgschema.com/syntax/unsupported
`pgschema` operates at the schema level. This means it does not support SQL commands that operate the non-schema level objects.
## Cluster Level Commands
* `CREATE DATABASE`
* `CREATE ROLE`
* `CREATE TABLESPACE`
* `CREATE USER`
## Database Level Commands
* `CREATE CAST`
* `CREATE COLLATION`
* `CREATE CONVERSION`
* `CREATE EVENT TRIGGER`
* `CREATE EXTENSION`
* `CREATE FOREIGN DATA WRAPPER`
* `CREATE LANGUAGE`
* `CREATE OPERATOR`
* `CREATE PUBLICATION`
* `CREATE SCHEMA`
* `CREATE SERVER`
* `CREATE SUBSCRIPTION`
* `CREATE TEXT SEARCH`
* `CREATE USER MAPPING`
## Schema Level Commands
We plan to support most schema-level commands in the future. Please check other sections for the schema-level database objects that we support right now.
## Rename
`RENAME` is not supported.
# GitOps
Source: https://www.pgschema.com/workflow/gitops
pgschema integrates seamlessly with GitOps workflows, providing a declarative approach to database schema management that fits naturally into your existing CI/CD pipelines.
The typical workflow follows a review-then-apply pattern that ensures all schema changes are properly reviewed before being applied to production.
* Developers modify schema files in their feature branch
* Schema changes are committed alongside application code
* The desired state is expressed declaratively in SQL files
* When a PR/MR is opened, CI automatically runs [pgschema plan](/cli/plan)
* The plan output shows exactly what changes will be applied
* The plan is posted as a comment on the PR/MR for review
* Reviewers can see:
* What tables, indexes, functions will be added/modified/dropped
* The exact SQL statements that will be executed
* Whether changes can run in a transaction
* Any potentially destructive operations
* Once reviewers approve the schema changes
* The PR/MR is merged to the target branch (e.g., main, production)
* After merge, CD pipeline automatically runs [pgschema apply](/cli/apply)
* The apply command uses the reviewed plan to execute migrations
* Schema changes are applied to the target database
* The deployment includes safety checks for concurrent modifications
## GitHub Actions
Complete example repository with workflows and sample PRs
**Single-file Schema Workflow **
Generates migration plan on pull requests
Applies migrations after merge
Live example with plan comments
**Modular Multi-file Schema Workflow **
Handles modular schema files
Applies modular migrations
Multi-file schema changes
**Example GitHub Actions Workflows**
```yaml .github/workflows/pgschema-plan.yml
name: Schema Migration Plan
on:
pull_request:
paths:
- 'schema/schema.sql'
jobs:
plan:
runs-on: ubuntu-latest
steps:
- uses: actions/checkout@v4
with:
fetch-depth: 0
- uses: actions/setup-go@v5
with:
go-version: '1.23'
- name: Install pgschema
run: go install github.com/pgschema/pgschema@latest
- name: Generate migration plan
env:
PGPASSWORD: ${{ secrets.DB_PASSWORD }}
run: |
pgschema plan \
--host ${{ secrets.DB_HOST }} \
--port ${{ secrets.DB_PORT }} \
--db ${{ secrets.DB_NAME }} \
--user ${{ secrets.DB_USER }} \
--file schema/schema.sql \
--output-json plan.json \
--output-human plan.txt
- name: Comment PR with plan
uses: actions/github-script@v7
with:
script: |
const fs = require('fs');
const planContent = fs.readFileSync('plan.txt', 'utf8');
// Find existing comment
const { data: comments } = await github.rest.issues.listComments({
owner: context.repo.owner,
repo: context.repo.repo,
issue_number: context.issue.number,
});
const botComment = comments.find(comment =>
comment.user.type === 'Bot' &&
comment.body.includes('## Migration Plan')
);
const body = `## Migration Plan\n\`\`\`sql\n${planContent}\n\`\`\``;
if (botComment) {
await github.rest.issues.updateComment({
owner: context.repo.owner,
repo: context.repo.repo,
comment_id: botComment.id,
body
});
} else {
await github.rest.issues.createComment({
owner: context.repo.owner,
repo: context.repo.repo,
issue_number: context.issue.number,
body
});
}
- name: Upload plan artifact
uses: actions/upload-artifact@v4
with:
name: pgschema-plan-${{ github.event.pull_request.number }}
path: plan.json
retention-days: 30
```
```yaml .github/workflows/pgschema-apply.yml
name: Apply Schema Migration
on:
pull_request:
types: [closed]
branches:
- main
paths:
- 'schema/schema.sql'
jobs:
apply:
runs-on: ubuntu-latest
if: github.event.pull_request.merged == true
environment: production
steps:
- uses: actions/checkout@v4
- uses: actions/setup-go@v5
with:
go-version: '1.23'
- name: Install pgschema
run: go install github.com/pgschema/pgschema@latest
- name: Download plan artifact
uses: dawidd6/action-download-artifact@v6
with:
workflow: pgschema-plan.yml
pr: ${{ github.event.pull_request.number }}
name: pgschema-plan-${{ github.event.pull_request.number }}
path: .
- name: Validate plan exists
run: |
if [ ! -f "plan.json" ]; then
echo "Error: plan.json not found"
exit 1
fi
- name: Apply migration
id: apply
env:
PGPASSWORD: ${{ secrets.DB_PASSWORD }}
run: |
echo "Applying migration plan from PR #${{ github.event.pull_request.number }}"
# Capture apply output
APPLY_OUTPUT=$(pgschema apply \
--host ${{ secrets.DB_HOST }} \
--port ${{ secrets.DB_PORT }} \
--db ${{ secrets.DB_NAME }} \
--user ${{ secrets.DB_USER }} \
--plan plan.json \
--auto-approve \
2>&1)
APPLY_EXIT_CODE=$?
echo "Apply output:"
echo "$APPLY_OUTPUT"
# Set output for the next step
echo "output<> $GITHUB_OUTPUT
echo "$APPLY_OUTPUT" >> $GITHUB_OUTPUT
echo "EOF" >> $GITHUB_OUTPUT
exit $APPLY_EXIT_CODE
- name: Comment on PR
uses: actions/github-script@v7
with:
script: |
await github.rest.issues.createComment({
owner: context.repo.owner,
repo: context.repo.repo,
issue_number: context.issue.number,
body: '✅ Schema migration has been successfully applied to production!'
});
```
## GitLab CI
Demonstrates a complete workflow for reviewing and applying schema changes through merge requests.
```yaml .gitlab-ci.yml
stages:
- plan
- apply
variables:
PGPASSWORD: $DB_PASSWORD
# Plan job - runs on merge requests and main branch
pgschema-plan:
stage: plan
image: golang:1.23
script:
- go install github.com/pgschema/pgschema@latest
- |
pgschema plan \
--host $DB_HOST \
--port ${DB_PORT:-5432} \
--db $DB_NAME \
--user $DB_USER \
--file schema/schema.sql \
--output-json plan.json \
--output-human plan.txt
- cat plan.txt
# Post plan as MR comment (only for merge requests)
- |
if [ -n "$CI_MERGE_REQUEST_IID" ]; then
PLAN_CONTENT=$(cat plan.txt)
curl --request POST \
--header "PRIVATE-TOKEN: $CI_JOB_TOKEN" \
--data-urlencode "body=## Migration Plan\n\`\`\`\n$PLAN_CONTENT\n\`\`\`" \
"$CI_API_V4_URL/projects/$CI_PROJECT_ID/merge_requests/$CI_MERGE_REQUEST_IID/notes"
fi
artifacts:
paths:
- plan.json
- plan.txt
expire_in: 7 days
rules:
- if: '$CI_PIPELINE_SOURCE == "merge_request_event"'
changes:
- schema/**
- if: '$CI_COMMIT_BRANCH == "main"'
changes:
- schema/**
# Apply job - manual trigger on main branch
pgschema-apply:
stage: apply
image: golang:1.23
needs: ["pgschema-plan"]
dependencies:
- pgschema-plan
script:
- go install github.com/pgschema/pgschema@latest
- |
if [ ! -f plan.json ]; then
echo "Error: plan.json not found"
exit 1
fi
- |
pgschema apply \
--host $DB_HOST \
--port ${DB_PORT:-5432} \
--db $DB_NAME \
--user $DB_USER \
--plan plan.json \
--auto-approve
- echo "✅ Schema migration applied successfully"
when: manual # Require manual approval
environment:
name: production
rules:
- if: '$CI_COMMIT_BRANCH == "main"'
changes:
- schema/**
```
## Azure Pipelines
Demonstrates a complete workflow for reviewing and applying schema changes through pull requests.
```yaml azure-pipelines.yml
trigger:
branches:
include:
- main
paths:
include:
- schema/*
pr:
branches:
include:
- main
paths:
include:
- schema/*
variables:
PGPASSWORD: $(DB_PASSWORD)
stages:
- stage: Plan
displayName: 'Generate Migration Plan'
jobs:
- job: PlanJob
displayName: 'Run pgschema plan'
pool:
vmImage: 'ubuntu-latest'
steps:
- task: GoTool@0
inputs:
version: '1.23'
- script: |
go install github.com/pgschema/pgschema@latest
displayName: 'Install pgschema'
- script: |
pgschema plan \
--host $(DB_HOST) \
--port $(DB_PORT) \
--db $(DB_NAME) \
--user $(DB_USER) \
--file schema/schema.sql \
--output-json plan.json \
--output-human plan.txt
displayName: 'Generate plan'
- script: cat plan.txt
displayName: 'Display plan'
# Post plan as PR comment (for PRs only)
- task: GitHubComment@0
condition: eq(variables['Build.Reason'], 'PullRequest')
inputs:
gitHubConnection: 'github-connection'
repositoryName: '$(Build.Repository.Name)'
comment: |
## Migration Plan
## What is pgschema?
`pgschema` is a CLI tool that brings terraform-style declarative schema migration workflow to Postgres:
* **Dump** a Postgres schema in a developer-friendly format with support for all common objects
* **Edit** a schema to the desired state
* **Plan** a schema migration by comparing desired state with current database state
* **Apply** a schema migration with concurrent change detection, transaction-adaptive execution, and lock timeout control
Think of it as Terraform for your Postgres schemas - declare your desired state, generate plan, preview changes, and apply them with confidence.
Watch in action:
## Why pgschema?
Traditional database migration tools often require you to write migrations manually or rely on ORMs that may not support all Postgres features. pgschema takes a different approach:
* **Declarative**: Define your desired schema state in SQL files
* **Schema-based**: Compare at the schema level instead of the database level to reconcile schemas across different tenants
* **Comprehensive**: Support most common Postgres objects under a schema
* **Transparent**: Show exactly what SQL will be executed before applying changes
## Getting Started
Install pgschema using Go or download pre-built binaries
Learn the basics with a hands-on tutorial
# Installation
Source: https://www.pgschema.com/installation
If you have Go 1.23.0 or later installed, you can install pgschema directly:
```bash
go install github.com/pgschema/pgschema@latest
```
This will install the latest version of pgschema to your `$GOPATH/bin` directory.
After installation, verify that pgschema is working correctly:
```bash
# View help and check version
pgschema --help
```
Run pgschema using Docker without installing it locally:
```bash
# Pull the latest image
docker pull pgschema/pgschema:latest
# Run pgschema commands
docker run --rm pgschema/pgschema:latest --help
```
```bash
# Dump a localhost database (requires --network host)
docker run --rm --network host \
-e PGPASSWORD=mypassword \
pgschema/pgschema:latest dump \
--host localhost \
--port 5432 \
--db mydb \
--schema public \
--user myuser > schema.sql
```
```bash
# Plan migration and save to plan.json on host
docker run --rm --network host \
-v "$(pwd):/workspace" \
-e PGPASSWORD=mypassword \
pgschema/pgschema:latest plan \
--host localhost \
--port 5432 \
--db mydb \
--schema public \
--user myuser \
--file /workspace/schema.sql \
--output-json /workspace/plan.json
```
```bash
# Apply changes using the saved plan.json
docker run --rm --network host \
-v "$(pwd):/workspace" \
-e PGPASSWORD=mypassword \
pgschema/pgschema:latest apply \
--host localhost \
--port 5432 \
--db mydb \
--schema public \
--user myuser \
--plan /workspace/plan.json
```
**Important Docker Usage Notes:**
* Use `--network host` when connecting to databases on localhost/127.0.0.1
* Mount volumes with `-v "$(pwd):/workspace"` to access local schema files
* Files inside the container should be referenced with `/workspace/` prefix
Download pre-built binaries from the [GitHub releases page](https://github.com/pgschema/pgschema/releases).
**MacOS (Apple Silicon):**
```bash
curl -L https://github.com/pgschema/pgschema/releases/download/v1.0.0/pgschema-darwin-arm64 -o pgschema
chmod +x pgschema
sudo mv pgschema /usr/local/bin/
```
**Linux**
```bash
curl -L https://github.com/pgschema/pgschema/releases/download/v1.0.0/pgschema-linux-amd64 -o pgschema
chmod +x pgschema
sudo mv pgschema /usr/local/bin/
```
Clone the repository and build from source:
```bash
# Clone the repository
git clone https://github.com/pgschema/pgschema.git
cd pgschema
# Build the binary
go build -v -o pgschema .
# Optional: Install to system
sudo mv pgschema /usr/local/bin/
```
Building from source requires Go 1.23.0 or later.
# Quickstart
Source: https://www.pgschema.com/quickstart
This guide will walk you through the core pgschema workflow: dumping a schema, making edits, planning changes, and applying migrations. By the end, you'll understand how to manage Postgres schemas declaratively.
## Prerequisites
Before starting, ensure you have:
* pgschema installed ([see installation guide](/installation))
* Access to a PostgreSQL database (14+)
* Database credentials with appropriate permissions
## Step 1: Dump Your Current Schema
First, let's capture the current state of your database schema:
```bash
$ PGPASSWORD=testpwd1 pgschema dump \
--host localhost \
--db testdb \
--user postgres \
--schema public > schema.sql
```
This creates a `schema.sql` file containing your complete schema definition. Let's look at what it contains:
```sql schema.sql
-- Example output
CREATE TABLE users (
id SERIAL PRIMARY KEY,
email VARCHAR(255) UNIQUE NOT NULL,
created_at TIMESTAMP DEFAULT NOW()
);
CREATE INDEX idx_users_email ON users(email);
```
The output is clean and developer-friendly, unlike the verbose output from `pg_dump`.
## Step 2: Make Schema Changes
Now, let's modify the `schema.sql` file to add new features. Edit the file to include:
```sql schema.sql (modified)
CREATE TABLE users (
id SERIAL PRIMARY KEY,
email VARCHAR(255) UNIQUE NOT NULL,
name VARCHAR(100), -- New column
created_at TIMESTAMP DEFAULT NOW(),
updated_at TIMESTAMP DEFAULT NOW() -- New column
);
-- New index
CREATE INDEX idx_users_name ON users(name);
CREATE INDEX idx_users_email ON users(email);
-- New table
CREATE TABLE posts (
id SERIAL PRIMARY KEY,
user_id INTEGER REFERENCES users(id),
title VARCHAR(200) NOT NULL,
content TEXT,
created_at TIMESTAMP DEFAULT NOW()
);
```
## Step 3: Generate Plan
```bash
$ PGPASSWORD=testpwd1 pgschema plan \
--host localhost \
--db testdb \
--user postgres \
--schema public \
--file schema.sql \
--output-json plan.json \
--output-human stdout
```
This will save the migration plan to `plan.json` and print the human-readable version to `stdout`:
```sql plan.txt
Plan: 2 to add, 1 to modify.
Summary by type:
tables: 1 to add, 1 to modify
indexes: 1 to add
Tables:
+ public.posts
~ public.users
+ column name
+ column updated_at
Indexes:
+ public.idx_users_name
Transaction: true
DDL to be executed:
--------------------------------------------------
ALTER TABLE users
ADD COLUMN name VARCHAR(100);
ALTER TABLE users
ADD COLUMN updated_at TIMESTAMP DEFAULT NOW();
CREATE INDEX idx_users_name ON users (name);
CREATE TABLE posts (
id SERIAL NOT NULL,
user_id integer,
title VARCHAR(200) NOT NULL,
content text,
created_at timestamp DEFAULT NOW(),
PRIMARY KEY (id),
FOREIGN KEY (user_id) REFERENCES users (id)
);
```
## Step 4: Apply Changes
When you're ready to apply the changes:
```bash
# Apply using the plan file from Step 3
$ PGPASSWORD=testpwd1 pgschema apply \
--host localhost \
--db testdb \
--user postgres \
--schema public \
--plan plan.json
```
### Alternative: Direct Apply
You can also skip the separate planning step and apply changes directly from the schema file:
```bash
# Apply directly from schema file (combines plan + apply)
$ PGPASSWORD=testpwd1 pgschema apply \
--host localhost \
--db testdb \
--user postgres \
--schema public \
--file schema.sql
```
This approach automatically generates the plan internally and applies the changes in one command.
The two-phase workflow (plan then apply) is recommended for production environments where you want to review and save the plan before execution. Direct apply is convenient for development environments.
pgschema will:
1. Show you the migration plan
2. Ask for confirmation (unless using [`--auto-approve`](/cli/apply#param-auto-approve))
3. Apply the changes
4. Report success or any errors
# COMMENT ON
Source: https://www.pgschema.com/syntax/comment_on
## Syntax
```sql
comment_on ::= COMMENT ON object_type object_name IS 'comment_text'
| COMMENT ON object_type object_name IS NULL
object_type ::= COLUMN | INDEX | TABLE | VIEW
object_name ::= [schema.]name
| [schema.]table_name.column_name -- for columns
```
`COMMENT ON` is supported for the following objects:
* Column
* Index
* Table
* View
# CREATE DOMAIN
Source: https://www.pgschema.com/syntax/create_domain
## Syntax
```sql
create_domain ::= CREATE DOMAIN domain_name AS data_type
[ DEFAULT expression ]
[ NOT NULL ]
[ constraint_definition [, ...] ]
domain_name ::= [schema.]name
constraint_definition ::= CHECK ( expression )
| CONSTRAINT constraint_name CHECK ( expression )
```
pgschema understands the following `CREATE DOMAIN` features:
* **Schema-qualified names**: Domains can be defined in specific schemas
* **Base types**: Any valid PostgreSQL data type as the underlying type
* **Default values**: Default expressions for the domain
* **NOT NULL constraints**: Enforce non-null values
* **CHECK constraints**:
* Anonymous CHECK constraints
* Named constraints with CONSTRAINT clause
* Multiple constraints per domain
* Expressions using VALUE keyword to reference the domain value
## Canonical Format
When generating migration SQL, pgschema produces domains in the following canonical format:
```sql
-- Simple domain without constraints
CREATE DOMAIN [schema.]domain_name AS data_type;
-- Domain with constraints (multi-line format)
CREATE DOMAIN [schema.]domain_name AS data_type
[ DEFAULT expression ]
[ NOT NULL ]
[ CONSTRAINT constraint_name CHECK ( expression ) ]
[ CHECK ( expression ) ];
```
**Key characteristics of the canonical format:**
* Uses single-line format for simple domains without constraints
* Uses multi-line format with indentation when domain has constraints, defaults, or NOT NULL
* DEFAULT clause appears before NOT NULL when both are present
* Named constraints use `CONSTRAINT constraint_name` prefix
* Anonymous constraints are listed without the CONSTRAINT keyword
* Each constraint is on its own indented line for readability
* For DROP operations: `DROP DOMAIN IF EXISTS domain_name RESTRICT;`
**Note**: Domain modifications in pgschema currently require dropping and recreating the domain, as PostgreSQL has limited ALTER DOMAIN support and complex dependencies make in-place modifications challenging.
# CREATE FUNCTION
Source: https://www.pgschema.com/syntax/create_function
## Syntax
```sql
create_function ::= CREATE [ OR REPLACE ] FUNCTION function_name
( [ parameter_list ] )
RETURNS return_type
LANGUAGE language_name
[ SECURITY { DEFINER | INVOKER } ]
[ volatility ]
[ STRICT ]
AS function_body
function_name ::= [schema.]name
parameter_list ::= parameter [, ...]
parameter ::= [ parameter_mode ] [ parameter_name ] parameter_type [ DEFAULT default_value ]
parameter_mode ::= IN | OUT | INOUT
argument_list ::= data_type [, ...]
return_type ::= data_type
| SETOF data_type
| TABLE ( column_name data_type [, ...] )
| trigger
language_name ::= plpgsql | sql | c | internal
volatility ::= IMMUTABLE | STABLE | VOLATILE
function_body ::= 'definition'
| $$definition$$
| $tag$definition$tag$
```
pgschema understands the following `CREATE FUNCTION` features:
* **Schema-qualified names**: Functions can be defined in specific schemas
* **Parameters**:
* IN, OUT, INOUT parameter modes
* Default parameter values
* Named parameters with data types
* **Return types**:
* Scalar data types
* SETOF for set-returning functions
* TABLE for table-returning functions
* trigger for trigger functions
* **Languages**: Any PostgreSQL procedural language (plpgsql, sql, c, internal, etc.)
* **Security**: DEFINER or INVOKER
* **Volatility**: IMMUTABLE, STABLE, or VOLATILE
* **STRICT**: Returns NULL automatically if any argument is NULL
* **Function body**: Any valid function definition with proper dollar-quoting
## Canonical Format
When generating migration SQL, pgschema produces functions in the following canonical format:
```sql
CREATE OR REPLACE FUNCTION [schema.]function_name(
parameter_name parameter_type[ DEFAULT default_value][,
...]
)
RETURNS return_type
LANGUAGE language_name
SECURITY { DEFINER | INVOKER }
[ IMMUTABLE | STABLE | VOLATILE ]
[ STRICT ]
AS $tag$function_body$tag$;
```
**Key characteristics of the canonical format:**
* Always uses `CREATE OR REPLACE FUNCTION` for modifications
* Parameters are formatted with line breaks for readability
* Explicitly specifies SECURITY mode (`INVOKER` is default if not specified)
* Includes volatility when specified
* Includes STRICT when the function should return NULL on NULL input
* Uses intelligent dollar-quoting with automatic tag generation to avoid conflicts with function body content
* For DROP operations: `DROP FUNCTION IF EXISTS function_name(argument_types);`
# CREATE INDEX
Source: https://www.pgschema.com/syntax/create_index
## Syntax
```sql
create_index ::= CREATE [ UNIQUE ] INDEX [ CONCURRENTLY ] [ IF NOT EXISTS ] index_name
ON table_name [ USING method ]
( index_element [, ...] )
[ WHERE condition ]
index_name ::= name
table_name ::= [schema.]name
method ::= btree | hash | gist | spgist | gin | brin
index_element ::= column_name [ direction ] [ operator_class ]
| ( expression ) [ direction ] [ operator_class ]
direction ::= ASC | DESC
operator_class ::= name
```
pgschema understands the following `CREATE INDEX` features:
* **Index types**:
* Regular indexes
* UNIQUE indexes for enforcing uniqueness
* Primary key indexes (handled with constraints)
* **Index methods**: btree (default), hash, gist, spgist, gin, brin
* **Concurrent creation**: CONCURRENTLY option for creating indexes without blocking writes
* **Columns and expressions**:
* Simple column indexes
* Multi-column indexes
* Expression/functional indexes (e.g., LOWER(column), JSON operators)
* **Sort direction**: ASC (default) or DESC for each column
* **Operator classes**: Custom operator classes for specialized indexing
* **Partial indexes**: WHERE clause for indexing subset of rows
* **Schema qualification**: Indexes can be created in specific schemas
## Canonical Format
When generating migration SQL, pgschema produces indexes in the following canonical format:
```sql
CREATE [UNIQUE] INDEX [CONCURRENTLY] IF NOT EXISTS index_name
ON [schema.]table_name [USING method] (
column_or_expression[ direction][,
...]
)[ WHERE condition];
```
**Key characteristics of the canonical format:**
* Always includes `IF NOT EXISTS` to prevent errors on re-running
* Includes `UNIQUE` when the index enforces uniqueness
* Includes `CONCURRENTLY` when specified (cannot run in a transaction)
* Only includes `USING method` when not btree (the default)
* Only includes direction when not ASC (the default)
* JSON expressions are wrapped in double parentheses: `((data->>'key'))`
* Partial index WHERE clause is included when present
* For DROP operations: `DROP INDEX IF EXISTS [schema.]index_name;`
**Note on transactions:**
* Regular index creation can run in a transaction
* `CREATE INDEX CONCURRENTLY` cannot run in a transaction and will be executed separately
# CREATE MATERIALIZED VIEW
Source: https://www.pgschema.com/syntax/create_materialized_view
## Syntax
```sql
create_materialized_view ::= CREATE MATERIALIZED VIEW [ IF NOT EXISTS ] view_name
AS select_statement
[ WITH [ NO ] DATA ]
view_name ::= [schema.]name
select_statement ::= SELECT ...
```
pgschema understands the following `CREATE MATERIALIZED VIEW` features:
* **Schema-qualified names**: Materialized views can be defined in specific schemas
* **IF NOT EXISTS**: Optional clause to avoid errors if the view already exists
* **AS clause**: Any valid SELECT statement that defines the view's contents
* **WITH \[NO] DATA**: Whether to populate the view immediately (WITH DATA) or defer population (WITH NO DATA)
## Canonical Format
When generating migration SQL, pgschema produces materialized views in the following canonical format:
```sql
CREATE MATERIALIZED VIEW IF NOT EXISTS [schema.]view_name AS
select_statement;
```
**Key characteristics of the canonical format:**
* Always uses `CREATE MATERIALIZED VIEW IF NOT EXISTS` for creation
* Schema qualification included when necessary
* Preserves the original SELECT statement formatting
* For modifications: Materialized views cannot use `CREATE OR REPLACE`, so changes require a drop/create cycle
* For DROP operations: `DROP MATERIALIZED VIEW IF EXISTS view_name;`
**Note on modifications:** Unlike regular views which support `CREATE OR REPLACE`, materialized views must be dropped and recreated when their definition changes. pgschema handles this automatically during migration planning.
# CREATE POLICY
Source: https://www.pgschema.com/syntax/create_policy
## Syntax
```sql
create_policy ::= CREATE POLICY policy_name ON table_name
[ AS { PERMISSIVE | RESTRICTIVE } ]
[ FOR command ]
[ TO { role_name | PUBLIC | CURRENT_USER | SESSION_USER } [, ...] ]
[ USING ( using_expression ) ]
[ WITH CHECK ( check_expression ) ]
policy_name ::= identifier
table_name ::= [schema.]table
command ::= ALL | SELECT | INSERT | UPDATE | DELETE
using_expression ::= sql_expression
check_expression ::= sql_expression
```
pgschema understands the following `CREATE POLICY` features:
* **Policy names**: Unique identifiers for Row Level Security policies
* **Table references**: Schema-qualified table names where policies apply
* **Policy type**:
* PERMISSIVE (default) - allows access when policy evaluates to true
* RESTRICTIVE - denies access unless policy evaluates to true
* **Commands**:
* ALL - applies to all commands
* SELECT - applies to SELECT queries
* INSERT - applies to INSERT commands
* UPDATE - applies to UPDATE commands
* DELETE - applies to DELETE commands
* **Roles**: Specific roles, PUBLIC, CURRENT\_USER, or SESSION\_USER that the policy applies to
* **USING clause**: Boolean expression checked for existing rows (SELECT, UPDATE, DELETE)
* **WITH CHECK clause**: Boolean expression checked for new rows (INSERT, UPDATE)
## Canonical Format
When generating migration SQL, pgschema produces policies in the following canonical format:
```sql
CREATE POLICY policy_name ON [schema.]table_name
[ FOR command ]
[ TO role_name[, ...] ]
[ USING expression ]
[ WITH CHECK expression ];
```
**Key characteristics of the canonical format:**
* Schema qualification is omitted for tables in the target schema
* The AS PERMISSIVE/RESTRICTIVE clause is omitted when PERMISSIVE (the default)
* FOR ALL is omitted as it's the default command
* Roles are listed in a consistent order
* USING and WITH CHECK expressions are preserved exactly as defined
* For ALTER operations that only change roles, USING, or WITH CHECK:
```sql
ALTER POLICY policy_name ON [schema.]table_name
[ TO role_name[, ...] ]
[ USING expression ]
[ WITH CHECK expression ];
```
* For changes requiring recreation (command or permissive/restrictive changes):
```sql
DROP POLICY IF EXISTS policy_name ON [schema.]table_name;
CREATE POLICY policy_name ON [schema.]table_name ...;
```
## Row Level Security
Policies require Row Level Security to be enabled on the table:
```sql
ALTER TABLE table_name ENABLE ROW LEVEL SECURITY;
```
pgschema automatically handles RLS enablement when policies are present and generates the appropriate `ALTER TABLE ... ENABLE/DISABLE ROW LEVEL SECURITY` statements in the migration plan.
# CREATE PROCEDURE
Source: https://www.pgschema.com/syntax/create_procedure
## Syntax
```sql
create_procedure ::= CREATE [ OR REPLACE ] PROCEDURE procedure_name
( [ parameter_list ] )
LANGUAGE language_name
AS procedure_body
procedure_name ::= [schema.]name
parameter_list ::= parameter [, ...]
parameter ::= [ parameter_mode ] [ parameter_name ] parameter_type [ DEFAULT default_value ]
parameter_mode ::= IN | OUT | INOUT
language_name ::= plpgsql | sql | c | internal
procedure_body ::= 'definition'
| $$definition$$
| $tag$definition$tag$
```
pgschema understands the following `CREATE PROCEDURE` features:
* **Schema-qualified names**: Procedures can be defined in specific schemas
* **Parameters**:
* IN, OUT, INOUT parameter modes
* Default parameter values
* Named parameters with data types
* **Languages**: Any PostgreSQL procedural language (plpgsql, sql, c, internal, etc.)
* **Procedure body**: Any valid procedure definition with proper dollar-quoting
## Canonical Format
When generating migration SQL, pgschema produces procedures in the following canonical format:
```sql
CREATE OR REPLACE PROCEDURE [schema.]procedure_name(
parameter_name parameter_type[ DEFAULT default_value][,
...]
)
LANGUAGE language_name
AS $tag$procedure_body$tag$;
```
**Key characteristics of the canonical format:**
* Always uses `CREATE OR REPLACE PROCEDURE` for modifications
* Parameters are formatted with line breaks for readability when multiple parameters exist
* Uses intelligent dollar-quoting with automatic tag generation to avoid conflicts with procedure body content
* For DROP operations: `DROP PROCEDURE IF EXISTS procedure_name(parameter_types);`
* The parameter\_types in DROP statements contain only the data types, not parameter names
# CREATE SEQUENCE
Source: https://www.pgschema.com/syntax/create_sequence
## Syntax
```sql
create_sequence ::= CREATE SEQUENCE [ IF NOT EXISTS ] sequence_name
[ AS data_type ]
[ INCREMENT [ BY ] increment ]
[ MINVALUE minvalue | NO MINVALUE ]
[ MAXVALUE maxvalue | NO MAXVALUE ]
[ START [ WITH ] start ]
[ CACHE cache ]
[ [ NO ] CYCLE ]
[ OWNED BY { table_name.column_name | NONE } ]
sequence_name ::= [schema.]name
data_type ::= smallint | integer | bigint
increment ::= integer
minvalue ::= integer
maxvalue ::= integer
start ::= integer
cache ::= integer
```
pgschema understands the following `CREATE SEQUENCE` features:
* **Schema-qualified names**: Sequences can be defined in specific schemas
* **Data types**: bigint (default), integer, smallint
* **START WITH**: Initial value of the sequence (default: 1)
* **INCREMENT BY**: Step value for sequence increments (default: 1)
* **MINVALUE/NO MINVALUE**: Minimum value for the sequence (default: 1 for ascending sequences)
* **MAXVALUE/NO MAXVALUE**: Maximum value for the sequence (default: 2^63-1 for bigint)
* **CYCLE/NO CYCLE**: Whether the sequence should wrap around when reaching min/max values
* **OWNED BY**: Associates the sequence with a table column for automatic cleanup
## Canonical Format
When generating migration SQL, pgschema produces sequences in the following canonical format:
```sql
CREATE SEQUENCE IF NOT EXISTS [schema.]sequence_name
[ START WITH start_value ]
[ INCREMENT BY increment_value ]
[ MINVALUE min_value ]
[ MAXVALUE max_value ]
[ CYCLE ];
```
**Key characteristics of the canonical format:**
* Always uses `IF NOT EXISTS` for CREATE operations
* Only includes parameters that differ from PostgreSQL defaults:
* START WITH is included if not 1
* INCREMENT BY is included if not 1
* MINVALUE is included if not 1
* MAXVALUE is included if not the data type maximum (9223372036854775807 for bigint)
* CYCLE is only included if enabled (default is NO CYCLE)
* For ALTER operations: `ALTER SEQUENCE sequence_name parameter_changes;`
* For DROP operations: `DROP SEQUENCE IF EXISTS sequence_name CASCADE;`
* CACHE specifications are included when they differ from the default (1)
* Data type specifications (AS bigint/integer/smallint) are included when explicitly specified
* OWNED BY relationships are tracked but managed separately through column dependencies
# CREATE TABLE
Source: https://www.pgschema.com/syntax/create_table
## Syntax
```sql
create_table ::= CREATE TABLE [ IF NOT EXISTS ] table_name
( [ column_definition [, ...] ] [ table_constraint [, ...] ] )
[ PARTITION BY { RANGE | LIST | HASH } ( { column_name | ( expression ) } ) ]
table_name ::= [schema.]name
column_definition ::= column_name data_type
[ NOT NULL | NULL ]
[ DEFAULT default_value ]
[ GENERATED { ALWAYS | BY DEFAULT } AS IDENTITY [ ( identity_option [, ...] ) ] ]
[ column_constraint [, ...] ]
column_constraint ::= [ CONSTRAINT constraint_name ]
{ PRIMARY KEY | UNIQUE | CHECK ( expression ) |
REFERENCES referenced_table [ ( referenced_column ) ]
[ ON DELETE { CASCADE | RESTRICT | SET NULL | SET DEFAULT } ]
[ ON UPDATE { CASCADE | RESTRICT | SET NULL | SET DEFAULT } ]
[ DEFERRABLE [ INITIALLY DEFERRED ] ] }
table_constraint ::= [ CONSTRAINT constraint_name ]
{ PRIMARY KEY ( column_name [, ...] ) |
UNIQUE ( column_name [, ...] ) |
CHECK ( expression ) |
FOREIGN KEY ( column_name [, ...] )
REFERENCES referenced_table [ ( referenced_column [, ...] ) ]
[ ON DELETE { CASCADE | RESTRICT | SET NULL | SET DEFAULT } ]
[ ON UPDATE { CASCADE | RESTRICT | SET NULL | SET DEFAULT } ]
[ DEFERRABLE [ INITIALLY DEFERRED ] ] }
data_type ::= { SMALLINT | INTEGER | BIGINT | DECIMAL | NUMERIC | REAL | DOUBLE PRECISION |
SMALLSERIAL | SERIAL | BIGSERIAL |
VARCHAR [ ( length ) ] | CHAR [ ( length ) ] | CHARACTER [ ( length ) ] |
CHARACTER VARYING [ ( length ) ] | TEXT |
DATE | TIME | TIMESTAMP | TIMESTAMPTZ | TIMETZ |
BOOLEAN | UUID | JSONB | JSON |
user_defined_type | ARRAY }
identity_option ::= { START WITH start_value | INCREMENT BY increment_value |
MAXVALUE max_value | NO MAXVALUE |
MINVALUE min_value | NO MINVALUE |
CYCLE | NO CYCLE }
default_value ::= literal | expression | function_call
```
pgschema understands the following `CREATE TABLE` features:
* **Schema-qualified names**: Tables can be created in specific schemas
* **Columns**:
* All PostgreSQL data types including user-defined types
* NULL/NOT NULL constraints
* DEFAULT values with expressions and function calls
* IDENTITY columns with GENERATED ALWAYS or BY DEFAULT
* Serial types (SMALLSERIAL, SERIAL, BIGSERIAL)
* **Constraints**:
* PRIMARY KEY (single or composite)
* UNIQUE constraints (single or composite)
* FOREIGN KEY references with referential actions (CASCADE, RESTRICT, SET NULL, SET DEFAULT)
* CHECK constraints with arbitrary expressions
* DEFERRABLE constraints with INITIALLY DEFERRED option
* **Partitioning**: PARTITION BY RANGE, LIST, or HASH
* **Row-level security**: RLS policies (handled separately)
* **Indexes**: Created via separate CREATE INDEX statements
* **Triggers**: Created via separate CREATE TRIGGER statements
## Canonical Format
When generating migration SQL, pgschema produces tables in the following canonical format. pgschema intelligently decides when to inline constraints with column definitions versus defining them as separate table constraints.
### Simple Table with Inline Constraints
```sql
CREATE TABLE IF NOT EXISTS users (
id SERIAL PRIMARY KEY,
email VARCHAR(255) NOT NULL UNIQUE,
age INTEGER CHECK (age >= 0),
created_at TIMESTAMP DEFAULT now()
);
```
### Complex Table with Mixed Inline and Separate Constraints
```sql
CREATE TABLE IF NOT EXISTS order_items (
order_id INTEGER NOT NULL REFERENCES orders(id) ON DELETE CASCADE,
item_id INTEGER NOT NULL REFERENCES items(id),
quantity INTEGER DEFAULT 1 CHECK (quantity > 0),
unit_price DECIMAL(10,2) NOT NULL,
discount_percent DECIMAL(5,2) DEFAULT 0.00 CHECK (discount_percent >= 0 AND discount_percent <= 100),
created_at TIMESTAMP NOT NULL DEFAULT now(),
updated_at TIMESTAMP,
CONSTRAINT pk_order_item PRIMARY KEY (order_id, item_id),
CONSTRAINT uk_order_item_position UNIQUE (order_id, position),
CONSTRAINT fk_order_item_supplier FOREIGN KEY (supplier_id, region)
REFERENCES suppliers(id, region) ON DELETE SET NULL ON UPDATE CASCADE,
CONSTRAINT chk_valid_dates CHECK (created_at <= updated_at),
CONSTRAINT chk_pricing CHECK (unit_price >= 0 AND (unit_price * quantity * (1 - discount_percent/100)) >= 0)
) PARTITION BY HASH (order_id);
```
### Identity and Serial Columns
```sql
CREATE TABLE IF NOT EXISTS products (
id BIGSERIAL PRIMARY KEY,
uuid UUID DEFAULT gen_random_uuid(),
version INTEGER GENERATED ALWAYS AS IDENTITY,
name VARCHAR(255) NOT NULL,
sku VARCHAR(50) UNIQUE,
price DECIMAL(10,2) DEFAULT 0.00
);
```
**Note on SERIAL types**: pgschema automatically detects and normalizes SERIAL columns (integer types with `nextval()` defaults) to their canonical SERIAL forms (SMALLSERIAL, SERIAL, BIGSERIAL) in CREATE TABLE statements.
### Constraint Handling Rules
**Inline Constraints (Column-Level)** - Added directly to the column definition:
* **PRIMARY KEY**: Single-column primary keys only (`id INTEGER PRIMARY KEY`)
* **UNIQUE**: Single-column unique constraints only (`email VARCHAR(255) UNIQUE`)
* **FOREIGN KEY**: Single-column foreign key references only (`user_id INTEGER REFERENCES users(id)`)
* **CHECK**: Single-column check constraints only (`age INTEGER CHECK (age >= 0)`)
**Separate Table Constraints** - Defined after all columns:
* **PRIMARY KEY**: Multi-column (composite) primary keys (`CONSTRAINT pk_name PRIMARY KEY (col1, col2)`)
* **UNIQUE**: Multi-column unique constraints (`CONSTRAINT uk_name UNIQUE (col1, col2)`)
* **FOREIGN KEY**: Multi-column foreign key references (`CONSTRAINT fk_name FOREIGN KEY (col1, col2) REFERENCES...`)
* **CHECK**: Table-level check constraints involving multiple columns or complex logic (`CONSTRAINT chk_name CHECK (col1 <= col2)`)
**Column Element Order** - When multiple elements are present in a column definition:
1. Column name and data type
2. NOT NULL (omitted if PRIMARY KEY, IDENTITY, or SERIAL)
3. DEFAULT value (omitted for SERIAL/IDENTITY columns)
4. GENERATED...AS IDENTITY
5. PRIMARY KEY (single-column only)
6. UNIQUE (single-column only, omitted if PRIMARY KEY present)
7. REFERENCES (single-column foreign key)
8. CHECK (single-column check constraints)
**Key characteristics of the canonical format:**
* Always uses `CREATE TABLE IF NOT EXISTS` for safety and idempotency
* Columns with inline constraints: single-column PRIMARY KEY, UNIQUE, REFERENCES, and CHECK
* Table-level constraints: multi-column PRIMARY KEY, UNIQUE, FOREIGN KEY, and complex CHECK constraints
* Constraints are ordered: PRIMARY KEY, UNIQUE, FOREIGN KEY, CHECK (both inline and separate)
* Column elements appear in order: data\_type, PRIMARY KEY, IDENTITY, DEFAULT, NOT NULL, UNIQUE, REFERENCES, CHECK
* SERIAL types are normalized to uppercase canonical forms (SMALLSERIAL, SERIAL, BIGSERIAL)
* Data types include appropriate precision/scale modifiers (e.g., VARCHAR(255), NUMERIC(10,2))
* Schema prefixes are stripped from user-defined types when they match the target schema
* Foreign key constraints include full referential action specifications when present
* IDENTITY columns preserve their generation mode and options
* NOT NULL is omitted for PRIMARY KEY, IDENTITY, and SERIAL columns (implicit)
* DEFAULT is omitted for SERIAL and IDENTITY columns
* CHECK constraints are simplified to developer-friendly format (e.g., `IN('val1', 'val2')` instead of `= ANY (ARRAY[...])`)
* Partitioned tables include the PARTITION BY clause
* Proper indentation with 4 spaces for readability
* All table creation operations can run within transactions
* For DROP operations: `DROP TABLE IF EXISTS table_name CASCADE;`
# CREATE TRIGGER
Source: https://www.pgschema.com/syntax/create_trigger
## Syntax
```sql
create_trigger ::= CREATE [ OR REPLACE ] TRIGGER trigger_name
{ BEFORE | AFTER | INSTEAD OF } trigger_event [ OR ... ]
ON table_name
[ FOR [ EACH ] { ROW | STATEMENT } ]
[ WHEN ( condition ) ]
EXECUTE FUNCTION function_name ( )
trigger_name ::= name
trigger_event ::= INSERT | UPDATE | DELETE | TRUNCATE
table_name ::= [schema.]name
condition ::= expression
function_name ::= [schema.]name
```
pgschema understands the following `CREATE TRIGGER` features:
* **Trigger timing**:
* BEFORE - executes before the triggering event
* AFTER - executes after the triggering event
* INSTEAD OF - replaces the triggering event (views only)
* **Trigger events**:
* INSERT, UPDATE, DELETE, TRUNCATE
* Multiple events can be combined with OR
* **Trigger level**:
* FOR EACH ROW - fires once for each affected row (default)
* FOR EACH STATEMENT - fires once for the entire SQL statement
* **WHEN condition**: Optional condition that must be true for trigger to fire
* **Schema-qualified names**: Tables and functions can be in specific schemas
* **Function execution**: Triggers execute functions that return TRIGGER type
## Canonical Format
When generating migration SQL, pgschema produces triggers in the following canonical format:
```sql
CREATE OR REPLACE TRIGGER trigger_name
{ BEFORE | AFTER | INSTEAD OF } { INSERT | UPDATE | DELETE | TRUNCATE } [ OR ... ] ON [schema.]table_name
FOR EACH { ROW | STATEMENT }
[ WHEN (condition) ]
EXECUTE FUNCTION function_name();
```
**Key characteristics of the canonical format:**
* Always uses `CREATE OR REPLACE TRIGGER` for modifications
* Events are ordered consistently: INSERT, UPDATE, DELETE, TRUNCATE
* Multi-line formatting with proper indentation for readability
* Explicit FOR EACH clause (ROW is default if not specified)
* WHEN conditions are properly parenthesized
* Function names include parentheses even when no arguments
* Schema qualifiers only included when table is in different schema than target
* For DROP operations: `DROP TRIGGER IF EXISTS trigger_name ON table_name;`
# CREATE TYPE
Source: https://www.pgschema.com/syntax/create_type
## Syntax
```sql
create_type ::= CREATE TYPE type_name AS enum_type
| CREATE TYPE type_name AS composite_type
enum_type ::= ENUM ( [ enum_value [, ...] ] )
composite_type ::= ( attribute_definition [, ...] )
type_name ::= [schema.]name
enum_value ::= 'value'
attribute_definition ::= attribute_name data_type
```
pgschema understands the following `CREATE TYPE` features:
* **Schema-qualified names**: Types can be defined in specific schemas
* **ENUM types**: User-defined enumeration types
* Empty enums (no values)
* Single-quoted string values
* Multiple values separated by commas
* **Composite types**: Row types with named attributes
* Multiple attributes with their data types
* Any valid PostgreSQL data type for attributes
* Named attributes for structured data
## Canonical Format
When generating migration SQL, pgschema produces types in the following canonical format:
```sql
-- ENUM type with no values
CREATE TYPE [schema.]type_name AS ENUM ();
-- ENUM type with values (multi-line format)
CREATE TYPE [schema.]type_name AS ENUM (
'value1',
'value2',
'value3'
);
-- Composite type (single line)
CREATE TYPE [schema.]type_name AS (attribute1 data_type, attribute2 data_type);
```
**Key characteristics of the canonical format:**
* Uses single-line format for empty enums
* Uses multi-line format with indentation for enums with values
* Each enum value is on its own indented line for readability
* No comma after the last enum value
* Composite types use single-line format with attributes separated by commas
* For DROP operations: `DROP TYPE IF EXISTS type_name RESTRICT;`
* ENUM types can be modified by adding values with `ALTER TYPE type_name ADD VALUE 'new_value' AFTER 'existing_value';`
**Note**: Composite type modifications in pgschema currently require dropping and recreating the type, as PostgreSQL has limited ALTER TYPE support for composite types and complex dependencies make in-place modifications challenging.
# CREATE VIEW
Source: https://www.pgschema.com/syntax/create_view
## Syntax
```sql
create_view ::= CREATE [ OR REPLACE ] VIEW [ IF NOT EXISTS ] view_name
AS select_statement
view_name ::= [schema.]name
select_statement ::= SELECT ...
```
pgschema understands the following `CREATE VIEW` features:
* **Schema-qualified names**: Views can be defined in specific schemas
* **OR REPLACE**: Optional clause to replace an existing view definition
* **AS clause**: Any valid SELECT statement that defines the view's contents
* **View dependencies**: Proper handling of view-to-view dependencies
## Canonical Format
When generating migration SQL, pgschema produces views in the following canonical format:
```sql
CREATE OR REPLACE VIEW [schema.]view_name AS
select_statement;
```
**Key characteristics of the canonical format:**
* Always uses `CREATE OR REPLACE VIEW` for creation and modifications
* Schema qualification included when necessary
* Preserves the original SELECT statement formatting
* For DROP operations: `DROP VIEW IF EXISTS view_name CASCADE;`
**Note on modifications:** Regular views support `CREATE OR REPLACE`, allowing seamless updates to view definitions without dropping dependent objects. pgschema leverages this feature for efficient view migrations.
# Unsupported
Source: https://www.pgschema.com/syntax/unsupported
`pgschema` operates at the schema level. This means it does not support SQL commands that operate the non-schema level objects.
## Cluster Level Commands
* `CREATE DATABASE`
* `CREATE ROLE`
* `CREATE TABLESPACE`
* `CREATE USER`
## Database Level Commands
* `CREATE CAST`
* `CREATE COLLATION`
* `CREATE CONVERSION`
* `CREATE EVENT TRIGGER`
* `CREATE EXTENSION`
* `CREATE FOREIGN DATA WRAPPER`
* `CREATE LANGUAGE`
* `CREATE OPERATOR`
* `CREATE PUBLICATION`
* `CREATE SCHEMA`
* `CREATE SERVER`
* `CREATE SUBSCRIPTION`
* `CREATE TEXT SEARCH`
* `CREATE USER MAPPING`
## Schema Level Commands
We plan to support most schema-level commands in the future. Please check other sections for the schema-level database objects that we support right now.
## Rename
`RENAME` is not supported.
# GitOps
Source: https://www.pgschema.com/workflow/gitops
pgschema integrates seamlessly with GitOps workflows, providing a declarative approach to database schema management that fits naturally into your existing CI/CD pipelines.
The typical workflow follows a review-then-apply pattern that ensures all schema changes are properly reviewed before being applied to production.
* Developers modify schema files in their feature branch
* Schema changes are committed alongside application code
* The desired state is expressed declaratively in SQL files
* When a PR/MR is opened, CI automatically runs [pgschema plan](/cli/plan)
* The plan output shows exactly what changes will be applied
* The plan is posted as a comment on the PR/MR for review
* Reviewers can see:
* What tables, indexes, functions will be added/modified/dropped
* The exact SQL statements that will be executed
* Whether changes can run in a transaction
* Any potentially destructive operations
* Once reviewers approve the schema changes
* The PR/MR is merged to the target branch (e.g., main, production)
* After merge, CD pipeline automatically runs [pgschema apply](/cli/apply)
* The apply command uses the reviewed plan to execute migrations
* Schema changes are applied to the target database
* The deployment includes safety checks for concurrent modifications
## GitHub Actions
Complete example repository with workflows and sample PRs
**Single-file Schema Workflow **
Generates migration plan on pull requests
Applies migrations after merge
Live example with plan comments
**Modular Multi-file Schema Workflow **
Handles modular schema files
Applies modular migrations
Multi-file schema changes
**Example GitHub Actions Workflows**
```yaml .github/workflows/pgschema-plan.yml
name: Schema Migration Plan
on:
pull_request:
paths:
- 'schema/schema.sql'
jobs:
plan:
runs-on: ubuntu-latest
steps:
- uses: actions/checkout@v4
with:
fetch-depth: 0
- uses: actions/setup-go@v5
with:
go-version: '1.23'
- name: Install pgschema
run: go install github.com/pgschema/pgschema@latest
- name: Generate migration plan
env:
PGPASSWORD: ${{ secrets.DB_PASSWORD }}
run: |
pgschema plan \
--host ${{ secrets.DB_HOST }} \
--port ${{ secrets.DB_PORT }} \
--db ${{ secrets.DB_NAME }} \
--user ${{ secrets.DB_USER }} \
--file schema/schema.sql \
--output-json plan.json \
--output-human plan.txt
- name: Comment PR with plan
uses: actions/github-script@v7
with:
script: |
const fs = require('fs');
const planContent = fs.readFileSync('plan.txt', 'utf8');
// Find existing comment
const { data: comments } = await github.rest.issues.listComments({
owner: context.repo.owner,
repo: context.repo.repo,
issue_number: context.issue.number,
});
const botComment = comments.find(comment =>
comment.user.type === 'Bot' &&
comment.body.includes('## Migration Plan')
);
const body = `## Migration Plan\n\`\`\`sql\n${planContent}\n\`\`\``;
if (botComment) {
await github.rest.issues.updateComment({
owner: context.repo.owner,
repo: context.repo.repo,
comment_id: botComment.id,
body
});
} else {
await github.rest.issues.createComment({
owner: context.repo.owner,
repo: context.repo.repo,
issue_number: context.issue.number,
body
});
}
- name: Upload plan artifact
uses: actions/upload-artifact@v4
with:
name: pgschema-plan-${{ github.event.pull_request.number }}
path: plan.json
retention-days: 30
```
```yaml .github/workflows/pgschema-apply.yml
name: Apply Schema Migration
on:
pull_request:
types: [closed]
branches:
- main
paths:
- 'schema/schema.sql'
jobs:
apply:
runs-on: ubuntu-latest
if: github.event.pull_request.merged == true
environment: production
steps:
- uses: actions/checkout@v4
- uses: actions/setup-go@v5
with:
go-version: '1.23'
- name: Install pgschema
run: go install github.com/pgschema/pgschema@latest
- name: Download plan artifact
uses: dawidd6/action-download-artifact@v6
with:
workflow: pgschema-plan.yml
pr: ${{ github.event.pull_request.number }}
name: pgschema-plan-${{ github.event.pull_request.number }}
path: .
- name: Validate plan exists
run: |
if [ ! -f "plan.json" ]; then
echo "Error: plan.json not found"
exit 1
fi
- name: Apply migration
id: apply
env:
PGPASSWORD: ${{ secrets.DB_PASSWORD }}
run: |
echo "Applying migration plan from PR #${{ github.event.pull_request.number }}"
# Capture apply output
APPLY_OUTPUT=$(pgschema apply \
--host ${{ secrets.DB_HOST }} \
--port ${{ secrets.DB_PORT }} \
--db ${{ secrets.DB_NAME }} \
--user ${{ secrets.DB_USER }} \
--plan plan.json \
--auto-approve \
2>&1)
APPLY_EXIT_CODE=$?
echo "Apply output:"
echo "$APPLY_OUTPUT"
# Set output for the next step
echo "output<> $GITHUB_OUTPUT
echo "$APPLY_OUTPUT" >> $GITHUB_OUTPUT
echo "EOF" >> $GITHUB_OUTPUT
exit $APPLY_EXIT_CODE
- name: Comment on PR
uses: actions/github-script@v7
with:
script: |
await github.rest.issues.createComment({
owner: context.repo.owner,
repo: context.repo.repo,
issue_number: context.issue.number,
body: '✅ Schema migration has been successfully applied to production!'
});
```
## GitLab CI
Demonstrates a complete workflow for reviewing and applying schema changes through merge requests.
```yaml .gitlab-ci.yml
stages:
- plan
- apply
variables:
PGPASSWORD: $DB_PASSWORD
# Plan job - runs on merge requests and main branch
pgschema-plan:
stage: plan
image: golang:1.23
script:
- go install github.com/pgschema/pgschema@latest
- |
pgschema plan \
--host $DB_HOST \
--port ${DB_PORT:-5432} \
--db $DB_NAME \
--user $DB_USER \
--file schema/schema.sql \
--output-json plan.json \
--output-human plan.txt
- cat plan.txt
# Post plan as MR comment (only for merge requests)
- |
if [ -n "$CI_MERGE_REQUEST_IID" ]; then
PLAN_CONTENT=$(cat plan.txt)
curl --request POST \
--header "PRIVATE-TOKEN: $CI_JOB_TOKEN" \
--data-urlencode "body=## Migration Plan\n\`\`\`\n$PLAN_CONTENT\n\`\`\`" \
"$CI_API_V4_URL/projects/$CI_PROJECT_ID/merge_requests/$CI_MERGE_REQUEST_IID/notes"
fi
artifacts:
paths:
- plan.json
- plan.txt
expire_in: 7 days
rules:
- if: '$CI_PIPELINE_SOURCE == "merge_request_event"'
changes:
- schema/**
- if: '$CI_COMMIT_BRANCH == "main"'
changes:
- schema/**
# Apply job - manual trigger on main branch
pgschema-apply:
stage: apply
image: golang:1.23
needs: ["pgschema-plan"]
dependencies:
- pgschema-plan
script:
- go install github.com/pgschema/pgschema@latest
- |
if [ ! -f plan.json ]; then
echo "Error: plan.json not found"
exit 1
fi
- |
pgschema apply \
--host $DB_HOST \
--port ${DB_PORT:-5432} \
--db $DB_NAME \
--user $DB_USER \
--plan plan.json \
--auto-approve
- echo "✅ Schema migration applied successfully"
when: manual # Require manual approval
environment:
name: production
rules:
- if: '$CI_COMMIT_BRANCH == "main"'
changes:
- schema/**
```
## Azure Pipelines
Demonstrates a complete workflow for reviewing and applying schema changes through pull requests.
```yaml azure-pipelines.yml
trigger:
branches:
include:
- main
paths:
include:
- schema/*
pr:
branches:
include:
- main
paths:
include:
- schema/*
variables:
PGPASSWORD: $(DB_PASSWORD)
stages:
- stage: Plan
displayName: 'Generate Migration Plan'
jobs:
- job: PlanJob
displayName: 'Run pgschema plan'
pool:
vmImage: 'ubuntu-latest'
steps:
- task: GoTool@0
inputs:
version: '1.23'
- script: |
go install github.com/pgschema/pgschema@latest
displayName: 'Install pgschema'
- script: |
pgschema plan \
--host $(DB_HOST) \
--port $(DB_PORT) \
--db $(DB_NAME) \
--user $(DB_USER) \
--file schema/schema.sql \
--output-json plan.json \
--output-human plan.txt
displayName: 'Generate plan'
- script: cat plan.txt
displayName: 'Display plan'
# Post plan as PR comment (for PRs only)
- task: GitHubComment@0
condition: eq(variables['Build.Reason'], 'PullRequest')
inputs:
gitHubConnection: 'github-connection'
repositoryName: '$(Build.Repository.Name)'
comment: |
## Migration Plan
$(cat plan.txt)
- publish: plan.json
artifact: migration-plan
displayName: 'Publish plan artifact'
- stage: Apply
displayName: 'Apply Migration'
dependsOn: Plan
condition: and(succeeded(), eq(variables['Build.SourceBranch'], 'refs/heads/main'))
jobs:
- deployment: ApplyJob
displayName: 'Apply pgschema migration'
pool:
vmImage: 'ubuntu-latest'
environment: 'production'
strategy:
runOnce:
deploy:
steps:
- task: GoTool@0
inputs:
version: '1.23'
- script: |
go install github.com/pgschema/pgschema@latest
displayName: 'Install pgschema'
- download: current
artifact: migration-plan
displayName: 'Download plan artifact'
- script: |
if [ ! -f $(Pipeline.Workspace)/migration-plan/plan.json ]; then
echo "Error: plan.json not found"
exit 1
fi
displayName: 'Verify plan exists'
- script: |
pgschema apply \
--host $(DB_HOST) \
--port $(DB_PORT) \
--db $(DB_NAME) \
--user $(DB_USER) \
--plan $(Pipeline.Workspace)/migration-plan/plan.json \
--auto-approve
displayName: 'Apply migration'
- script: echo "✅ Schema migration applied successfully"
displayName: 'Report success'
```
# Local to Production
Source: https://www.pgschema.com/workflow/local-to-production
This workflow guides you through promoting schema changes across your environment pipeline. Start by
developing and testing migrations locally, then systematically deploy them through dev, UAT, and staging
environments before reaching production. Each environment serves as a validation checkpoint, ensuring
your schema changes are safe and reliable before they impact your production database.
Work on your feature in your development environment, making database changes as needed.
```bash
# Make database changes, add tables, modify columns, etc.
# Test your application with the new schema
```
Once your changes are complete and tested, dump the development database schema.
```bash
pgschema dump --host dev.db.com --db myapp --user dev > schema.sql
```
This creates a `schema.sql` file containing your complete schema definition.
Add the schema file to your repository and create a pull request.
```bash
git add schema.sql
git commit -m "feat: add user profiles and audit logging"
git push origin feature/user-profiles
# Create a pull request
gh pr create --title "feat: add user profiles and audit logging" --body "Schema changes for user profiles feature"
```
The schema file serves as both documentation and the source of truth for migrations.
In your CI pipeline, you would automatically generate a `plan.json` as well as the human readable plan by running `pgschema plan` against your staging environment to show reviewers what changes will be applied.
```bash
pgschema plan --host staging.db.com --db myapp --user staging \
--file schema.sql --output-human stdout --output-json plan.json
```
This `plan.json` will later be used to deploy to both staging and production. Review the plan carefully to ensure the changes match your expectations.
After code review and approval, merge your changes to the main branch.
```bash
git checkout main
git pull
```
Both `schema.sql` and `plan.json` would be merged together and are now ready for deployment.
Apply the schema changes to your staging environment using the plan.json.
```bash
pgschema apply --host staging.db.com --db myapp --user staging --plan plan.json
```
If there have been concurrent schema changes since the plan was created, the apply will fail safely due to fingerprinting. In this case, regenerate the plan and try again.
After successful staging validation, apply changes to production using the same plan.json.
```bash
# Apply with plan (add [`--auto-approve`](/cli/apply#param-auto-approve) for automated deployments)
pgschema apply --host prod.db.com --db myapp --user prod --plan plan.json
```
If the production schema has drifted from the staging schema (manual changes, hotfixes, etc.), the fingerprint will fail and the apply will be rejected. This prevents applying changes to an unexpected schema state.
# Modular Schema Files
Source: https://www.pgschema.com/workflow/modular-schema-files
For large schemas and teams, managing your database schema as a single file becomes unwieldy. The [`dump --multi-file`](/cli/dump#param-multi-file) option allows you to split your schema into modular files organized by database objects, enabling better collaboration, clearer ownership, and easier maintenance.
This approach is ideal for:
* Large schemas with hundreds of tables, views, and functions
* Teams where different developers/teams own different parts of the schema
* Schemas that need granular code review processes
## Workflow
### Step 1: Initialize Multi-File Structure
Set up your schema directory structure and dump your existing schema into multiple files:
```bash
# Create schema directory
mkdir -p schema
# Dump existing database schema into multiple files
pgschema dump --host localhost --db myapp --user postgres \
--multi-file --file schema/main.sql
# Examine the generated structure
tree schema/
# schema/
# ├── main.sql # Main entry file with \i directives
# ├── tables/
# │ ├── users.sql
# │ ├── orders.sql
# │ └── products.sql
# ├── views/
# │ ├── user_orders.sql
# │ └── product_stats.sql
# ├── functions/
# │ ├── calculate_discount.sql
# │ └── update_inventory.sql
# └── indexes/
# ├── idx_users_email.sql
# └── idx_orders_date.sql
# View the main.sql file
cat schema/main.sql
# \i tables/users.sql
# \i tables/orders.sql
# \i tables/products.sql
# \i views/user_orders.sql
# \i views/product_stats.sql
# \i functions/calculate_discount.sql
# \i functions/update_inventory.sql
# \i indexes/idx_users_email.sql
# \i indexes/idx_orders_date.sql
# Create CODEOWNERS file for GitHub to define team ownership
cat > .github/CODEOWNERS << 'EOF'
schema/tables/users* @user-team
schema/tables/orders* @orders-team
schema/tables/products* @inventory-team
schema/views/user_* @user-team
schema/views/order_* @orders-team
schema/functions/*inventory* @inventory-team
EOF
```
Each database object is now in its own file, organized by object type for easy navigation and maintenance.
### Step 2: Development Workflow
Use the multi-file structure to define the desired state of your schema components:
```bash
# Edit schema files to define the desired state
# Example: Update users table to include new column
cat > schema/tables/users.sql << 'EOF'
CREATE TABLE users (
id SERIAL PRIMARY KEY,
email VARCHAR(255) UNIQUE NOT NULL,
name VARCHAR(100) NOT NULL,
created_at TIMESTAMP DEFAULT NOW(),
last_login TIMESTAMP -- New desired column
);
EOF
# Generate plan to see what changes are needed
pgschema plan --host localhost --db myapp --user postgres \
--file schema/main.sql \
--output-json plan.json \
--output-human plan.txt
# Review the plan to see migration steps
cat plan.txt
# Apply changes after review
pgschema apply --host localhost --db myapp --user postgres --plan plan.json
```
Each team defines the desired state of their schema components, and pgschema generates the necessary migration steps.
### Step 3: Team Collaboration
Teams work on separate branches and test independently before combining changes for production deployment:
```bash
# Team A develops and tests their changes in isolation
git checkout -b feature/user-profile-enhancements
# ... modify schema/tables/users.sql and related files ...
# Test Team A changes independently
pgschema plan --host test-a.db.com --db myapp --user postgres \
--file schema/main.sql --output-json team-a-plan.json
pgschema apply --host test-a.db.com --db myapp --user postgres \
--plan team-a-plan.json
# Team B develops and tests their changes separately
git checkout -b feature/inventory-tracking
# ... modify schema/tables/products.sql and related files ...
# Test Team B changes independently
pgschema plan --host test-b.db.com --db myapp --user postgres \
--file schema/main.sql --output-json team-b-plan.json
pgschema apply --host test-b.db.com --db myapp --user postgres \
--plan team-b-plan.json
# Combine changes for production deployment
git checkout main
git merge feature/user-profile-enhancements
git merge feature/inventory-tracking
# Generate single combined plan for production
pgschema plan --host prod.db.com --db myapp --user postgres \
--file schema/main.sql \
--output-json prod_plan.json \
--output-human prod_plan.txt
# Review combined plan before production deployment
cat prod_plan.txt
```
Each team validates their changes independently in test environments, then combines into a coordinated production deployment.
### Step 4: Production Deployment
Deploy schema changes safely to production using the established multi-file workflow:
```bash
# Generate production deployment plan
pgschema plan --host prod.db.com --db myapp --user postgres \
--file schema/main.sql \
--output-json prod_plan.json \
--output-human prod_plan.txt
# Review production plan thoroughly
less prod_plan.txt
# Apply to production (consider maintenance windows)
pgschema apply --host prod.db.com --db myapp --user postgres \
--plan prod_plan.json \
--lock-timeout 30s
# Verify deployment success
mkdir -p verification/
pgschema dump --host prod.db.com --db myapp --user postgres \
--multi-file --file verification/main.sql
# Compare entire schema structure recursively
diff -r schema/ verification/
# Clean up verification files
rm -rf verification/
```
## File Organization Strategies
### By Object Type (Default)
pgschema generates files organized by database object type:
```
schema/
├── main.sql # Generated with \i directives
├── tables/
├── views/
├── functions/
├── procedures/
├── indexes/
├── triggers/
└── types/
```
### Custom Organization
You can reorganize files into any structure you prefer and update the `\i` directives in `main.sql`:
#### By Business Domain
```
schema/
├── main.sql # Updated with custom \i paths
├── user_management/
│ ├── users_table.sql
│ ├── user_sessions_table.sql
│ └── hash_password_function.sql
├── inventory/
│ ├── products_table.sql
│ ├── inventory_table.sql
│ └── update_stock_procedure.sql
└── orders/
├── orders_table.sql
├── order_items_table.sql
└── calculate_total_function.sql
```
Update `main.sql` to match your structure:
```sql
-- main.sql with custom organization
\i user_management/users_table.sql
\i user_management/user_sessions_table.sql
\i inventory/products_table.sql
\i inventory/inventory_table.sql
\i orders/orders_table.sql
\i orders/order_items_table.sql
\i user_management/hash_password_function.sql
\i inventory/update_stock_procedure.sql
\i orders/calculate_total_function.sql
```
#### Hybrid Approach
```
schema/
├── main.sql
├── core/
│ ├── tables/
│ └── functions/
├── user_management/
│ ├── tables/
│ └── views/
└── reporting/
├── views/
└── materialized_views/
```
The key is ensuring your `main.sql` file contains the correct `\i` directives that match your chosen file organization.
### Nested Includes
The `\i` directive can be nested, allowing for hierarchical file organization:
```
schema/
├── main.sql
├── core/
│ ├── init.sql # Includes all core components
│ ├── tables/
│ │ ├── users.sql
│ │ └── products.sql
│ └── functions/
│ └── utilities.sql
└── modules/
├── auth/
│ ├── auth.sql # Includes all auth components
│ ├── tables.sql
│ └── functions.sql
└── reporting/
└── reporting.sql # Includes all reporting components
```
With nested includes:
```sql
-- main.sql
\i core/init.sql
\i modules/auth/auth.sql
\i modules/reporting/reporting.sql
-- core/init.sql
\i tables/users.sql
\i tables/products.sql
\i functions/utilities.sql
-- modules/auth/auth.sql
\i tables.sql
\i functions.sql
```
This approach allows for modular organization where each subsystem manages its own includes.
# Online DDL
Source: https://www.pgschema.com/workflow/online-ddl
`pgschema` picks migration strategies that minimize downtime and blocking when making schema changes to production PostgreSQL databases.
## Index Operations
### Adding Indexes
When adding new indexes, `pgschema` automatically uses `CREATE INDEX CONCURRENTLY` to avoid blocking table writes:
```sql
-- Generated migration
CREATE INDEX CONCURRENTLY IF NOT EXISTS idx_users_email_status ON users (email, status DESC);
-- pgschema:wait
SELECT
COALESCE(i.indisvalid, false) as done,
CASE
WHEN p.blocks_total > 0 THEN p.blocks_done * 100 / p.blocks_total
ELSE 0
END as progress
FROM pg_class c
LEFT JOIN pg_index i ON c.oid = i.indexrelid
LEFT JOIN pg_stat_progress_create_index p ON c.oid = p.index_relid
WHERE c.relname = 'idx_users_email_status';
```
The `pgschema:wait` directive blocks the schema migration execution, polls the database to monitor progress, displays the progress to the user, and automatically continues when the operation completes. It tracks:
* **Completion status**: Whether the index is valid and ready
* **Progress percentage**: Based on `pg_stat_progress_create_index`
### Modifying Indexes
When changing existing indexes, `pgschema` uses a safe "create new, drop old" pattern:
```sql
-- 1. Create new index with temporary name
CREATE INDEX CONCURRENTLY IF NOT EXISTS idx_users_email_pgschema_new ON users (email, status);
-- 2. Wait for completion with progress monitoring
-- pgschema:wait
SELECT
COALESCE(i.indisvalid, false) as done,
CASE
WHEN p.blocks_total > 0 THEN p.blocks_done * 100 / p.blocks_total
ELSE 0
END as progress
FROM pg_class c
LEFT JOIN pg_index i ON c.oid = i.indexrelid
LEFT JOIN pg_stat_progress_create_index p ON c.oid = p.index_relid
WHERE c.relname = 'idx_users_email_pgschema_new';
-- 3. Drop old index (fast operation)
DROP INDEX idx_users_email;
-- 4. Rename new index to final name
ALTER INDEX idx_users_email_pgschema_new RENAME TO idx_users_email;
```
This approach ensures:
* No downtime during index creation
* Query performance is maintained throughout the migration
* Rollback is possible until the old index is dropped
## Constraint Operations
**Supported constraint types:**
* **Check constraints**: Data validation rules
* **Foreign key constraints**: Referential integrity with full options
* **NOT NULL constraints**: Column nullability (via check constraint pattern)
### CHECK Constraints
Constraints are added using PostgreSQL's `NOT VALID` pattern:
```sql
-- 1. Add constraint without validation (fast)
ALTER TABLE orders
ADD CONSTRAINT check_amount_positive CHECK (amount > 0) NOT VALID;
-- 2. Validate existing data (may take time, but non-blocking)
ALTER TABLE orders VALIDATE CONSTRAINT check_amount_positive;
```
### Foreign Key Constraints
Foreign keys use the same `NOT VALID` pattern:
```sql
ALTER TABLE employees
ADD CONSTRAINT employees_company_fkey
FOREIGN KEY (tenant_id, company_id)
REFERENCES companies (tenant_id, company_id)
ON UPDATE CASCADE ON DELETE RESTRICT DEFERRABLE NOT VALID;
ALTER TABLE employees VALIDATE CONSTRAINT employees_company_fkey;
```
### NOT NULL Constraints
Adding `NOT NULL` constraints uses a three-step process:
```sql
-- 1. Add check constraint (non-blocking)
ALTER TABLE users ADD CONSTRAINT email_not_null CHECK (email IS NOT NULL) NOT VALID;
-- 2. Validate constraint (ensures data compliance)
ALTER TABLE users VALIDATE CONSTRAINT email_not_null;
-- 3. Set NOT NULL (fast, since data is already validated)
ALTER TABLE users ALTER COLUMN email SET NOT NULL;
```
## Examples
### Adding a Multi-Column Index
**Schema change:**
```sql
-- old.sql
CREATE TABLE users (id int, email text, status text);
-- new.sql
CREATE TABLE users (id int, email text, status text);
CREATE INDEX idx_users_email_status ON users (email, status DESC);
```
**Generated migration:**
```sql
CREATE INDEX CONCURRENTLY IF NOT EXISTS idx_users_email_status ON users (email, status DESC);
-- pgschema:wait
SELECT
COALESCE(i.indisvalid, false) as done,
CASE
WHEN p.blocks_total > 0 THEN p.blocks_done * 100 / p.blocks_total
ELSE 0
END as progress
FROM pg_class c
LEFT JOIN pg_index i ON c.oid = i.indexrelid
LEFT JOIN pg_stat_progress_create_index p ON c.oid = p.index_relid
WHERE c.relname = 'idx_users_email_status';
```
### Adding a Foreign Key Constraint
**Schema change:**
```sql
-- old.sql
CREATE TABLE orders (id int, customer_id int);
-- new.sql
CREATE TABLE orders (
id int,
customer_id int,
CONSTRAINT orders_customer_fkey FOREIGN KEY (customer_id) REFERENCES customers(id)
);
```
**Generated migration:**
```sql
ALTER TABLE orders
ADD CONSTRAINT orders_customer_fkey
FOREIGN KEY (customer_id) REFERENCES customers(id) NOT VALID;
ALTER TABLE orders VALIDATE CONSTRAINT orders_customer_fkey;
```
For more examples, see the test cases in [testdata/diff/online](https://github.com/pgschema/pgschema/tree/main/testdata/diff/online) which demonstrate online DDL patterns for various PostgreSQL schema operations.
# Plan, Review, Apply
Source: https://www.pgschema.com/workflow/plan-review-apply
The Plan-Review-Apply workflow separates change planning from execution, creating a safety gate that prevents unintended database modifications:
1. **Plan** - Generate a detailed migration plan showing exactly what will change
2. **Review** - Examine the plan for correctness, safety, and business impact
3. **Apply** - Execute the reviewed and approved changes
This separation allows for thorough validation and team collaboration before making any database changes.
## Workflow
### Step 1: Plan Your Changes
Generate a migration plan to see what changes pgschema will make:
```bash
# Print a human-readable plan
pgschema plan --host localhost --db myapp --user postgres --file schema.sql
# Or save the plan to a file for review
pgschema plan --host localhost --db myapp --user postgres --file schema.sql \
--output-human plan.txt \
--output-json plan.json
```
### Step 2: Review the Plan
Examine the generated plan carefully:
```bash
# View the saved plan
cat plan.txt
```
### Step 3: Apply the Changes
Once the plan is approved, apply the changes:
```bash
# Apply with interactive confirmation
# For automated deployments, use --auto-approve
pgschema apply --host localhost --db myapp --user postgres --plan plan.json
```
## Detect Concurrent Changes with Fingerprinting
Fingerprinting ensures that the exact changes you reviewed in the plan are the changes that get applied, maintaining the integrity of the Plan-Review-Apply workflow.
pgschema uses a **fingerprinting mechanism** to ensure consistency between the plan and apply phases. When you run `pgschema plan`, it captures a snapshot (fingerprint) of the current database schema state.
Later, when you run `pgschema apply`, it verifies that the database hasn't changed since the plan was generated. This prevents scenarios where:
* Someone else modified the database between your plan and apply
* The database drifted from the expected state
* Multiple developers are making concurrent schema changes
### How Fingerprinting Works
1. **During Plan**: pgschema calculates a fingerprint of the current database schema
2. **Plan Storage**: The fingerprint is embedded in the plan
```json
{
...
"source_fingerprint": {
"hash": "965b1131737c955e24c7f827c55bd78e4cb49a75adfd04229e0ba297376f5085"
},
...
}
```
3. **During Apply**: pgschema recalculates the database fingerprint and compares it with the stored one
4. **Safety Check**: If fingerprints don't match, apply is aborted with an error
### Fingerprint Validation Example
```bash
# Generate plan (captures current state fingerprint)
pgschema plan --host prod.db.com --db myapp --user postgres --file schema.sql --output-json plan.json
# Time passes... other changes might occur...
# Apply checks fingerprint before proceeding
pgschema apply --host prod.db.com --db myapp --user postgres --plan plan.json
# ✅ Success: Database state matches plan expectations
# ❌ Error: schema fingerprint mismatch detected - the database schema has changed since the plan was generated.
#
# schema fingerprint mismatch - expected: 965b1131737c955e, actual: abc123456789abcd
```
When fingerprint mismatches occur, you need to regenerate the plan:
```bash
# If apply fails due to fingerprint mismatch
pgschema plan --host prod.db.com --db myapp --user postgres --file schema.sql --output-json new-plan.json
# Review the updated plan for any unexpected changes
diff plan.json new-plan.json
# Apply with the new plan
pgschema apply --host prod.db.com --db myapp --user postgres --plan new-plan.json
```
## Online DDL
`pgschema` automatically generates migration plans that use online DDL strategies to minimize downtime. When possible, operations like index creation, constraint addition, and schema modifications are executed using PostgreSQL's concurrent and non-blocking features. For detailed information about online DDL patterns and strategies, see the [Online DDL documentation](online-ddl.mdx).
# Rollback
Source: https://www.pgschema.com/workflow/rollback
Rolling back schema changes is inherently risky and may result in data loss. Always test rollback procedures in non-production environments and ensure you have complete database backups before proceeding.
The pgschema approach to rollback is to revert your schema file to a previous version and apply the changes using the standard plan/apply workflow. This ensures rollbacks follow the same safety mechanisms as forward migrations.
Use git to revert your schema file to the previous working version.
```bash
# Revert to previous commit (most common case)
git checkout HEAD~1 schema.sql
# Or find and revert to a specific commit
git log --oneline schema.sql
git checkout schema.sql
```
This restores your schema file to the state before the problematic migration was applied.
Create and review a migration plan that will rollback the database to match the reverted schema file.
```bash
# Generate rollback plan
pgschema plan --host localhost --db myapp --user postgres --file schema.sql \
--output-json rollback_plan.json \
--output-human rollback_plan.txt
# Review the rollback plan carefully
cat rollback_plan.txt
```
The plan will show exactly what changes pgschema will make to rollback the database to the previous schema state.
Apply the rollback plan with appropriate safety measures for production environments.
```bash
# Execute the rollback
pgschema apply --host localhost --db myapp --user postgres \
--plan rollback_plan.json \
--lock-timeout 30s
# Verify rollback success
pgschema dump --host localhost --db myapp --user postgres > post_rollback_state.sql
diff schema.sql post_rollback_state.sql
```
# Tenant Schema Reconciliation
Source: https://www.pgschema.com/workflow/tenant-schema
This workflow helps you apply schema changes consistently across multiple tenant databases in a
multi-tenant architecture. When you need to update the schema structure for all tenants, this
workflow ensures every tenant database reaches the same desired schema state, even though each
tenant may require different migration steps depending on their current state.
Create a master schema template that defines the desired state for all tenant schemas.
```bash
# Dump the template schema from your reference tenant or development environment
pgschema dump --host localhost --db myapp --user postgres --schema tenant_template > tenant_schema.sql
```
Review the schema file to ensure it contains all necessary changes and is ready for deployment across all tenants.
Generate migration plans for each tenant to see what changes will be applied before execution.
```bash
# Create a list of all tenant schema names
echo "tenant_001
tenant_002
tenant_003
tenant_test" > tenant_list.txt
# Preview changes for a single tenant
mkdir -p plans
pgschema plan --host localhost --db myapp --user postgres \
--schema tenant_001 --file tenant_schema.sql \
--output-json "plans/tenant_001_plan.json" \
--output-human "plans/tenant_001_plan.txt"
# Generate plans for all tenants (optional but recommended)
while read tenant; do
echo "=== Plan for $tenant ==="
pgschema plan --host localhost --db myapp --user postgres \
--schema "$tenant" --file tenant_schema.sql \
--output-json "plans/${tenant}_plan.json" \
--output-human "plans/${tenant}_plan.txt"
done < tenant_list.txt
```
Review the plans to ensure the changes are expected and safe for all tenants. The JSON plans can be used later with the [`--plan`](/cli/apply#param-plan) flag to ensure exactly the same migration steps are executed across all tenants.
Validate the schema changes on a single test tenant before rolling out to all tenants.
```bash
# Apply using the pre-generated plan
pgschema apply --host localhost --db myapp --user postgres \
--schema tenant_test --plan plans/tenant_test_plan.json
# Verify the test tenant schema was updated correctly
pgschema dump --host localhost --db myapp --user postgres \
--schema tenant_test > test_result.sql
# Compare with expected template
diff tenant_schema.sql test_result.sql
```
Perform application testing on the test tenant to ensure functionality works as expected with the new schema. Note that each tenant may have different migration steps depending on their current schema state, but all will reach the same final desired state.
Apply the schema changes to all production tenant schemas.
```bash
# Apply using pre-generated plans
while read tenant; do
echo "Updating schema: $tenant"
pgschema apply --host localhost --db myapp --user postgres \
--schema "$tenant" --plan "plans/${tenant}_plan.json" \
--auto-approve --lock-timeout 30s
# Check for errors and log results
if [ $? -eq 0 ]; then
echo "✅ Successfully updated $tenant"
echo "$(date): $tenant - SUCCESS" >> migration.log
else
echo "❌ Failed to update $tenant"
echo "$(date): $tenant - FAILED" >> migration.log
exit 1
fi
# Add small delay between updates to reduce database load
sleep 2
done < tenant_list.txt
```
For production environments, consider adding delays between tenant updates, monitoring for issues, and using the [`--lock-timeout`](/cli/apply#param-lock-timeout) flag to prevent long-running locks.
Confirm all tenant schemas have been updated to match the desired template state.
```bash
# Create verification directory
mkdir -p verification
# Dump all tenant schemas
while read tenant; do
echo "Verifying $tenant..."
pgschema dump --host localhost --db myapp --user postgres \
--schema "$tenant" > "verification/${tenant}.sql"
done < tenant_list.txt
# Compare each tenant schema against the template
while read tenant; do
diff tenant_schema.sql "verification/${tenant}.sql" || {
echo "❌ Schema mismatch detected in $tenant - does not match template"
exit 1
}
echo "✅ $tenant matches template schema"
done < tenant_list.txt
echo "✅ All tenant schemas match the desired template state"
```
All tenants now have the same schema structure matching the template and are ready for application deployment.